
Use and Care Manual


56-VOLT LITHIUM-ION CORDLESS LAWN MOWER — LM2020SP/LM2020
26
MAINTENANCE
WARNING: To avoid serious personal injury, always remove the battery pack from the mower before cleaning or
performing any maintenance.
WARNING: When servicing, use only identical replacement parts. Use of any other parts may create a hazard or
cause product damage. To ensure safety and reliability, all repairs should be performed by a qualified service technician.
CLEANING THE MOWER
WARNING: Always remove the battery pack when servicing or transporting the mower.
The underside of mower deck should be cleaned after each use, as grass clippings, leaves, dirt and other debris will
accumulate. This accumulation is undesirable, as it will promote rust and corrosion.
Remove any build-up of grass and leaves on or around the drive shaft (LM2020SP only) and motor fan (do not use water).
Wipe the mower clean with a damp cloth.
REMOVING THE BLADE
WARNING: Always protect your hands by wearing heavy gloves or wrapping the cutting edges with rags or other
materials when performing any maintenance on the mower blade. Always remove the battery pack when servicing or
transporting the mower.
NOTICE: The following tools are required for replacing the blade:
◾
9/16'' (14mm) wrench
◾
Torque wrench
◾
Manual screwdriver or metal rod with a diameter of
5/16'' (8mm)
◾
Manual screwdriver or metal rod with a diameter of 1/4'' (6.35mm) or less.
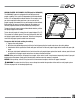
1. Stop the motor; remove the battery pack from the mower.
2. Turn the mower on its side.
3. While wearing protective gloves, place a metal rod (e.g., a
3.5'' length screw bit) with diameter less than 5/16'' (8mm)
into the fixing hole to act as a stabilizer.
NOTICE: If the bolt rotates with the motor shaft when loosening
the bolt, turn the fan by hand to align the through holes in the fan
with the holes in the blade, and place another metal rod (e.g., a
3.5'' length screw bit) with diameter less than 1/4'' (6.35mm)
into the aligned holes to act as another stabilizer (Fig. 22).
4. Use a 9/16'' (14mm) wrench to turn the blade bolt
counterclockwise to loosen it.
5. Continue using the 9/16'' (14mm) wrench to turn the blade
bolt counterclockwise to loosen it completely.
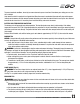
6. While wearing protective gloves, remove the bolt, outer
flange and the blade (Fig. 23).
THIS SIDE FACING GRASS
22
Loosen
Stabilizer 1
Stabilizer 2