
Installation & Assembly

ASSEMBLY INSTRUCTION
Eichholtz B.V. l Delfweg 52 l 2211 VN Noordwijkerhout l P.O. Box: 23, 2160 AA Lisse l The Netherlands l www.eichholtz.com
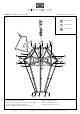
ZOOM
ZOOM
1
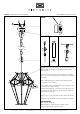
11877 CHANDELIER SHARD
A
1
CARE INSTRUCTION
Wipe clean with soft, dry cloth.
Always avoid the use of harsh chemicals or abrasive cleaners
as they may cause damage to the fixture’s finish.
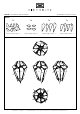
Installation of the glass is the final step in the assembly of this chandelier.
Do not assemble the glass first as it is fragile and could break during
further assembly.
Turn off the electricity supply at the main circuit panel before installing.
Do not connect the electricity supply until your luminaire is fully assembled
and installed.
Fix the ceiling bracket (A) to the ceiling by using mounting plugs and
screws suitable to your ceiling type.
Place or hold the lamp in an elevated position in such a way that the wires
can freely reach the ceiling junction box.
Thread the wires through the components and connect the 3 power wires
according to their colours. Brown is the live wire, blue is the neutral wire,
green/yellow is the earth wire.
Slide the canopy over the ceiling bracket and fix it with the two cap nuts.
Carefully lower the lamp until the chain is taut. Straighten the chain links.