
Instruction manual


REAR
CHASSIS
MOUNTING
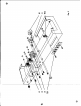
1. ( ) Fig. 2. Mount the
foufcrew
terminal
board
Tal, from the outside of
the chQlli.
QI
shown. Us. two
6-32lcrews
and two
'6-32
hex nut. Under
one hex nut, mount a
'6
groun lug. Under
the
lecond
hex nut, mount a one
post right terminal strip, r&2, nd a
'6
lockwasher.
I
2.
()
Fig. 2.
Mount
the
pcbtentiometer
Tl,
as shown. Us. one
3/81ock-
washer and one
3/8
hex nut. i
'(!:
3. ( ) Fig. 2.
Mount
the
InLtlack
J I, as
.hown
(Fig.
4). lke
two
'6-32
screws,
two'6
lockwashen
anr
two
'6--032
hexnuts.
4. ( ) Fig. 2. Mount the oC'41 socket, J4, as shown. Note direction of key
In Fig. 4.
Use
two
'6-32
scr~,
two'6
lockwashers and two
'6
hex nuts.
s.
( ) Fig. 2.
t¥t.ount
conve~lence
outlets
J2
md
J3,
as shown. Use two
'60032
screws, two
'6
10ckwasWers
and two
'6-32
hex
nuh
on
each.
6. ( ) Fig. 2. Push a
3/8"
rLbber grommet through the remaining hole at
the rear of
the
chClllls near
co~v.nl.nc.
outl.t
J3.
7.
()
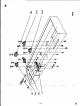
Fig. 2A. Cut two 2" lengtbi of block hook-up wire. Strip
3/4"
of
insulatIon from both
ends of
each.
this
will
leave
1/2"
of Insulation at the
exact center of each wire;
Bend
each wire into a "U" shape. One will be
used as a Jumper between pins 2 and 3 of
the
octal plug
and
the
other
Cll a
Jumper between pins 6 end 7 of
the
oc:tol plug.
8. ( ) Fig. 2A. Pulh one end of one
lead
into pin 2 of the
octal
plug
and
the other end of the same
I.od
into pin 3. When the
lead
ends
have
reached
the ends
of
the
pins, only the Insulatlcln will be vIsible at
.h.
rear
of
the
plug.
9.
()
Fig. 2A. Similarly
connect
1)lugpins 6 and 7 with
the
other
2
11
lead.
10.
( )
Fig.
2A.
Fonn
0 puddleolsolder at the tlpol the soldering I"",.
Hold
the plug with
the
pins
down
directly
above
the
tip
of the soldering iron. Dip
each
of
the
pin-ends Into which wires have been inserted one at a time
into
tl\e solder puddle and hold there for several' seconds until
the
solder rises up
into the pin by captllary
action.
11. ( ) Fig. 2A. Press the cap down over the octal plug. It
may
be
left
off
jf there is inadequate room ot
the
desired location for mounting
the
chassis.