DIVA LAN ISDN Modem User’s Guide
First Edition (August 1999) 206-312-01 DIVA LAN ISDN Modem is a trademark of Eicon Technology Corporation. All other brand and product names are trademarks or registered trademarks of their respective owners. Changes are periodically made to the information herein; these changes will be incorporated into new editions of the publication. Eicon Technology may make improvements and/or changes in the products and/or programs described in this publication at any time.
Table of Contents Chapter One: Introduction ......................................................................................................... 9 Introducing the DIVA LAN ISDN Modem ........................................................ 10 Creating your own LAN for resource sharing .............................................................. Connecting to the Internet ........................................................................................... Connecting to a corporate network .....
DIVA LAN ISDN Modem User’s Guide Table of Contents Chapter Three: Using Modem Monitor ...................................................................................... 39 Starting Modem Monitor .................................................................................. 40 Start menu program group .......................................................................................... 40 Properties dialog box ...................................................................................
DIVA LAN ISDN Modem User’s Guide Table of Contents Chapter Six: Security.............................................................................................................. 74 Security features .............................................................................................. 75 System password ............................................................................................. 76 Automatic log out .............................................................................
DIVA LAN ISDN Modem User’s Guide Table of Contents 2. Configure the Corporate profile ............................................................... 103 Using the corporate connection ................................................................... 107 How long will the line stay connected? ...................................................................... Support for Microsoft Network Neighborhood ........................................................... NetBIOS name resolution ................
DIVA LAN ISDN Modem User’s Guide Table of Contents Command line interface (CLI) ....................................................................... 146 Establishing a Telnet connection via IP ..................................................................... Establishing a serial connection ................................................................................ Using the command line interface .............................................................................
DIVA LAN ISDN Modem User’s Guide Table of Contents ISDN ................................................................................................................ 184 ISDN Access Time ......................................................................................... 187 LAPD ............................................................................................................... 188 Logging and Mail Trace .................................................................................
Chapter One Introduction Eicon Technology's DIVA LAN ISDN Modem provides affordable workgroup computing for branch offices, small businesses, and home offices. This chapter summarizes the features of the DIVA LAN ISDN Modem and shows how it can be used in a variety of applications.
Chapter One: Introduction Introducing the DIVA LAN ISDN Modem 10 Introducing the DIVA LAN ISDN Modem The DIVA LAN ISDN Modem is a powerful networking solution for SOHO (small office/home office) and branch office users. It creates a complete networking, phone, fax, and data communications system in one box. The DIVA LAN ISDN Modem is easy to install, use, and maintain, without the need for technical support from the remote, corporate office.
Chapter One: Introduction Introducing the DIVA LAN ISDN Modem 11 Connecting to a corporate network This option enables you to connect one or more computers to your corporate LAN for file sharing, e-mail, data transfer. Generally, this type of connection takes place via a direct, dial-up link with the corporate LAN.
Chapter One: Introduction Introducing the DIVA LAN ISDN Modem 12 The DIVA LAN ISDN Modem supports caller ID, call transfer, call waiting, call holding, call forwarding, and 3-way conference call features.
Chapter One: Introduction Introducing the DIVA LAN ISDN Modem Bandwidth on-demand The DIVA LAN ISDN Modem's bandwidth-on-demand feature automatically monitors data traffic and engages the second B-channel only when needed, reducing ISDN costs. Advanced ISDN tariff management The DIVA LAN ISDN Modem can be configured to: • Disable ISDN access during peak tariff rates or limit the total line usage in minutes for a given time period. • Set a maximum number of connections for a given period.
Chapter One: Introduction Summary of features 14 Summary of features Note The DIVA LAN ISDN Modem is available with or without analog phone ports. Phone related features are only available on models with analog phone ports.
Chapter One: Introduction Contacting customer services 15 Administration • Web-based, TELNET, and command line management interfaces • Configure using IP via the Ethernet or ISDN ports, or by using a direct serial link via the console port • DTMF interface permits configuration with a touch tone telephone • Statistics with real-time updates • Ability to save and restore configuration locally or remotely • SNMP MIB II support Contacting customer services To obtain technical support for Eicon products, co
Chapter Two Getting Started This chapter explains how to install and configure the DIVA LAN ISDN Modem to provide Internet access for up to four computers. If this type of installation does not meet your needs, instructions for creating other types of installations are found in Chapter Eight and Chapter Nine.
Chapter Two: Getting Started 1. Installation overview 1. Installation overview The steps in this chapter explain how to install and configure DIVA LAN ISDN Modem to provide Internet access for up to four computers. The following diagram illustrates the key components that are part of this installation.
Chapter Two: Getting Started 2. Prepare for installation 18 2. Prepare for installation To ensure that the installation of your DIVA LAN ISDN Modem is quick and trouble free, take a few moments to prepare for installation.
Chapter Two: Getting Started 2. Prepare for installation 19 To configure the DIVA LAN ISDN Modem The computer you are going to use to configure the DIVA LAN ISDN Modem must have: • Web browser software (Netscape 3.01 or later, or Internet Explorer 4 or later). Internet Explorer 4 is included on the DIVA LAN ISDN Modem CD for computers running Windows 95, Windows 98, or NT 4.0 or later. NT 4.0 requires SP3 or SP4 available on the DIVA LAN ISDN Modem CD.
Chapter Two: Getting Started 3. Choose a connection protocol 20 3. Choose a connection protocol The usage of the ISDN link is governed by the type of connection protocol you choose. The connection protocol defines the rules by which ISDN channels are enabled and disabled. The type of protocol you choose to use depends on the type of connections you plan to make. Important ISDN concepts Before you can decide on a connection protocol, you must become familiar with the following ISDN concepts.
Chapter Two: Getting Started 3. Choose a connection protocol 21 Choosing a connection protocol Since the DIVA LAN ISDN Modem supports so many potential connections, a set of rules is needed to control how the two ISDN B-channels are shared between connections. These rules are based on the type of connection protocol you decide to use for your data traffic. The DIVA LAN ISDN Modem supports the two protocols: PPP and V.120. • PPP is a widely-used standard for transferring data on point-to-point links.
Chapter Two: Getting Started 3. Choose a connection protocol 22 Only one PHONE port can be used when an MLPPP + BACP connection is active. However, since MLPPP + BACP may only be using one B-channel, either PHONE 1 or PHONE 2 may not be available. For example, if PHONE 2 was in use when the data connection was established, the data connection uses telephone number 1. Even though telephone number 2 becomes available when PHONE 2 hangs up, the data connection does not switch over.
Chapter Two: Getting Started 4. Order an ISDN Line 23 4. Order an ISDN Line Call your local phone company and order an ISDN Basic Rate line. To make ordering an ISDN line easier, Bellcore, in conjunction with the North American ISDN User’s Forum (NIUF) and Local Exchange Carriers (LEC), have created several pre-defined ISDN packages which you can order by simply specifying an ISDN ordering code (IOC).
Chapter Two: Getting Started 5. Gather Internet account information 5. Gather Internet account information Obtain an account with an ISP (Internet Service Provider) and record the following: Item Description ISP’s ISDN phone number(s) This is the phone number the DIVA LAN ISDN Modem dials to access the ISP. Some ISPs will give you two phone numbers—one for each ISDN channel. Your ISP may also have a backup number for each channel in case the primary number is busy or unavailable.
Chapter Two: Getting Started 5. Gather Internet account information Item Description Window size Applies to Multiframe mode only. The DIVA LAN ISDN Modem supports windows sizes from 1 to 7. Maximum retry count Applies to Multiframe mode only. Defines the maximum number of retransmissions of an unacknowledged frame. Retransmission timer (T200) Applies to Multiframe mode only. Defines how long to wait before retransmitting an unacknowledged frame.
Chapter Two: Getting Started 6. Install the DIVA LAN ISDN Modem 26 6. Install the DIVA LAN ISDN Modem Installing the DIVA LAN ISDN Modem is as simple as plugging it in and connecting a few cables. Before you begin make sure that each computer has the required prerequisites as explained in the section “Verify the configuration of your computers” on page 18. Note The DIVA LAN ISDN Modem is available with or without analog phone ports.
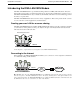
Chapter Two: Getting Started 6. Install the DIVA LAN ISDN Modem 27 4. Connect the power supply to the POWER jack on the DIVA LAN ISDN Modem, and plug it into a power outlet. 5. Wait at least 10 seconds for the DIVA LAN ISDN Modem to initialize. 6. Turn on your computers. 7. You are now ready to install the Modem Monitor software and configure the DIVA LAN ISDN Modem. Note Do not connect the beige cable. It is for advanced configuration options only. See Chapter Eight.
Chapter Two: Getting Started 7. Install Modem Monitor (Windows 95/98/NT4) 28 7. Install Modem Monitor (Windows 95/98/NT4) Note If you are using an operating system other than Windows 95/98/NT4, turn to page 31. Modem Monitor provides quick access to the DIVA LAN ISDN Modem Web-based configuration interface, as well as online help, and utilities. Modem Monitor runs under Windows 95/98/NT4. It should be installed only on the computer you are going to use to configure the DIVA LAN ISDN Modem.
Chapter Two: Getting Started 7. Install Modem Monitor (Windows 95/98/NT4) 29 3. On the Install Software screen, click Install DIVA LAN ISDN Modem Software. 4. The DIVA LAN ISDN Modem Setup Wizard starts. Follow the directions on your screen to install the software. 5. Once installation is complete, the Setup Wizard then attempts to contact the DIVA LAN ISDN Modem. 6. Once detected, the Setup Wizard starts the Network Wizard.
Chapter Two: Getting Started 7. Install Modem Monitor (Windows 95/98/NT4) 30 7. When the Network Wizard is done, you will see the following dialog box. 8. Click Configure.The DIVA LAN ISDN Modem launches your default Web browser and displays the first page of the Internet wizard. If your Web browser is unable to load this page, make sure that: • it is configured to use the LAN, and not a dial-up connection • it is not set to use a proxy server 9.
Chapter Two: Getting Started 8. Connecting a non-Windows computer to the DIVA LAN ISDN Modem 31 8. Connecting a non-Windows computer to the DIVA LAN ISDN Modem Note If you are using an operating system other than Windows 95/98/NT4, follow the steps in this section to configure your system so that it can communicate with the DIVA LAN ISDN Modem. To connect to the DIVA LAN ISDN Modem 1. Make sure that your computer has TCP/IP installed, configured, and bound to its Ethernet card. 2.
Chapter Two: Getting Started 8. Connecting a non-Windows computer to the DIVA LAN ISDN Modem 32 7. The DIVA LAN ISDN Modem displays the Configuration main menu. 8. The Configuration main menu gives you access to all configuration options. However, the first time you start the web configuration program, most of the options in the Administration section are disabled. These options only become available once you have configured the DIVA LAN ISDN Modem with the Internet wizard. 9. Click Internet wizard.
Chapter Two: Getting Started 9. Configuring the Internet connection 33 9. Configuring the Internet connection This section explains how to use the Internet wizard to set up an Internet connection. Configuration occurs via a series of web pages that reside on the DIVA LAN ISDN Modem. You use your web browser to access these pages and change configuration settings. To configure the Internet connection 1.
Chapter Two: Getting Started 9. Configuring the Internet connection 34 • If your line does not support AutoSPID, you will see the following page: Enter your area code and your ISDN numbers and click Next. The DIVA LAN ISDN Modem will use this information to attempt to guess your SPIDs. If SPID guessing is successful, go to step 4. If not, see the next bullet below.
Chapter Two: Getting Started 9. Configuring the Internet connection 5. Fill in the fields as indicated below. A B C This is the name assigned to your Internet connection profile. It is recommended that you do not change it. Specify your ISP’s ISDN phone numbers. If your ISP uses two numbers (one for each B-channel), enter the second one after the first. Separate the two with an ampersand (&), a tilde (~), or a forward slash (/).
Chapter Two: Getting Started 9. Configuring the Internet connection 36 7. Click Save + Test. This will validate your configuration and point out any errors. Note If your ISDN line is not connected, the Save + Test option is not available. 8. First, your configuration is saved to the DIVA LAN ISDN Modem. 9. Next, the test is executed. For example, this page shows the results of a successful test: This page shows the results of a test that failed due to an invalid username or password.
Chapter Two: Getting Started 9. Configuring the Internet connection 10. If your test was successful, you are now connected to the Internet. • Click the Go Check Firmware button to visit the Eicon Technology web site. There you will find the latest firmware for your DIVA LAN ISDN Modem and other news and information as it becomes available. • To visit any other web site, simply enter the URL in your browser and press Enter. You may want to visit www.isdnzone.com.
Chapter Two: Getting Started 10. Using your DIVA LAN ISDN Modem 38 10. Using your DIVA LAN ISDN Modem The DIVA LAN ISDN Modem automatically dials out and establishes the ISDN link to the Internet as required. You simply launch the applications you use to do your work, such as a web browser or e-mail program, and you are automatically connected. You can also establish your connections manually, dialing and hanging up as you see fit. See the Dial and Hangup buttons on page 45 for details.
Chapter Three Using Modem Monitor The Modem Monitor program provides an effective way to manage your DIVA LAN ISDN Modem. This section provides an overview of some of Modem Monitor’s main functions. For more information, consult the Modem Monitor online help. Note Modem Monitor is available for Windows 95/98/NT4 systems only and should be installed on only one computer connected to the DIVA LAN ISDN Modem.
Chapter Three: Using Modem Monitor Starting Modem Monitor 40 Starting Modem Monitor By default, Modem Monitor is automatically loaded each time you start Windows. An icon appears in your system tray to indicate it is running. The icon will change its appearance depending on the state of your DIVA LAN ISDN Modem. If you place your cursor on the Modem Monitor icon, it will display a tooltip describing the current state. Modem Monitor icon in the system Tray.
Chapter Three: Using Modem Monitor Starting Modem Monitor Start menu options • Call Viewer: Starts the Call Viewer, which lets you view information for all incoming and outgoing calls. • Configuration (Web): Opens a folder from which you can start the web-based configuration program. • Event Viewer: Starts the Event Viewer, which lets you view the list of messages recorded in the log file. • Modem Monitor: Opens the Modem Monitor properties dialog box. • Online Help: Starts the Modem Monitor online help.
Chapter Three: Using Modem Monitor Properties dialog box Properties dialog box The Modem Monitor Properties dialog box gives you quick access to your DIVA LAN ISDN Modem. To access it, double-click the Modem Monitor icon in your system tray. Displays the list of active DIVA LAN ISDN Modems that are reachable from your computer. Buttons • Utilities: Let’s you perform configuration tasks.
Chapter Three: Using Modem Monitor Utilities dialog box Utilities dialog box Display the Utilities dialog box by clicking the Utilities button in the Properties dialog box. Buttons • Configure: Starts the web-based configuration interface using your default web browser. • Backup: Backs up the current configuration settings to a file on your computer. • Restore: Restores a saved configuration from a file on your computer.
Chapter Three: Using Modem Monitor Options dialog box 44 Options dialog box Lets you define the operational characteristics of the Modem Monitor software. Check latest firmware is on your device When enabled, Modem Monitor automatically checks if the firmware on your DIVA LAN ISDN Modem is the latest firmware version available on your computer. Check for devices not responding When enabled, Modem Monitor checks if any DIVA LAN ISDN Modem’s on your LAN are not responding.
Chapter Three: Using Modem Monitor Status Viewer 45 Status Viewer Lets you view the operational status of the DIVA LAN ISDN Modem and manually manage your connections. Shows the state of the front panel LEDs in real time. Displays the list of connection profiles. • Device name: Name assigned to the DIVA LAN ISDN Modem. • IP address: IP address assigned to the DIVA LAN ISDN Modem. • MAC address: Ethernet address assigned to the DIVA LAN ISDN Modem.
Chapter Four The Web-based Configuration Interface The DIVA LAN ISDN Modem uses a single ISDN link to provide communications services for all your connected devices. It manages incoming and outgoing data calls from your computers, as well as incoming and outgoing analog calls from connected telephones and/or fax machines. To accomplish all this, the DIVA LAN ISDN Modem implements a number of important ISDN features that enable complex communications requirements to be supported on a single link.
Chapter Four: The Web-based Configuration Interface Starting the web-based configuration interface Starting the web-based configuration interface The web-based interface enables you to manage the configuration and operation of the DIVA LAN ISDN Modem. It also lets you view status information and perform maintenance tasks like updating the firmware. Note Only one user can access the web-based configuration interface at a time. To start the web-based configuration interface 1.
Chapter Four: The Web-based Configuration Interface Starting the web-based configuration interface 48 4. The DIVA LAN ISDN Modem displays the Main configuration menu. Note The first time you access the web-based configuration interface, most of the options in the Administration section are not available. They are only activated once you have defined your configuration settings using the Internet wizard. Saving configuration settings Most pages in the configuration interface have a Save button.
Chapter Four: The Web-based Configuration Interface General settings and connection profiles 49 General settings and connection profiles Before you begin customizing your configuration, you should familiarize yourself with how the DIVA LAN ISDN Modem organizes its configuration settings. Configuration settings are split into two groups: general settings and connection profile settings.
Chapter Four: The Web-based Configuration Interface Editing the ISP profile 50 Editing the ISP profile After you have defined your connections with the Internet wizard, it may be necessary to fine tune certain parameters manually. To do this, you need to edit the ISP profile settings. Although it is possible to change the names of this profile, it is not recommended. To edit the ISP profile 1. Start the web-based configuration interface and log in.
Chapter Four: The Web-based Configuration Interface Editing the ISP profile 4. Use the menu bar to navigate between the six configuration pages: Profile, Connection, IP, RIP, Authentication, and Callback. For a description of each parameter, just click the parameter name. The DIVA LAN ISDN Modem will display a help window. 5. When you are done with your settings, click Finish, then click Save. 6. To activate the settings you must reset the DIVA LAN ISDN Modem.
Chapter Four: The Web-based Configuration Interface Editing LAN settings 52 Editing LAN settings The LAN parameters page defines the settings for the LAN created by the Ethernet hub built into the DIVA LAN ISDN Modem. You need to modify these settings if: • you need to assign a specific (static) IP address to it. This is usually the case when installing on an existing LAN. See page 112 for more information.
Chapter Four: The Web-based Configuration Interface Saving and restoring configuration files 53 Saving and restoring configuration files The web-based configuration interface makes it easy to save and restore configuration settings on the DIVA LAN ISDN Modem. This is useful for backup purposes, or if you intend to maintain several different configurations. When you save the configuration settings, they are stored in a file on your computer. To save/restore configuration settings 1.
Chapter Four: The Web-based Configuration Interface Viewing status information Viewing status information Click Status on the Main configuration menu to view real-time status information. The DIVA LAN ISDN Modem will open a new browser window containing the System status page. System status Indicates the status of each of your ISDN channels (via front panel lights). The status of each porfile is also shown. It can be one of the following: • Connected: The profile is in use for a data connection.
Chapter Four: The Web-based Configuration Interface Obtaining statistics 55 Obtaining statistics The DIVA LAN ISDN Modem records a view variety of statistics, which you can use for information and troubleshooting purposes. Click Statistics on the Main configuration menu, then choose the type of statistics you want to view from the menu bar. For example, the following screen shows ISDN statistics. Click the Automatic Refresh button to have the page updated every 4 seconds.
Chapter Four: The Web-based Configuration Interface Upgrading the DIVA LAN ISDN Modem firmware 56 Upgrading the DIVA LAN ISDN Modem firmware Eicon Technology posts the latest DIVA LAN ISDN Modem firmware on its web site. You can automatically update your DIVA LAN ISDN Modem to this version by using the web configuration program. To upgrade the firmware 1. On the Main configuration menu, click Maintenance. 2. Click Firmware. The DIVA LAN ISDN Modem displays the Firmware Maintenance page. 3.
Chapter Four: The Web-based Configuration Interface Resetting to factory defaults 57 Resetting to factory defaults Resetting the DIVA LAN ISDN Modem to factory defaults will erase all your configuration settings, including the system password. You may want to consider backing up your current configuration, as explained on page 53, before you reset to factory defaults. To reset the DIVA LAN ISDN Modem to factory defaults 1. On the Main Configuration menu, click Maintenance.
Chapter Five Minimizing ISDN Charges ISDN billing practices vary from flat-rate monthly services to per-call billing to per-minute usage fees. To help you reduce your ISDN charges, the DIVA LAN ISDN Modem provides you with several cost-cutting configuration options. Use this chapter to find the best options for use on your ISDN line.
Chapter Five: Minimizing ISDN Charges The Cost Control page 59 The Cost Control page For your convenience, the DIVA LAN ISDN Modem groups the most commonly used options for reducing your ISDN charges on the Cost Control page. To define Cost Control settings Click Cost Control on the Manual configuration menu. The DIVA LAN ISDN Modem displays the following page: Idle timer Each profile has its own idle timer.
Chapter Five: Minimizing ISDN Charges 2. 3. 4. 5. The Cost Control page 60 Set the Idle timer. Click Finish. Click Save. Click Reset. Data call thresholds By defining data call thresholds, you are able to limit the total number of calls or total length of calls made by any one profile during a set period of time. This is especially useful as a safety measure if you have devices that may inadvertently generate a large number of calls or may stay connected indefinitely.
Chapter Five: Minimizing ISDN Charges Configuring BACP 61 Configuring BACP The bandwidth allocation protocol (BACP) works in conjunction with the MLPPP connection protocol to regulate usage of your ISDN line. The DIVA LAN ISDN Modem uses BACP to monitor incoming and outgoing traffic, and to open or close the second ISDN B-channel as the traffic volume warrants. This reduces your communications charges by ensuring that two ISDN channels are never active when one is sufficient.
Chapter Five: Minimizing ISDN Charges 4. Click the More button next to the Protocol field. You will see the following page. 5. 6. 7. 8. 9. Set the BACP parameters as required. Click Save. Click Finish. Click Save. Click Reset.
Chapter Five: Minimizing ISDN Charges Configuring AO/DI 63 Configuring AO/DI AO/DI lets you maintain a permanent connection to the Internet or a corporate network, without tying up an expensive ISDN B-channel. AO/DI accomplishes this by using the ISDN D-channel to establish a low-bandwidth (9.6 kbps) connection with your ISP or corporate network. When incoming or outgoing traffic exceeds the capabilities of the D-channel, AO/DI automatically invokes one or more B-channels to handle the increased traffic.
Chapter Five: Minimizing ISDN Charges Configuring AO/DI To configure AO/DI 1. On the Configuration main menu, click Connection Profiles. 2. Click Edit for the profile you want to configure AO/DI for. You will see the following page. 3. If you have not selected MLPPP + AO/DI as the Protocol, do so now. 4. Click the More button next to the Protocol field. You will see the following page. 5. Set the AO/DI parameters as required. 6. Click Save. 7. You are now ready to configure the X.25 parameters.
Chapter Five: Minimizing ISDN Charges Configuring AO/DI 65 X.25 on the D-channel During normal ISDN operation, the D-channel is used for signalling traffic purposes (call setup, call take down, caller ID, etc.) However, the full bandwidth of the D-channel is not needed for this. AO/DI takes advantage of the extra 9.6 bps that is available to establish an X.25 packet-switched connection to a remote site. Therefore, to take advantage of AO/DI, the remote site must support X.
Chapter Five: Minimizing ISDN Charges Configuring AO/DI 3. Click Finish. 4. Click Save. 5. On the Manual configuration menu, click X.25. The DIVA LAN ISDN Modem displays this page: 6. Set the X.25 parameters as required. 7. Click Save. 8. Click Reset.
Chapter Five: Minimizing ISDN Charges Setting ISDN active intervals 67 Setting ISDN active intervals By defining ISDN active intervals, you are able to place restrictions on when data calls can be made or received. To set ISDN active intervals 1. On the Manual configuration menu, click ISDN active intervals. 2. For each interval specify the day of the week it applies to, and the starting and ending times. Make sure you set the system clock, so the time and date on the DIVA LAN ISDN Modem are accurate.
Chapter Five: Minimizing ISDN Charges Spoofing NetBIOS services 68 Spoofing NetBIOS services The NetBIOS protocol is used by Windows 95/98/NT to support Microsoft Windows Network Neighborhood, the MAP NETWORK option in Windows Explorer, and various DOS-based networking commands (such as net use, net view, and net logon). To maintain these services, NetBIOS regularly exchanges bookkeeping messages between connected systems.
Chapter Five: Minimizing ISDN Charges Data compression 69 Data compression Data compression increases the effective throughput of a B-channel by encoding data so that fewer bits are required to represent it. Popular compression algorithms typically reduce the size of the data by 50 percent, effectively doubling the rate at which it is transmitted. However, not all types of data lend themselves to such high compression ratios.
Chapter Five: Minimizing ISDN Charges Manual dialing 70 Manual dialing ISDN active intervals lets you control costs by specifying time ranges when the ISDN link can be used. However, there may be certain situations where direct control of the ISDN link is desirable. The manual dialing option gives you this control. Each profile can be configured to use manual dialing only.
Chapter Five: Minimizing ISDN Charges Restricting analog calls 71 Restricting analog calls Generally, most of the activity on the ISDN line will be created by data traffic. That is why the most of the settings in this section are targeted at data calls. However, in some cases, you may want to place some restrictions on analog use of the ISDN line. Each phone port has a type of calls setting which you can use for cost control purposes.
Chapter Five: Minimizing ISDN Charges Data over voice 72 Data over voice In some regions, ISDN voice calls cost less than ISDN data calls. You can configure the DIVA LAN ISDN Modem to take advantage of this discrepancy to reduce your ISDN charges. When you enable data over voice support, the DIVA LAN ISDN Modem establishes all data calls as voice calls. This does not affect the throughput of your call, the only change is in how the call is billed.
Chapter Five: Minimizing ISDN Charges Traffic filtering Traffic filtering By using the DIVA LAN ISDN Modem’s IP filters, you can selectively drop outgoing traffic to reduce your communications charges. This can be useful if you have applications on your LAN that regularly send non-critical traffic across the ISDN link. For more information on filters, see “IP filters” on page 128.
Chapter Six Security Connecting your computers to the internet or a remote corporate LAN creates a wide range of benefits, but also exposes your computers to certain risks. To safeguard your data and systems, the DIVA LAN ISDN Modem provides a comprehensive range of security features. This chapter explains how to use and configure each feature for optimal protection of your systems.
Chapter Six: Security Security features 75 Security features The following table lists all security features offered by the DIVA LAN ISDN Modem, and their default settings. Feature Default Description System password None Restricts access to the DIVA LAN ISDN Modem configuration interfaces. Automatic log out Active Automatically terminates idle configuration sessions.
Chapter Six: Security System password 76 System password The DIVA LAN ISDN Modem provides a system password that restricts access to the Web-based configuration interface and the CLI. This ensures that configuration changes can only be made by authorized personnel. By default, no password is defined. To set the system password 1. On the Manual Configuration menu, click System. 2. Enter the system password in the Login Password and Repeat Login Password fields. 3. Click Save. 4. Click Reset.
Chapter Six: Security Automatic log out 77 Automatic log out The DIVA LAN ISDN Modem applies an automatic time out to configuration sessions. When a configuration session is idle for more than the time out value, the DIVA LAN ISDN Modem automatically logs the user out. This reduces the risk of unauthorized persons taking advantage of a logged-in computer that has been left unattended. Time outs are not configurable and are set as follows: • If you are using the web interface, the time out is 30 minutes.
Chapter Six: Security Network address translation 78 Network address translation The DIVA LAN ISDN Modem uses network address translation (NAT) to “hide” the local LAN it creates from all external resources. The benefits of this are the ability for all connected computers to access the Internet using one Internet address and ISP account. For example, when communicating with the Internet, these four computers share the dynamically assigned address 222.182.22.39. 192.168.1.5 192.168.1.4 192.168.1.
Chapter Six: Security Network address translation 79 Default NAT server When the DIVA LAN ISDN Modem receives incoming datagrams containing protocols it does not handle, it discards them. For example, if an incoming datagram contains an FTP request and no FTP server has been defined using a static mapping, the data is discarded. In some cases, you may want to forward these datagrams to a specific computer. The DIVA LAN ISDN Modem calls this computer, the default NAT server.
Chapter Six: Security Network address translation To create a static NAT mapping 1. On the Manual Configuration menu, click IP. 2. On the IP menu, click NAT Static Mappings. 3. For each server that you want to define, specify the following parameters: • Protocol: Select the protocol that remote computers will use to access the server. • Server port: Enter the port number that the protocol will use on the server. • Server address: Enter the IP address of the computer that will act as the server.
Chapter Six: Security Remote management 81 Remote management By default, the DIVA LAN ISDN Modem does not allow remote devices to access its configuration interfaces via the ISDN link. This prevents unauthorized tampering when the DIVA LAN ISDN Modem has dialed out and is connected to the Internet or a remote corporate network. To accomplish this security, all incoming HTTP and Telnet traffic on the ISDN line is automatically dropped.
Chapter Six: Security Remote management 82 To enable remote management If you want to support remote configuration, you must enable the remote management option. This option can only be set with the web-based configuration interface. 1. On the Manual Configuration menu, click System. 2. Check the Enable remote management check box. 3. Click Save. 4. Click Reset. Note Is is strongly suggested that you define a log in password if you enable remote management.
Chapter Six: Security Incoming data calls 83 Incoming data calls By default, the DIVA LAN ISDN Modem refuses all incoming ISDN data calls. This effectively shuts the door on unauthorized systems dialing-in. (Voice calls are not blocked by this setting.
Chapter Six: Security Incoming data calls 84 Notes on the diagram 1. The DIVA LAN ISDN Modem provides an IP address to the remote computer. 2. Both the DIVA LAN ISDN Modem and the remote computer have their own fixed IP addresses so no assignments are made. 3. Both the DIVA LAN ISDN Modem and the remote computer have their own fixed IP addresses AND have specified remote addresses. This means they will only be able to connect if the remote addresses match the IP addresses of the other device. 4. 5. 6.
Chapter Six: Security Incoming data calls 85 6. Click Edit for the profile that will answer the call. 7. Click Authentication. 8. Define the Remote username and Remote password the DIVA LAN ISDN Modem expects the remote to send. See “Call authentication” on page 87 for more information. 9. 10. 11. 12. 13. Click IP. Set IP address, Subnet mask, and Remote IP address as required. Click Finish. Click Save. Click Reset.
Chapter Six: Security Call screening Call screening Call screening enables you to accept or reject incoming data calls based on their phone number. This is an effective way to limit dial-in access to the DIVA LAN ISDN Modem to a small group of remote sites. To set up call screening 1. On the Manual Configuration menu, click Incoming data calls. 2. In the Define settings for box choose Call screening. You will see the following page. 3. Check the Enable call screening box. 4.
Chapter Six: Security Call authentication 87 Call authentication Call authentication enables ISDN devices, like the DIVA LAN ISDN Modem, to validate the identity of the device at the other end of the line. Authentication works through the exchange of usernames and passwords. It can be one-way (either the caller gets validated or the callee gets validated) or two-way (both sides validate each other). Generally, authentication is one-way, with the caller getting validated.
Chapter Six: Security Callback 88 Callback Callback is another effective method to control access to the DIVA LAN ISDN Modem. When callback is enabled, the DIVA LAN ISDN Modem functions as a callback client, and the remote site being called functions as a callback server. The client calls the server, the connection is dropped or disconnected, then waits for the server to call back to re-establish the connection.
Chapter Six: Security Callback 89 Delay before host calls back This option is only supported by the callback control protocol. It allows you to specify the amount of time the server waits before calling back. The DIVA LAN ISDN Modem proposes the delay during callback negotiation. The server can either accept or reject it. Timeout waiting for callback Sets the amount of time the DIVA LAN ISDN Modem waits for the server to call back.
Chapter Six: Security Manual dialing 90 Manual dialing The DIVA LAN ISDN Modem automatically establishes the ISDN link whenever there is outgoing data traffic. There may be certain situations where this is not desirable and you will want to have manual control of ISDN usage. The manual dialing option gives you this control. Each profile can be configured to use manual dialing only.
Chapter Six: Security Custom security features Custom security features By using IP filters you can create your own custom security solutions. For example: • limiting local access to the DIVA LAN ISDN Modem for certain computers • accepting incoming traffic only from certain remote users or networks • dropping incoming or outgoing nuisance traffic For more information see “IP filters” on page 128.
Chapter Seven Setting up the Phone Ports If you purchased a DIVA LAN ISDN Modem with analog ports, you are able to use ordinary telephones, answering machines, fax machines, and modems over your ISDN line. This chapter explains how to configure the DIVA LAN ISDN Modem to support these analog devices. Also in this chapter are instructions for configuring supplementary calling services.
Chapter Seven: Setting up the Phone Ports Setting phone numbers manually 93 Setting phone numbers manually The ISP wizard makes it easy for you to define your phone numbers and SPIDs. However, you can edit them manually using this method. 1. On the Manual Configuration menu, click ISDN and phone ports. The DIVA LAN ISDN Modem displays the ISDN line parameters page. 2. Set your 1st ISDN phone number and your 2nd ISDN phone number (if you have one). 3.
Chapter Seven: Setting up the Phone Ports Connecting modems and fax machines 94 Connecting modems and fax machines If you are using a PHONE port to connect an analog modem or fax machine, the DIVA LAN ISDN Modem lets you configure the port for better throughput. Note that although you will still be able to make voice calls on the port, some ISDN phones may not work in this mode and supplementary services (Call Hold, Call Waiting, etc.) is disabled. To enable support for fax/modem 1.
Chapter Seven: Setting up the Phone Ports Call bumping 95 Call bumping Call bumping, more formally known as dynamic bandwidth allocation (DBA), allows you to share the ISDN line between data and analog calls. This enables you to send and receive faxes, or make phone calls, while at the same time downloading data from the Internet with your computers.
Chapter Seven: Setting up the Phone Ports Restricting analog calls 96 Restricting analog calls Generally, most of the activity on the ISDN line will be created by data traffic. That is why the most of the settings in this section are targeted at data calls. However, in some cases, you may want to place some restrictions on analog use of the ISDN line. Each phone port has a type of calls setting which you can use for cost control purposes.
Chapter Seven: Setting up the Phone Ports Supplementary services 97 Supplementary services The supplementary services described in this section only work if they are supported by your ISDN service provider and if they are enabled on your ISDN line. Contact your ISDN service provider for more information on the calling features that are available in your area and the provisioning of your ISDN connection.
Chapter Seven: Setting up the Phone Ports Supplementary services 98 If your ISDN service conforms to EZ-ISDN 1A or EZ-ISDN 3A, you will also have VoiceMail. If the number to which you have forwarded your calls is busy or does not answer, the call will automatically be forwarded to your VoiceMail. With VoiceMail, the DIVA LAN ISDN Modem also supports Visual Message Waiting Indicator. Call Forwarding supports Reminder Ring.
Chapter Seven: Setting up the Phone Ports Supplementary services 99 Call Transfer Call Transfer allows you to disconnect from a Three-Way Conference call and leave the other two people connected. It works as follows: Establish a Three-Way call as described in the section above. Hang up. The other two people remain connected. Feature Key values To access calling features, the DIVA LAN ISDN Modem supplies the ISDN switch with certain codes called Feature Keys.
Chapter Eight Connecting to a Corporate Network Intranets are an effective way for organizations to share data and resources. The DIVA LAN ISDN Modem makes it easy for branch offices and telecommuters to connect to a corporate Intranet. This chapter explains how to configure the DIVA LAN ISDN Modem to connect with a remote network only. If you need to connect to the Internet and a remote network at the same time, see “Concurrent Internet and Intranet connections” on page 119.
Chapter Eight: Connecting to a Corporate Network Overview 101 Overview This option enables you to connect one or more computers to your corporate LAN for intranet web browsing, e-mail, and file transfer. Generally, this type of connection takes place via a direct, dial-up ISDN link with the corporate LAN.
Chapter Eight: Connecting to a Corporate Network 1. Gather information 1. Gather information Contact your corporate network administrator and record the following information: Item Description ISDN number(s) of corporate network This is the phone number the DIVA LAN ISDN Modem will dial to access the corporate network. A backup number may also exist in case the primary number is busy or unavailable. User name Name the DIVA LAN ISDN Modem will use to log on to the corporate network.
Chapter Eight: Connecting to a Corporate Network 2. Configure the Corporate profile 103 2. Configure the Corporate profile Use the Corporate profile to define the configurations settings for the connection to your corporate network. To configure the Corporate profile 1. Start the Web-based configuration interface and log in as explained in Chapter Four. 2. Click Connection profiles. The DIVA LAN ISDN Modem displays the Connection Profiles list page.
Chapter Eight: Connecting to a Corporate Network 2. Configure the Corporate profile 104 5. Click Connection on the menu bar. The DIVA LAN ISDN Modem displays the Connection parameters page. 6. Set the following parameters: • Telephone number 1: Specify the ISDN phone number of the corporate network. • Backup telephone number 1: Specify the backup number to dial when Telephone number 1 is busy or not available. If the corporate network does not have a backup number, leave this field blank. • Remote X.
Chapter Eight: Connecting to a Corporate Network 2. Configure the Corporate profile 105 8. Set the following parameters: • Select profile mode: Leave this set to NAT unless you have a specific requirement not too. For more information on NAT, see “Network address translation” on page 78. • Primary/Secondary DNS address: Specify the addresses of the primary/secondary DNS servers on the corporate network. If you leave these addresses set to 0.0.0.
Chapter Eight: Connecting to a Corporate Network 2. Configure the Corporate profile 106 15. Click Routes. The DIVA LAN ISDN Modem displays the Routes page. Edit the fields (if required) so that they are set as follows: 16. Click Save. 17. Click Reset. Your corporate connection is now ready to use. You should be able to send and receive e-mail, share files, or browse any intranet web pages.
Chapter Eight: Connecting to a Corporate Network Using the corporate connection 107 Using the corporate connection The DIVA LAN ISDN Modem automatically dials out and establishes the ISDN link to your corporate network as required. You simply launch the applications you use to do your work, such as a web browser or e-mail program, and you are automatically connected. You can also establish your connections manually, dialing and hanging up connections as you see fit. See page 45 for details.
Chapter Eight: Connecting to a Corporate Network What’s next? 108 What’s next? Other chapters in this manual provide in depth information and instruction on a variety of topics relating to operating and configuring the DIVA LAN ISDN Modem. Some of the topics that you may want to consult are: Minimizing your ISDN charges The DIVA LAN ISDN Modem has several pre-defined settings to help reduce your ISDN charges. To adjust these settings for your installation, see Chapter Five.
Chapter Nine Advanced Installations This chapter describes advanced installation scenarios and provides background information on advanced configuration issues like IP filtering and IP routing.
Chapter Nine: Advanced Installations Connection retries 110 Connection retries The connection retry parameter controls how many times the DIVA LAN ISDN Modem attempts to establish a connection using a specific profile. If the profile cannot be connected using either its primary telephone number or backup telephone number, it is disabled, and the DIVA LAN ISDN Modem attempts to connect using a backup profile instead. Once a profile has been disabled, it must be re-enabled before it can be used again.
Chapter Nine: Advanced Installations Connection retries To define a backup profile and set the profile restore delay 1. On the Configuration main menu, click Connection Profiles. 2. Click Edit for the profile you want to define a backup profile for. You will see the following page. 3. Choose a Backup profile from the list. 4. Set a value for Profile restore delay. (This value must be greater than 0, if you want to use a backup profile.) 5. Click Finish. 6. Click Save. 7. Click Reset.
Chapter Nine: Advanced Installations Installing on an existing LAN 112 Installing on an existing LAN Installing the DIVA LAN ISDN Modem on an existing LAN can be extremely simple, or quite challenging, depending on the complexity of your existing LAN setup. To help you successfully integrate the DIVA LAN ISDN Modem into your setup, this section presents an installation strategy that should work in the majority of cases.
Chapter Nine: Advanced Installations Installing on an existing LAN 113 6. Click LAN on the Manual Configuration menu. The DIVA LAN ISDN Modem displays the LAN parameters page. 7. Set the IP address to a free address on your LAN. If your LAN uses dynamic addressing (DHCP server) make sure that the address you choose is outside the range of dynamically assigned ones, or that you reserve the address. For background information on IP addresses, see “About IP addresses” on page 120. 8.
Chapter Nine: Advanced Installations Installing on an existing LAN 114 16. Connect the DIVA LAN ISDN Modem to the LAN. Do this by connecting any one of the DIVA LAN ISDN Modem’s ETHERNET ports to a port on your LAN hub. If your hub has a cross-over switch or cascade port, you can use the supplied blue Ethernet cable to make this connection. If not, you will need a special cross-over Ethernet cable to make this connection.
Chapter Nine: Advanced Installations Connecting more than four computers 115 Connecting more than four computers In certain cases, you may want to share the DIVA LAN ISDN Modem with more than four computers. To do this, you can connect the DIVA LAN ISDN Modem to an Ethernet hub. This connection requires either a special Ethernet cable, called a cross-over, or you can use the supplied blue cable if the hub has a cross-over switch.
Chapter Nine: Advanced Installations Creating a virtual private network 116 Creating a virtual private network A virtual private network (VPN) is an interconnection between two networks that uses the PPTP (point-to-point tunneling protocol). By using the Internet to transport data, a VPN can eliminate long distance charges associated with traditional dial-up solutions. And, since PPTP provides a secure connection, network security is not compromised.
Chapter Nine: Advanced Installations Creating a virtual private network 117 8. Click Next. You will see the following dialog box. 9. Enter the IP address or host name of the VPN server. 10. Click Next. You will see the following dialog box. 11. Click Finish to create the new connection. Connecting to the VPN 1. To connect to the VPN, you simply launch the connection you just created with Dial-Up Networking. You will see the following dialog box. 2. Enter your user name and password and click Connect.
Chapter Nine: Advanced Installations Creating a virtual private network 118 3. The DIVA LAN ISDN Modem will automatically establish the link to the Internet and you will see the following Dial-Up Networking dialog box, showing the details of your connection. Note The bps value reported by this dialog box is your LAN Ethernet speed. Your actual connection speed will be either 64 bps or 128 kbps depending on how many B-channels you are using.
Chapter Nine: Advanced Installations Concurrent Internet and Intranet connections 119 Concurrent Internet and Intranet connections The DIVA LAN ISDN Modem can support both an Internet connection and an intranet connection to your corporate network. This section explains how to install and configure such a setup. Selecting a connections protocol One of the primary considerations is choice of connection protocol.
Chapter Nine: Advanced Installations IP routes 120 IP routes This section provides background information on why IP routes are needed and explains how to define them. However, before you can understand routing, you must be familiar with IP addressing and how the DIVA LAN ISDN Modem assigns them. About IP addresses IP addresses identify the computers (and other devices) on an IP network. Each address is composed of 32 bits.
Chapter Nine: Advanced Installations IP routes 121 The following diagram shows four computers with addresses assigned by the DIVA LAN ISDN Modem. 192.168.1.5 192.168.1.4 192.168.1.3 192.168.1.2 LAN interface 192.168.1.1 DIVA LAN ISDN Modem B1 B2 ISDN D E1 LINK Ethernet E2 E3 E4/C FAULT POWER DIVA LAN ISDN Modem By default, the DIVA LAN ISDN Modem uses the mask 255.255.255.0 when assigning addresses. This means that the network portion of the address is: 192.168.1.
Chapter Nine: Advanced Installations IP routes 122 In some cases, you may be required to assign a static IP address to a profile. This may occur when connecting to a corporate network. For example: 192.168.1.5 192.168.1.4 192.168.1.3 Internet 192.168.1.2 ISP ISP profile Address dynamically assigned by ISP 192.168.1.1 222.182.22.39 B-channel 201.163.1.
Chapter Nine: Advanced Installations IP routes 123 Why routes are needed Data on an IP network is carried in small packages called datagrams. Each datagram contains the IP address of its source and destination. In order to send datagrams to their proper destination, the DIVA LAN ISDN Modem requires a list of destinations and the addresses that are associated with it. This information is stored in a route. Since more than one route is generally required, they are grouped together in a routing table.
Chapter Nine: Advanced Installations IP routes 124 Multiple connections Consider the following scenario, which features an Internet and Corporate connection, each using one B-channel (PPP): 192.168.1.5 192.168.1.4 192.168.1.3 Internet 192.168.1.2 ISP ISP profile Address negotiated with ISP 192.168.1.1 212.182.22.39 B-channel 201.163.1.
Chapter Nine: Advanced Installations IP routes 125 Routing on the local LAN The DIVA LAN ISDN Modem lets you create your own local area network. In some instances, this network, or the DIVA LAN ISDN Modem itself, will be connected to another network via a bridge or router. Consider this scenario, which adds another LAN to the previously discussed example: 150.150.5.2 150.150.5.3 150.150.5.4 150.150.5.1 192.168.1.4 192.168.1.3 Internet 192.168.1.2 192.168.1.
Chapter Nine: Advanced Installations IP routes 126 The Routing Information Protocol (RIP) RIP permits the DIVA LAN ISDN Modem to automatically discover routes for itself, by listening to routing broadcasts from other networks. If your corporate LAN broadcasts RIP updates, the DIVA LAN ISDN Modem will be able to discover routes to all subnets connected to it.
Chapter Nine: Advanced Installations IP routes • Gateway address: Only used if the Interface is set to LAN. This is the address of the device you want to send the routed traffic to. This will usually be the address of a bridge or router. • Interface: Choose the name of the profile you want to send the routed data to. The profile you choose should establish a connection to the proper destination so that routing is successful.
Chapter Nine: Advanced Installations IP filters 128 IP filters IP filtering provides you with the means to implement customized security, usage, and cost control measures. How filtering works Filters are defined in a stack. Up to 8 filters can be combined together to obtain sophisticated results.
Chapter Nine: Advanced Installations IP filters 129 Default filters By default, the DIVA LAN ISDN Modem defines the following three filters for the ISP profile: The first two filters prevent outside access to the web-based configuration interface and the CLI by discarding incoming HTTP and Telnet traffic. When you enable remote management, these filters are deleted. The last filter is required because, by default, any traffic that is not forwarded is discarded when it reaches the bottom of the stack.
Chapter Nine: Advanced Installations IP filters 130 4. Click Filters to display the following page. (If you enabled remote management you will not see the first two filters.) 5. Select the profile you want to define filters for. 6. Click a “+” symbol to insert a new filter. The DIVA LAN ISDN Modem displays the Edit Filters page.
Chapter Nine: Advanced Installations IP filters 131 7. Define the settings for the filter and click Done. The following descriptions explain the options that are available. Source /Destination Action Direction Address Location Protocol Action • Drop: Discard data that matches the filter definition. • Forward: Send data that matches the filter definition to the filter output. Direction • incoming: Data being received by the DIVA LAN ISDN Modem on the ISDN link.
Chapter Nine: Advanced Installations IP filters 132 • any well known: Applies the filter to any protocol using TCP or UDP ports in the range 0 to 1023. See RFC 1700 for the complete list of protocols. • UNIX: Applies the filter to any protocol using TCP or UDP ports in the range 512 to 1023. See RFC 1700 for the complete list of protocols. • TCP: Many protocols (such as HTTP, FTP, Telnet, News) make use of TCP. If you filter all TCP traffic you will prevent the use of these protocols.
Chapter Nine: Advanced Installations IP filters 133 When done, the filter stack should look like this: Allowing incoming traffic only from a specific network This example shows how to allow the DIVA LAN ISDN Modem to only receive incoming data from a specific network (112.111.212.0) on the Internet. Data from all other networks is dropped. However, outgoing traffic is not affected. This requires defining two filters.
Chapter Nine: Advanced Installations IP filters 134 When done, the filter stack should look like this: Blocking web surfing This example shows how to block computers on the local LAN created by the DIVA LAN ISDN Modem from surfing the web. Web traffic is carried by the HTTP protocol. Therefore, to stop web access, this protocol needs to be dropped for all outgoing traffic. A single filter needs to be defined. Place this filter in the third position in the stack.
Chapter Nine: Advanced Installations When done, the filter stack should look like this: IP filters 135
Chapter Nine: Advanced Installations Making a V.120 connection 136 Making a V.120 connection V.120 was designed to allow non-ISDN devices to communicate with the ISDN network. The DIVA LAN ISDN Modem provides support for V.120, so you can connect with such legacy systems. For example, in many countries around the world, Compuserve offers access to their network over ISDN, using the V.120 protocol. In general, you should use V.120 only when the site you are connecting to requires it. Once the V.
Chapter Nine: Advanced Installations Making a V.120 connection 137 8. Click More. You will see the V.120 Dialing Script page: 9. This page contains a pre-defined script that you can modify for your installation. When the V.120 connection is established, this script is automatically run to complete the log in process. Consult your ISP to determine the sequence of events that occur during the log in process. Then modify this script accordingly.
Chapter Nine: Advanced Installations SecurID support 138 SecurID support When establishing a connection to a SecurID server, a special username and password must be supplied to log on. The server will request this information during authentication. In order to reply to the request, the DIVA LAN ISDN Modem must obtain the log on information from the user that initiated the connection.
Chapter Nine: Advanced Installations To enable SecurID support 1. On the Configuration main menu, click Connection Profiles. 2. Click Edit for the profile you want to enable SecurID support for. 3. Click Authentication on the menu bar. You will see the following page. 4. 5. 6. 7. Check the Use SecurID box. Click Finish. Click Save. Click Reset.
Chapter Ten Other Configuration Tools The DIVA LAN ISDN Modem has four configuration interfaces: Web, CLI, DTMF, and TFTP. For most configuration tasks you should use the Web interface, since it is the easiest and fastest way to change configuration settings. However, in some cases, you may want to take advantage of the other tools described in this chapter.
Chapter Ten: Other Configuration Tools Configuration options 141 Configuration options Local configuration The following diagram illustrates the configuration interfaces that are accessible locally.
Chapter Ten: Other Configuration Tools Web interface 142 Web interface An easy to use interface that provides access to configuration wizards, advanced configuration parameters, and status information. The web interface is discussed in detail in Chapter Four. Prerequisites • Requires Web browser software. • Netscape 3.01 or later • Internet Explorer 4 or later Internet Explorer 4 is included on the DIVA LAN ISDN Modem CD for computers running Windows 95, Windows 98, or NT 4.0 or later. NT 4.
Chapter Ten: Other Configuration Tools TFTP interface TFTP interface The TFTP interface lets you upload and download configuration files and firmware. Prerequisites • Requires TFTP client software. A shareware client is included on the DIVA LAN ISDN Modem CD. Local access • IP connection via an Ethernet port. • Support for TFTP server must be enabled. Remote access • IP connection via ISDN. • Remote management must be enabled (page 81). • Support for incoming data calls must be enabled (page 83).
Chapter Ten: Other Configuration Tools TFTP interface 144 Uploading/downloading configuration files All configuration settings on the DIVA LAN ISDN Modem are stored in configuration files. Using TFTP, you can access these files to retrieve and set configuration values. File Name Access Description config.bat Write-only A file containing CLI commands. The commands in this file are automatically executed after being uploaded with TFTP. Trace commands are not supported by this file. Use trace.
Chapter Ten: Other Configuration Tools DTMF interface 145 DTMF interface The DIVA LAN ISDN Modem enables you to set certain parameters using a standard touch-tone telephone. Prerequisites • touch-tone analog phone Local access • Phone must be plugged into PHONE port 2. • ISDN line must not be connected. Remote access • Not available. How it works Plug an analog phone into PHONE port 2. • Each command starts and ends with a #. • A short beep indicates that the command you entered was accepted.
Chapter Ten: Other Configuration Tools Command line interface (CLI) 146 Command line interface (CLI) The command line interface provides you with access to all DIVA LAN ISDN Modem parameters. Some advanced parameters are only accessible via this interface. Prerequisites • Requires Telnet software for an IP connection. • Requires terminal emulation software for a direct serial connection. • Requires special serial cable (included) for a direct serial connection.
Chapter Ten: Other Configuration Tools Command line interface (CLI) 147 To establish a serial connection Establish a serial connection as follows: 1. Connect the DB9 connector on the beige serial cable to the serial port on your computer, and plug the RJ45 connector into the CONSOLE port on the back of the DIVA LAN ISDN Modem. 2. Start your communications software. (If you are running Windows 95/98/NT, use HyperTerminal which is available in the Accessories folder.) 3.
Chapter Ten: Other Configuration Tools Command line interface (CLI) 148 About configuration context The command line interface identifies the configuration context you are in by changing the prompt. When you first activate the CLI interface you are in the General configuration context, which is identified by a plain prompt (>). All other contexts are identified by a label added to the prompt.
Chapter Ten: Other Configuration Tools Command line interface (CLI) 149 To load the new firmware 1. Log in to the CLI. 2. Type the following command and press Enter. > monitor 3. Type the following command and press Enter. > at@load 4. The DIVA LAN ISDN Modem warns you that your firmware is about to be erased. Note that all configuration settings are retained, including passwords. Type ‘Y’. This will erase your FLASH memory, do you wish to proceed (y/n)? y 5.
Appendix A TCP/IP Configuration This appendix provides instructions on how to install and configure TCP/IP for use with the DIVA LAN ISDN Modem.
Appendix A: TCP/IP Configuration Installing and configuring TCP/IP for Windows 95/98 151 Installing and configuring TCP/IP for Windows 95/98 Installing TCP/IP If TCP/IP is not installed on your computer, install it as follows: 1. On the Start menu, choose Settings, then choose Control Panel. 2. Double-click the Network icon. The Network dialog box appears. 3. Click Add. The Select Network Component Type dialog box appears. 4. Select Protocol and click Add.
Appendix A: TCP/IP Configuration Installing and configuring TCP/IP for Windows 95/98 5. Click the IP Address tab. 6. Select Obtain an IP address automatically. This defines your machine as a DHCP client. 7. Click the WINS Configuration tab. 8. Select Use DHCP for WINS Resolution.
Appendix A: TCP/IP Configuration Installing and configuring TCP/IP for Windows 95/98 153 9. Click the Gateway tab. 10. Make sure no gateways are defined. 11. Click the DNS Configuration tab. 12. 13. 14. 15. Select Disable DNS. This sets your computer to use the DIVA LAN ISDN Modem as its DNS server. Click OK. Click OK. When prompted, insert the original Windows 95/98 installation CD and enter the drive letter of your CD drive (or use the Browse button to locate your CD drive), then click OK. 16.
Appendix A: TCP/IP Configuration Installing TCP/IP for Windows NT 154 Installing TCP/IP for Windows NT Installing TCP/IP 1. On the Start menu, choose Settings, then choose Control Panel. 2. Double-click the Network icon. The Network dialog box appears. 3. Click the Protocols tab. 4. Click Add. 5. Select TCP/IP protocol as your network protocol. 6. Click OK. 7. Click Yes to use DHCP. 8.
Appendix A: TCP/IP Configuration Configuring TCP/IP on an iMac Set up TCP/IP on an iMac as follows: 1. 2. 3. 4. On the Apple menu, select Control Panels. Select TCP/IP. Set Connect via to Ethernet. Set Configure to Using DHCP Server.
Appendix B Technical Information This appendix provides detailed technical information on the DIVA LAN ISDN Modem.
Appendix B: Technical Information DIVA LAN ISDN Modem indicator lights DIVA LAN ISDN Modem indicator lights The front panel lights show you the status of the DIVA LAN ISDN Modem. ® B1 ISDN B2 D E1 Ethernet E2 E3 FAULT POWER B1, B2 Indicates the status of the B-channels. State Description Green Indicates a data call. Orange Indicates a phone call. Off No call activity on the specified B-channel. Flashing An incoming or outgoing call is being established on the B-channel.
Appendix B: Technical Information DIVA LAN ISDN Modem indicator lights E1, E2, E3, E4 Indicates the status of the four ETHERNET ports. State Description Off There is no device connected to the specified ETHERNET port, or the connected device is not powered on. Flashing Data is being received on the specified ETHERNET port. Steady There is a device connected to the specified ETHERNET port and the link is up. /C Indicates the status of Ethernet collisions in red.
Appendix B: Technical Information DIVA LAN ISDN Modem connectors DIVA LAN ISDN Modem connectors The back panel is where you connect your equipment to the DIVA LAN ISDN Modem. ISDN PHONE 1 2 E4 ETHERNET E3 E2 E1 POWER 12VDC CONSOLE Reset Port Description ISDN Use this RJ-45 port to connect the DIVA LAN ISDN Modem to the ISDN line jack. An RJ-45 to RJ-11 cable is included for this purpose. Phone 1, 2 Use these RJ-11 ports to connect analog devices such as telephones or fax machines.
Appendix B: Technical Information Resetting the DIVA LAN ISDN Modem 160 Resetting the DIVA LAN ISDN Modem The Reset button is located on the back of the DIVA LAN ISDN Modem. ISDN PHONE 1 2 E4 ETHERNET E3 E2 E1 POWER 12VDC CONSOLE Reset Reset button Two reset options are available: Resetting operational settings Use this to activate configuration settings you have made. To reset • Press and release the Reset button quickly.
Appendix B: Technical Information Termination 161 Termination If you are in North America or Australia and you are installing a DIVA LAN ISDN Modem with an S/T interface, you must connect the terminating resistor to ensure the proper operation of your equipment. Determining termination requirements Termination requirements vary depending on the number of devices connected to an external NT1 and the distance between these devices and the NT1.
Appendix C Command Line Reference This appendix provides a description for each CLI command. The commands are grouped according to functionality.
Appendix C: Command Line Reference Notational Conventions Notational Conventions The section uses the following conventions: Syntax Example Description Cancel Boldface type indicates the name of an item (a parameter name, command button, menu option, etc.) you need to select or perform an action on. RESET UPPERCASE TYPE indicates keywords. The actual words can be entered in either uppercase or lowercase. [ /C n ] Items enclosed in square brackets are optional. You can either include them or not.
Appendix C: Command Line Reference Commands Commands For information on: See page: AO/DI 165 Callback 166 Call screening 167 Call thresholds 168 DHCP 169 DNS 172 Ethernet 173 General 174 IP filters 177 IP NAT 180 IP routing 181 IP various 182 ISDN 184 ISDN Access Time 187 LAPD 188 Logging and Mail Trace 189 MLPPP 190 Phone 191 PPP 194 Profiles 197 Q.931 198 RIP 199 SNMP 201 TCP 202 TFTP 203 Time Protocol 204 UDP 205 V.120 206 V.
Appendix C: Command Line Reference AO/DI 165 AO/DI ENABLE AODI AREACODE Valid context: Profile/PPP Enables or disables use of the area code when making an AO/DI call. When enabled, the DIVA LAN ISDN Modem uses the area code when dialing a remote site. When disabled, it does not. DISABLE AODI AREACODE Valid context: Profile/PPP SET AODI DIALPREFIX dialstr Valid context: Profile/PPP Specifies the prefix to dial when making an AO/DI call.
Appendix C: Command Line Reference Callback 166 Callback SET CALLBACK MODE type option [number1 number2] Valid context: Profile/PPP Several callback modes are available. Each provides different features. For callback to work, both client and server must use the same mode. The DIVA LAN ISDN Modem can only function as a callback client. type: NONE, NCP, ISDN NONE: No callback. NCP: Supports both the USERSPEC and ADMINSPEC options. This is a Microsoft-developed solution.
Appendix C: Command Line Reference Call screening 167 Call screening ADD ISDN SCREENING channel number Valid context: General Adds a number to the call screening table. When call screening is enabled, an incoming data call is only accepted if its number appears in the call screening table. Use this command to add a number to the call screening table. channel: ISDN number to screen calls on. Range 1 to 2. number: ISDN telephone number to screen for. Enter up to 20 digits.
Appendix C: Command Line Reference Call thresholds 168 Call thresholds SET ISDN THRESHOLD intervalDays maxHours maxCalls Valid context: General Limits usage of the ISDN line based on number of calls or time connected during a specified interval. intervalDays: Number of days in the interval. Range: 1 to 31 days. maxHours: Maximum number of hours a profile can be connected during the interval. Range: 0 (disabled), 1 hour to (24 * intervalDays) hours.
Appendix C: Command Line Reference DHCP 169 DHCP SET DHCP TYPE { SERVER | NONE} Valid context: General Sets the type of DHCP services the DIVA LAN ISDN Modem will supply. DHCP server is active by default. SERVER: As a DHCP server, the DIVA LAN ISDN Modem is responsible for assigning IP addresses when it receives a DHCP request from a network device. NONE: No DHCP services are supplied. SHOW DHCP STATUS Valid context: General Displays DHCP status and the list of IP addresses that are currently defined.
Appendix C: Command Line Reference DHCP 170 SET DHCP DOMAIN domain Valid context: General Specifies the domain name returned by the DIVA LAN ISDN Modem when acting as a DHCP server in response to a DHCP request. domain: Domain name as a string of up to 31 characters. SHOW DHCP CONFIGURATION Valid context: General Displays the setting of all DHCP related parameters.
Appendix C: Command Line Reference DHCP 171 DELETE DHCP STATICMAP ip Valid context: General Deletes an entry from the STATICMAP table. See ADD DHCP STATICMAP for complete details. ipAddress: IP address of the entry to delete. SHOW DHCP STATICMAP Valid context: General Displays the list of defined static DHCP addresses. See ADD DHCP STATICMAP for complete details.
Appendix C: Command Line Reference DNS 172 DNS SET DNS DOMAIN domain Valid context: Profile When DNS relay is enabled, the DIVA LAN ISDN Modem checks each DNS request to see if it matches this name. If so, the DIVA LAN ISDN Modem establishes the connection defined by this profile, and forwards the request. domain: Domain name or * to match any name. Range: Up to 32 characters.
Appendix C: Command Line Reference Ethernet 173 Ethernet SHOW ETHERNET STATISTICS Valid context: General Displays Ethernet statistics. SHOW ETHERNET ADDRESS Valid context: Profile Displays the Ethernet address of the DIVA LAN ISDN Modem. You must be in the LAN profile to issue this command. SHOW ETHERNET TRACE [memsize [framesize]] Valid context: General Starts or displays an Ethernet trace. memsize: The amount of RAM reserved to store the trace on the DIVA LAN ISDN Modem. Range: 1 to 63 KB .
Appendix C: Command Line Reference General 174 General MONITOR Valid context: General Invokes monitor mode. Use monitor mode to upload new firmware or to dump system memory for debugging purposes. You can set the DIVA LAN ISDN Modem to automatically invoke monitor mode when a fatal error occurs by issuing the SET ONERROR command. NEXT Valid context: Filter Makes the next IP filter the current context so you can edit it.
Appendix C: Command Line Reference General 175 VALIDATE Valid context: General Validates the current configuration by running a series of tests. Validate helps you determine if the DIVA LAN ISDN Modem is properly configured. SET TIME hh:mm[:ss] Valid context: General Sets the internal system clock. hh: Hours. Range: 0 to 24. mm: Minutes. Range 00 to 59. ss: Seconds. Range 00 to 59. SET DATE yy[yy]-mm-dd Valid context: General Sets the internal system date. For example: yyyy-mm-dd mm: Month.
Appendix C: Command Line Reference General 176 SHOW LED STATUS Valid context: General Displays the current status of the DIVA LAN ISDN Modem LEDs. For example: LED Status B1 On B2 Off D On LINK On E1 Flash E2 Flash E3 Off E4/C *Flash FAULT Off POWER On A * next to an On indicates that the LED color is NOT green. It could be orange or red. SET SYSTEM NAME name Valid context: General Defines the SNMP name of the DIVA LAN ISDN Modem. Enter up to 29 alphanumeric characters.
Appendix C: Command Line Reference IP filters 177 IP filters ADD IP FILTER filterNum Valid context: Profile Adds a new IP filter to the list at the specified position. This enables you to insert a filter at any point in the list. filternum: Position to add the new filter. DELETE IP FILTER filterNum Valid context: Profile Delete an IP filter. filterNum: Number of the IP filter to delete. ENABLE FILTER DISABLE FILTER Valid context: Filter/Profile Enables or disables IP filters.
Appendix C: Command Line Reference IP filters 178 SET IP DESTINATION Ipaddr netMask Valid context: Filter/Profile Sets the destination address and network mask for the filter. Only data which is destined for the specified address and network is processed by this filter. Ipaddr: Destination IP address of data to filter. netMask: Destination network mask for data to filter.
Appendix C: Command Line Reference SET TYPE {ALL | UDP | TCP | SYN | ANYICMP} Valid context: Filter Sets the type of data this filter applies to. ALL: This filter applies to all data. UDP: This filter applies to UDP data. TCP: This filter applies to TCP data. Default setting. SYN: This filter applies to TCP connection (SYN) data. ANYICMP: This filter applies to all ICMP data. ICMP: This filter applies to specific ICMP data only (as set by type) type: ICMP type to filter.
Appendix C: Command Line Reference IP NAT 180 IP NAT ENABLE IP NAT DISABLE IP NAT Valid context: Profile Enables or disables NAT (network address translation) for this profile. NAT allows the DIVA LAN ISDN Modem to use only one IP address when communicating with remote sites via the ISDN port. NAT is enabled by default. SHOW IP NAT Valid context: General Displays the IP NAT table, which contains the settings for all computers on the internal LAN that are visible to the external network.
Appendix C: Command Line Reference IP routing 181 IP routing ADD IP ROUTE Ipaddr maskLen[:metric] [gwAddr] Valid context: Profile Adds a static IP route. Ipaddr: Specifies the IP address of datagrams that should be routed. maskLen: Lets you specify the number of bits that are checked when comparing the address of a datagram to that specified by the lpaddr parameter. Range: 0 to 32. metric:Metric determines the weight of a route.
Appendix C: Command Line Reference IP various 182 IP various SHOW ICMP STATISTICS Valid context: General Displays ICMP statistics. SET IP REMOTE Ipaddr Valid context: Profile Sets the IP address of the remote device this profile connects to. Use this only in cases when a static IP address is assigned to the remote site. In most cases, specify 0.0.0.0 to allow dynamic negotiation of the address when the connection is established. Dynamic negotiation is not supported by the LAN profile.
Appendix C: Command Line Reference IP various 183 SHOW IP CONFIGURATION Valid context: General Displays IP configuration settings. SET IP SERVICES {ALL | INTELLIGENT | MINIMAL | NONE} Valid context: General Defines the level of support the DIVA LAN ISDN Modem provides for Microsoft NetBIOS services (which are integrated into Microsoft TCP/IP).
Appendix C: Command Line Reference ISDN 184 ISDN ENABLE ISDN TEISHARING DISABLE ISDN TEISHARING Valid context: General Enables or disables the sharing of TEI assignments. Some switches only make two TEIs available for an ISDN line. Therefore, if you are using AO/DI, enable this option. This shares the TEI between channels B1 and D. TEISHARING is disabled by default and is only available if TEI assignment is dynamic (SET ISDN TEI DYNAMIC).
Appendix C: Command Line Reference ISDN 185 SET ISDN REMOTE channel isdnNumber Valid context: Profile/PPP Sets the remote ISDN numbers the DIVA LAN ISDN Modem should dial when making calls for this profile. channel: ISDN channel. Range: 1 to 2. isdnNumber: ISDN number. SET ISDN BACKUP channel isdnNumber Valid context: Profile/PPP Sets the remote backup ISDN numbers the DIVA LAN ISDN Modem should dial when the remote numbers failed to connect. channel: ISDN channel. Range: 1 to 2.
Appendix C: Command Line Reference ISDN 186 SET ISDN TEI {isdnTEI | DYNAMIC} Valid context: General Defines the TEI used by ISDN to support X.25 communications over the D-channel. This setting takes precedence over TEI sharing (dynamic allocation). isdnTEI: TEI number to assign to the D-channel for X.25. Your service provider will provide this value. Range: 1 to 127. DYNAMIC: TEI number is negotiated with the ISDN switch and also allows TEIs to be shared (ENABLE ISDN TEISHARING).
Appendix C: Command Line Reference ISDN Access Time 187 ISDN Access Time ADD ISDN ACCESSTIME days time {IN | OUT | ANY| BLOCKED} Valid context: General Defines the times during which ISDN data calls can be made or received. For example, the command \"add isdn accesstime mon-fri 9:00-17:00 IN\" enables incoming calls Monday to Friday, from 9AM to 5PM. days: Starting and ending days, separated by a hyphen. Range: mon, tues, wed, thur, fri, sat, sun. Range must be within the same week (sun-sat).
Appendix C: Command Line Reference LAPD 188 LAPD SHOW LAPD TRACE [memsize [framesize]] Valid context: General This command will start a LAPD trace or display information for a LAPD trace that is already active. memsize: The amount of RAM reserved to store the trace on the DIVA LAN ISDN Modem. Range: 1 to 63 KB. Default: 16 KB framesize: The number of characters to display in each frame. STOP LAPD TRACE Valid context: General Stops and resets a LAPD trace.
Appendix C: Command Line Reference Logging and Mail Trace 189 Logging and Mail Trace SET LOG FILTER {TRACE | DEBUG | INFO | SECURITY | WARNING} Valid context: General Specifies the type of information that will be written to the DIVA LAN ISDN Modem event log. See SHOW LOG for a description of the information written to the log by each setting.
Appendix C: Command Line Reference MLPPP 190 MLPPP SET MLPPP LINKUP threshold delay [channel] Valid context: Profile/PPP Sets the conditions that define when the DIVA LAN ISDN Modem brings up an ISDN B-channel. threshold: Percent usage of the current channel. Range: 50 to 100%. Default: 70%. delay: How long usage must stay at threshold before the B-channel is brought up. Range: 1 to 120 sec. Default: 5 sec. channel: ISDN B-channel to bring up. Range: 1 to 2. Default: assign to both B-channels.
Appendix C: Command Line Reference Phone 191 Phone ENABLE PHONE ALTRING channel DISABLE PHONE ALTRING channel Valid context: General If you have two phone numbers assigned to phone port, the DIVA LAN ISDN Modem assigns a distinctive ring to each number. If you ENABLE PHONE ALTRING for a port, the assigned rings are swapped. channel: PHONE port number. Range: 1 to 2. ENABLE PHONE CALLBUMPING DISABLE PHONE CALLBUMPING Valid context: General Enables or disables call bumping.
Appendix C: Command Line Reference Phone 192 SET PHONE FEATUREKEY {CONFERENCE | TRANSFER | DROP | MSGINDICATOR} value Valid context: General Specifies the feature key for analog device calling features. CONFERENCE: Conference call. TRANSFER: Call transfer. DROP: Call drop. MSGINDICATOR: Message waiting indicator. value: 1 to 16383. Defaults are: Conference Call = 60, Call Transfer = 61, Call Drop = 62, Message Waiting Indicator = 63.
Appendix C: Command Line Reference Phone 193 ENABLE PHONE SERVICES channel DISABLE PHONE SERVICES channel Valid context: General Enables or disables support for all supplementary phone services. channel: Channel number. Range: 1 to 2. SET PHONE COUNTRY country Valid context: General Specifies the country in which this phone is being used. Sets the phone to behave as expected in the selected country. country: Code identifying the country in which the phone is being used.
Appendix C: Command Line Reference PPP 194 PPP SET PPP AUTHENT {ENCRYPTED | ANY} Valid context: Profile/PPP Specifies how authentication is handled for a call. If the remote is not using the same type of password (encrypted/unencrypted), then the call is rejected. ENCRYPTED: Accepts only calls using encrypted passwords for authentication. ANY: Accepts calls using either encrypted or unencrypted passwords. Default setting.
Appendix C: Command Line Reference PPP 195 When enabled, the DIVA LAN ISDN Modem uses the SecureID name and password instead of the username (SET PPP LNAME ) and password (SET PPP LPASSWORD) configured on the DIVA LAN ISDN Modem for the active profile. The DIVA LAN ISDN Modem dynamically obtains the SecureID name and password from the SecureID client application as required.
Appendix C: Command Line Reference SHOW PPP STATISTICS Valid context: General Displays PPP statistics. SHOW PPP STATUS Valid context: Profile/PPP Displays PPP status. SHOW PPP TRACE [port[mask] [memsize [framesize]]] Valid context: Profile/PPP Starts or displays an already started PPP trace for an ISDN channel. memsize: The amount of RAM reserved to store the trace on the DIVA LAN ISDN Modem. Range: 1 to 63 KB . Default: 16 KB framesize: The number of characters to display in each frame.
Appendix C: Command Line Reference Profiles 197 Profiles SET PROFILE NAME name Valid context: Profile Changes the name of the current profile. name: New name for the profile. The name must not contain spaces. ENABLE PROFILE DISABLE PROFILE Valid context: Profile Enables or disables the current profile. SHOW PROFILE [profileName] Valid context: General Displays the configuration settings for all profiles. TEST PROFILE Valid context: Profile/PPP Tests the profile.
Appendix C: Command Line Reference Q.931 SHOW Q931 TRACE [memsize [framesize]] Valid context: General Start a Q931 trace, or display one that is already running. memsize: The amount of RAM reserved to store the trace on the DIVA LAN ISDN Modem. Range: 1 to 63 KB . Default: 4 KB framesize: The number of characters to display in each frame. STOP Q931 TRACE Valid context: General Stops a running Q931 trace. Q.
Appendix C: Command Line Reference RIP 199 RIP ENABLE RIP [V1 | V2 | V2COMPATIBLE | MERGE] Valid context: Profile Enables or disables support for RIP (routing information protocol). When enabled, the DIVA LAN ISDN Modem will exchange routing information with other devices. V1: Supports RIP version 1. V2: Supports RIP version 2. V2COMPATIBLE: Supports RIP version 2 that is version 1 compatible (implies broadcasting RIP-2). MERGE: Merge equivalent routes.
Appendix C: Command Line Reference RIP DELETE RIP REJECT ipaddr Valid context: General SHOW RIP REJECT Valid context: General Displays the RIP reject table. RIP ignores all routing information received from peers with IP address that appears in this table.
Appendix C: Command Line Reference SNMP 201 SNMP SET SNMP NAME name Valid context: General Lets you assign a name to the DIVA LAN ISDN Modem. This information can be retrieved by SNMP agents. Range: 1 to 39 alphanumeric characters. SET SNMP DESCRIPTION name Valid context: General Lets you associate a description with the DIVA LAN ISDN Modem. This information can be retrieved by SNMP agents.
Appendix C: Command Line Reference TCP SHOW TCP STATISTICS Valid context: General Displays TCP statistics. SHOW TCP TRACE [memsize [framesize]] Valid context: General Starts or displays a TCP trace. memsize: The amount of RAM reserved to store the trace on the DIVA LAN ISDN Modem. Range: 1 to 63 KB . Default: 16 KB framesize: Number of characters to show for each frame. STOP TCP TRACE Valid context: General Stops an active TCP trace.
Appendix C: Command Line Reference TFTP 203 TFTP ENABLE TFTP SERVER DISABLE TFTP SERVER Valid context: General Enables or disables the TFTP (Trivial File Transfer Protocol). When enabled the DIVA LAN ISDN Modem acts as a TFTP server, and can respond to upload or download requests from TFTP clients. TFTP server is disabled by default.
Appendix C: Command Line Reference Time Protocol 204 Time Protocol SET TIMEPROTOCOL SERVER timeServer Valid context: General Use this command to automatically update the DIVA LAN ISDN Modem internal clock using a time server. timeServer: IP address of the time server. SET TIMEPROTOCOL ZONE timeZoneDiff Valid context: General Specifies the difference between your time zone and Greenwich mean time (GMT) in hours. Range: -12 to 12.
Appendix C: Command Line Reference UDP 205 UDP SHOW UDP STATISTICS Valid context: General Displays UDP statistics. SHOW UDP TRACE [memsize [framesize]] Valid context: General Starts or displays an UDP trace. memsize: The amount of RAM reserved to store the trace on the DIVA LAN ISDN Modem. Range: 1 to 63 KB. Default: 16 KB framesize: Number of characters to show for each frame. STOP UDP TRACE Valid context: General Stops an active UDP trace.
Appendix C: Command Line Reference V.120 206 V.120 ENABLE V120 DISABLE V120 Valid context: Profile/PPP Enables or disables the V.120 protocol for the current profile. SET V120 MODE {MULTIFRAME | UNACKNOWLEDGED} Valid context: General V.120 was designed to allow non-ISDN devices to communicate with the ISDN network. The DIVA LAN ISDN Modem provides support for V.120, so you can connect with such legacy systems.
Appendix C: Command Line Reference V.120 207 SET V120 IDLETIME IdleDelay Valid context: General Defines the maximum amount of time the line can remain idle without the exchange of data, before the DIVA LAN ISDN Modem disconnects the link. This enables you to reduce your communications charges by dropping the link when no data is being transferred. Range: 0 (never disconnect, 1 to 10000 minutes. Default: 1440 minutes (24 hours). SHOW V120 CONFIGURATION Valid context: General Displays V.
Appendix C: Command Line Reference V.120 Scripting V.120 Scripting ADD SCRIPT LINE index command [argument] Valid context: Profile/PPP Adds a line to the V.120 script for the current profile. The script is executed when the DIVA LAN ISDN Modem establishes a V.120 connection. \"command\" are: ABORT: End the script. SEND text: Send the specified text to the remote. Enter up to 33 alphanumeric characters. WAITFOR text: Pause script execution until the specified text is sent by the remote system.
Appendix C: Command Line Reference X.25 209 X.25 SET X25 ADDRESS localX25addr Valid context: Profile Sets the X.25 DTE address assigned to the DIVA LAN ISDN Modem. Specify up to 15 digits. localX25addr: DTE address of the device. SET X25 CUD callUserData Valid context: Profile Specifies the call user data the device will include when establishing an X.25 call. callUserData: Call user data as hexidecimal digits separated by commas, colons, or hyphens. Maximum length is 16 bytes.
Appendix C: Command Line Reference X.25 210 SET X25 PACKETSIZE default maximum Valid context: General Sets the default and maximum X.25 packet sizes supported for X.25 communications over the D-channel. default: Default packet size. Range: 64 to 1024 bytes. Default: 128 bytes. maximum: Maximum packet size. Range: Default packet size - 1024 bytes. Default: 256 bytes. SET X25 REMOTE x25addr Valid context: Profile Only required if this profile uses AO/DI. Specifies the remote X.
Appendix D Regulatory Information This appendix provides regulatory information.
Appendix D: Regulatory Information 212 Regulatory Information for the U.S.A WARNING. Changes or modifications to this unit not expressly approved by Eicon Technology Corporation could void the user's authority to operate the equipment. FCC Declaration of Conformity We: Eicon Technology Inc.
Appendix D: Regulatory Information 213 Regulatory Information for Canada NOTICE: The Industry Canada label identifies certified equipment. This certification means that the equipment meets certain telecommunications network protective, operational and safety requirements. Industry Canada does not guarantee the equipment will operate to the user’s satisfaction.