
Installation guide

Troubleshooting 120
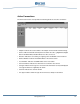
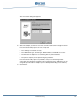
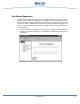
2. To configure output options for your trace files, click ‘Tracing > Configuration’ or click
the configuration button in the toolbar. The following dialog box appears:
3. Click the ‘Output’ tab.
4. In ‘Directory’, enter the path where the trace files are to be saved.
5. To use the default file names, enable the ‘Use default file names’ option. Otherwise,
enter the desired file name in ‘File name’.
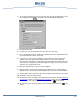
6. To generate a cyclic trace file, enable the ‘Cycle output files’ option. Specify the
number of files to be generated in ‘Maximum Files’. A cyclic trace writes trace
messages into several files, overwriting the oldest information when the last file is full.
Thus, you have a large buffer for trace messages that allows you to monitor events
and errors over long periods of time.
7. Enter the maximum size for your trace files in KBytes.
8. Specify whether existing traces should be overwritten when you restart the Diva
Diagnostics tool. If you leave this option disabled, the trace file is continued endlessly.
9. Click the ‘Editor’ tab to specify the editor that should be used to view the trace output.
10. Click ‘OK’ to save the output settings.
11. Set the trace masks according to the support personnel’s advice. See also Individual
trace options on page 121 and Predefined trace masks on page 121. Start the tracing.
Click ‘Tracing > Start Tracing’ or click the start trace button in the toolbar.
12. To stop tracing, click ‘Tracing > Stop Tracing’ or click the stop trace button in the
toolbar.