
International Media Card Imager Kit Installation and Operation Manual


English
11
IMAGE PLAYBACK (OPERATING PROJECTOR)
Attach Imager Box to your projector properly (P5), and turn the projector on. Refer to Owner’s Manual
of your projector for operation.
1
2
Load a memory card into CF Card Slot of Imager Box. (P6)
NOTE ; Refer to Owner’s Manual of your projector for location of each button and basic operation.
3
Projector automatically turns to MCI mode and shows the image data in a memory card.
PLAYING BACK IMAGE IN THE MEMORY CARD
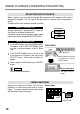
MENU BAR
Used to select
input source
either Computer
(MCI) or Video.
(Refer to P12)
INPUT MENU
Used to select image
level among Standard,
Real and Image 1 ~ 4.
(Refer to P15)
IMAGE SELECT MENU
Used to adjust size
of image to Normal
or True, or expand /
compress image
(Digital zoom +/–).
(Refer to P17)
SCREEN MENU
Used to change settings
of projector or reset Lamp
Reset Counter.
(Refer to Owner’s Manual
of your projector.)
SETTING MENU
Used to display
image data in a
memory card.
(Refer to P13, 14)
VIEW MENU
Used to adjust picture image.
[Contrast / Brightness / White
balance (Red/Green/Blue) /
Gamma]
(Refer to P16)
IMAGE ADJUST MENU
Used to adjust volume
or mute sound. (Refer
to Owner’s Manual of
your projector.)
SOUND MENU
Press MENU button while in MCI mode.
Shows selected
item of ON-
SCREEN Menu.
GUIDE WINDOW