
Owner`s manual


39
Computer Input
Store
This projector has the picture screen resize function, which
enables you to customize the image size.
Screen Menu
Note:
• The Screen Menu, except for Normal and Custom, can not be operated when 720p, 1035i or 1080i is
selected in the PC System Menu (p.33).
• This projector can not display any resolution higher than 1920 x 1200. If your computer’s screen resolution is
higher than it, reset the resolution to the lower before connecting to the projector.
• The image data in other than 1024 x 768 is modified to fit the screen size in initial mode.
• True, Full and Digital zoom +/– can not be selected when 480i, 575i, 480p or 575p is selected in the PC
System Menu (p.33).
1
2
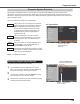
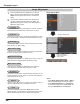
To store the adjusted data, select Store and press the Point
► or the SELECT button. Use the Point ▲▼ buttons to
select one from Image 1 to 4 and press the SELECT button.
A confirmation box appears and then select Yes. Stored
data can be called up by selecting an Image (1–4) in the
Image Mode Selection on page 37.
A confirmation box appears and
then select Yes.
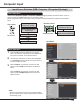
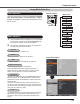
Press the MENU button to display the On-Screen
Menu. Use the Point ▲▼ buttons to select Screen and
then press the Point ► or the SELECT button.
Use the Point ▲▼ buttons select the desired item and
then press the SELECT button .
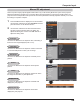
Screen Size Adjustment
Provide the image to fit the screen size.
Normal
True
Provide the image in its original size. When the original
image size is larger than the screen size (1024 x 768), the
projector enters to the panning mode automatically. Use the
Point ▲▼◄►buttons to pan the image. When adjusted, the
arrows will turn red. When reached to the correction limits,
the arrows will disappear.
Full
Provide the full screen image.
Wide
Provide the image to fit the wide video aspect ratio (16:9) by
expanding the image width uniformly. This function can be
used for providing a squeezed video signal at 16:9.