
Owner`s manual


37
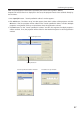
5. After completing all the settings, select “Set” and press SELECT button. Now, all procedures have
been done. To cancel the adjusted settings, select the "Cancel" and press SELECT button.
If you want to set the security, select "Next" and press SELECT button to proceed to the security
setting window and refer to the following pages in detail.
For configuring of WEP, WPA-PSK, WPA2-PSK security, select “Next”. Refer to “Configuring security
with the projector” on next page for details.
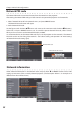
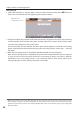
Item Description
DHCP .......................... Sets DHCP function On or Off. When you setup the network setting manually, select "Off". When
its set On, IP address, Subnet, Gateway and DNS are automatically set according to your network
environment *
1
.
IP address .................Sets IP address of the projector
Subnet .......................Sets Subnet mask. Normally sets 255.255.255.0
Gateway*
2
.................Sets IP address of the default gateway (Router)
DNS*
3
.......................... Sets IP address of the DNS server. Must be set when the E-mail function is used.
Network type .......... Sets Infrastructure or AdHoc mode. When the "AdHoc" is selected, the security "WPA-PSK" and
"WPA2-PSK" are not available.
SSID/ESSID
...................Identifier of the wireless access point.
*1 Set "On" only when the DHCP server is available on your network environment.
*2 Set [255.255.255.255] if the network does not provide the gateway (router).
*3 Set [255.255.255.255] if you do not use the function E-mail alert.
* While the network communication function (p.98) or moderator function (p.107) is to be executing, the menus
"Network capture", "Network viewer" and "Memory viewer" are displayed in gray.
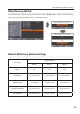
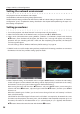
Setting the network environment
Network setting
DHCP: On DHCP: Off
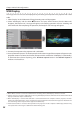
You can confirm that the projector settings from “Network Information” in the projector menu (p.44)
To confirm whether the settings are correct, follow the procedures in “4. Wired LAN configurations”
➔ “Confirming the Operation” (p.30).