
Operation Manual
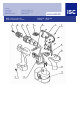

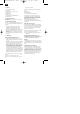

1. Layout:
1: Torque adjustment facility
2: Bit holder
3: Forward / Reverse selector switch
4: On/Off switch
5: Battery pack
6: Battery charger
7: Selector switch for drill/hammerdrill
8: Pushlock button
2. Safety information
Please refer to the booklet included for the safety
instructions.
3. Important information
Be sure to read the following information before you
use your cordless Hammer Drill/Screwdriver for the
first time:
1. Charge the battery pack with the charger
supplied. An empty battery pack requires a
charging period of approximately 1 hour.
2. Only ever use sharp drill bits and screwdriver bits
which are suitable for the purpose and in good
condition.
3. Always check for concealed electric cables and
gas and water pipes before drilling and screwing
into walls.
4. Starting up
Charging the NC battery pack
1. Take the rechargeable battery pack out of the
handle, pressing the pushlock buttons at the side
to do so.
2. Check that your mains voltage is the same as that
marked on the rating plate of the battery charger.
Plug the battery charger in the Power socket.
3. Insert the battery pack in the battery charger. The
green LED will come on. Press the SET button to
charge the battery pack. The red LED will come
on to indicate that the battery pack is being
charged. The green LED will come on to indicate
that charging has been completed. Empty battery
packs will require approx. 1 hour for charging. The
temperature of the battery pack may rise slightly
during the charging operation. This is normal.
If the battery pack fails to become charged, please
check
앬 There is voltage at the socket-outlet
앬 There is good connection with both contacts on
the charger and battery
If the battery still fails to become charged, please
return
앬 the charger
앬 the battery pack
to our Customer Service Department.
Timely recharging of the Ni-Cd battery pack is
recommended in the interest of long battery life.
Recharging is always necessary when you notice
that the power of the battery-powered Hammer
Drill/Screwdriver is decreasing.
Never allow the battery pack to discharge
completely. This will result in damage to the Ni-Cd
battery pack!
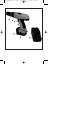
Adjusting the torque (1)
The battery-powered drill/screwdriver is equipped
with a 17-step mechanical torque adjustment facility.
The torque for a specific size of screw is selected
with the set-collar (Figure 1). The correct torque
depends on several factors:
앬 on the type and hardness of material in question
앬 on the type and length screws used
앬 on the requirements needing to be met by the
screwed joint.
The clutch disengages with a grating sound to
indicate when the set torque is used.
Important! The tool must be at a standstill when
you set the torque with the setting ring.
Drilling
For drilling purposes, move the set-collar to the last
step „Drill“ (Figure 1). In this setting the slip clutch is
inactive. The maximum torque is available in drilling
mode.
Forward/Reverse switch (3)
With the slide switch above the On/Off switch you
can select the direction of rotation of the battery-
powered drill/screwdriver and secure it against being
switched on accidentally. You can choose between
forward and reverse rotation. To avoid causing
damage to the gearing it is advisable to change the
direction of rotation only when the tool is at a
standstill. The On/Off switch is blocked when the
slide switch is in centre position.
4
GB
Anleitung BAS 18 S SPK 1 21.12.2005 7:50 Uhr Seite 4