
User Manual

2
37-902755-01
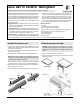
Quick start for InterWrite MeetingBoard
Mount the tablet (choose one method: wall or floor...)
CAUTION: To avoid damage to the controller, do not rest the
MeetingBoard tablet on the controller housing (located on the rear of the
tablet near one corner). Do not scratch or damage the tablets writing
surface.
WARNING: Never nail or drill the MeetingBoard tablet. Doing so will
damage the unit and void your warranty.
IMPORTANT: To avoid damage to the tablet or injury, two people should
carry out this mounting procedure.
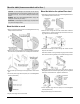
Mount the tablet on a wall
1. Attach one mounting bracket to the back of the MeetingBoard tablet using
4 Phillips screws as shown below.
2. Attach the other mounting bracket to the wall using hardware appropriate
for the wall structure (this hardware is not included) as shown below left.
3. Hang the tablet by interlocking the mounting brackets as shown above
right.
4. Connect the power supply cable to the power port on the MeetingBoard
controller (shown above).
5. Plug the power supply into an electrical outlet.
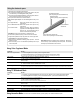
Mount the tablet on the optional floor stand
1. Attach each mounting bracket to the back of the MeetingBoard tablet us-
ing three Phillips screws as shown below.
2. Attach one foot to one leg with four screws as shown below. Attach two
casters to each foot. Insert three end caps (two on the foot and one on the
leg). Repeat for the other foot and leg.
3. IMPORTANT: In this step, the sides of the legs with 10 holes must face
away from the crossbars.
Attach both crossbars to one leg assembly using eight screws as shown
below. Attach the other leg assembly to the crossbars with eight screws.
4.Thread two thumbscrews into each leg as shown below. Hang the
MeetingBoard tablet at the desired height by sliding the mounting bracket
slots over the loose thumbscrews. Tighten the thumbscrews.
5. Connect the power supply cable to the power port on the MeetingBoard
controller (shown at left).
6. Plug the power supply into an electrical outlet.