
User Manual

4
37-902755-01
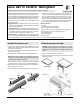
Quick start for InterWrite MeetingBoard
Using the electronic pens
Using PC Whiteboard Mode
To do this... Do this...
Start 1. If necessary, turn the MeetingBoard ON, and turn the PC ON. Wait for the PC to display the Windows desktop.
2. On the MeetingBoard control panel, press the PC Whiteboard button. (This activates InterWrite on the PC.)
Note: You can also launch InterWrite through the Start > Programs menu.
Write or draw 1. Remove the cap from a pen, exposing the dry-erase marker tip.
2. Write or draw on the MeetingBoard tablet.
Note: Your marks appear on the PCs screen, within the InterWrite application window.
Erase... both marker ink and corresponding parts of the electronic image: Use the large eraser, or use the small eraser on the
back of the pen.
Erase... electronic image only: On the MeetingBoard control panel, press the Clear button twice. This will not erase the marker
ink. Erase the marker ink with a standard eraser or cloth.
Print an image On the MeetingBoard control panel, press Print, or on the PC, in InterWrite, File > Print.
Save an image On the MeetingBoard control panel, press Save, or on the PC, in InterWrite, File > Save As.
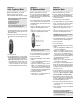
The electronic pens provide multiple functions:
n
By incorporating standard Expo or Pilot dry-erase markers, the pens
can mark directly on the MeetingBoard writing surface.
n
The pens work with InterWrite software to control programs, edit docu-
ments and annotate screens using electronic ink.
n
The pens have buttons that act as mouse buttons.
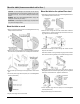
How you use a pen depends on which MeetingBoard mode you are
using:
n
In Copyboard mode Remove the cap and use the pen as a dry-
erase marker.
n
In PC Whiteboard mode Remove the cap and use the pen as a dry-
erase marker.
n
In Interactive mode Keep the cap in place. Marks you make are
projected onto the MeetingBoard surface as
electronic ink. Use the pen buttons as you
would use mouse buttons (see below).
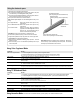
Pen buttons function as mouse buttons in Interactive mode:
n
Lower button (nearest the pen tip): same as a mouses left button.
n
Upper button (farthest from pen tip): same as a mouses right button.
The pen LED lights in the following situations:
n
When the pen is assembled, indicating proper operation. The LED
flashes four times.
n
When the battery is low. The LED flashes periodically until the pen
enters sleep mode.
Using Color Copyboard Mode
To do this... Do this...
Start Color Copyboard Mode 1. On the MeetingBoard control panel, press the Copyboard button.
2. Press the Clear button twice. (This removes previous electronic images from the buffer.)
Tip: Its always good to clear the buffer before starting to use the MeetingBoard. This assures that you are starting with a blank page.
Write or draw 1. Remove the cap from a pen, exposing the dry-erase marker tip.
2. Write or draw on the MeetingBoard tablet.
Erase... both marker ink and corresponding parts of the electronic image: Use the large eraser, or use the small eraser on the
back of the pen.
Erase... electronic image only: On the MeetingBoard control panel, press the Clear button twice. This will not erase the marker
ink. Erase the marker ink with a standard eraser or cloth.
Print an image On the MeetingBoard control panel, press the Print button.
The image will print on the attached printer. You can continue writing/drawing on the MeetingBoard while the image is being printed. The print buffer can store up to three pages.
Sleep mode assures pens operate over the longest time. After 20 sec-
onds of inactivity, a pen automatically enters sleep mode. This enables
its battery to provide several months of service.
Using Interactive Mode See Quick start for InterWrite Software (a printed guide) or the InterWrite Software help file.
Left-double-click button
(same as pressing mouses left button twice)
Right-click button
(same as pressing mouses right button)
Erase annotations
with this end
Tip
(write or draw using electronic ink,
or click: same as pressing mouses left button)