
User`s manual


28
Chapter2AdjustingScreens
2-5. Specifying Color Space
The color space of the input signal can be specied. Set to other than “Auto” if this product cannot display correct
color.
Settings Function
Auto Identiesthecolorspaceoftheinputsignalautomatically.
YUV4:2:2 ConvertsthecolorspaceoftheinputsignaltoaYUV4:2:2format.
YUV4:4:4 ConvertsthecolorspaceoftheinputsignaltoaYUV4:4:4format.
RGB ConvertsthecolorspaceoftheinputsignaltoanRGBformat.
Procedure
1. Choose “Screen” from the Adjustment menu, and press
.
2. Choose “Color Space” from “Screen”, and press
.
3. Select “Auto”, “YUV 4:2:2”, “YUV 4:4:4”, or “RGB” with
or .
4. Press
to exit.
Attention
• The setting is required when a DVI device is connected to the monitor (at the HDMI connector port) using the DVI-
HDMI conversion connector.
• Even if “Auto” is set, correct color might not be displayed.
Note
• The color space at the DVI input is converted to an RGB format.
• See ”2-6. Expanding Signal Output Range” (page 28) to set the range of input signals.
2-6. Expanding Signal Output Range
●
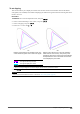
To extend the output range
Theoutputrangeofthesignalisextendedto0-255fordisplay.
When images are displayed in black and white
within the restricted range for purposes such as image creation, use this setting to improve the contrast of the
images.
Settings Function
On Theoutputrangeofthesignalisextendedto0-255fordisplay.
Off Thesignaloutputrangeisnotextended.
Auto Themonitorautomaticallyrecognizesthebrightnessrangeofinputsignalsanddisplays
imagesappropriately(recommended).
Procedure
1. Choose “Screen” from the Adjustment menu, and press
.
2. Choose “Range Extension” from “Screen”, and press
.
3. Choose “Range Extension” from “Range Extension”, and press
.
4. Select “On”, “Off”, or “Auto” with
or .
Attention
• When the DVI signal is input, “Auto” cannot be selected.
5. Press to exit.