Power Management Software Important Please read this User’s Manual carefully to familiarize yourself with safe and effective usage. • The latest User’s Manual is available for download from our site: http://www.eizo.
About this Manual About this Manual This manual describes the features, installation and use of the EIZO EcoView NET LCD monitor power management software. Copyright © 2009-2013 EIZO Corporation All rights reserved. No part of this manual may be reproduced, stored in a retrieval system, or transmitted, in any form or by any means, electric, mechanical, or otherwise, without the prior written permission of EIZO Corporation.
Table of Contents Table of Contents Cover . ............................................................ 1 3-4. Registering a Power Schedule...................... 25 Creating a Schedule............................................. 26 About this Manual.................................................. 2 Editing a Schedule............................................... 27 Deleting a Schedule............................................. 27 Table of Contents................................................
1. Introduction 1. Introduction EIZO EcoView NET is a software that enables you to centrally operate and manage the power and screen brightness of monitors connected to client computers on the network (“client monitors”) from a single server computer. 1-1. Features • Monitor Remote Management*1 --Centrally operates and manages the power, Auto EcoView features, brightness and Locking Buttons of up to 8,000 monitors. --Available to register the monitor installing location and its ID number respectively.
1. Introduction 1-2. System Configuration EIZO EcoView NET consists of two software: [EIZO EcoView NET Server] and [EIZO EcoView NET Client]. The system configuration is as follows. Server Computer (EIZO EcoView NET Server) Network Client Monitor Client Monitor Client Monitor Client Computers (EIZO EcoView NET Client) Server Computer The [EIZO EcoView NET Server] software is installed. Manages and operates the client monitors. Client Computer The [EIZO EcoView NET Client] software is installed.
1. Introduction 1-3. System Requirements Below are the system requirements for using EIZO EcoView NET. Server Computer • Operating System (OS): --Microsoft Windows 8 (32 bit and 64 bit) --Microsoft Windows 7 (32 bit and 64 bit) --Microsoft Windows Vista (32 bit) --Microsoft Windows XP Service Pack 3 (32 bit) --Microsoft Windows Server 2008 R2 --Microsoft Windows Server 2008 (32 bit) --Microsoft Windows Server 2003 (32 bit) • Software: --Windows 8: Microsoft .NET Framework 3.
1. Introduction Client Computer • Operating System (OS): --Microsoft Windows 8 (32 bit and 64 bit) --Microsoft Windows 7 (32 bit and 64 bit) --Microsoft Windows Vista (32 bit) • Software: --Windows 8: Microsoft .NET Framework 3.5 --Other operating systems: Microsoft .NET Framework 2.0 • Supported Monitors (Client Monitors): --DDC/CI extended command-compatible EIZO FlexScan LCD monitors Note • To use the software on Windows 8, install the Microsoft .NET Framework 3.5 beforehand.
2. Setting Up EIZO EcoView NET 2. Setting Up EIZO EcoView NET The EIZO EcoView NET setup sequence is described below. “2-1. Setting Up the Server Computer” (page 9) • Installing EIZO EcoView NET Server • Configuring Network “2-2. Setting Up the Client Computer” (page 12) • Installing EIZO EcoView NET Client • Configuring Network “2-3.
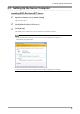
2. Setting Up EIZO EcoView NET 2-1. Setting Up the Server Computer Installing EIZO EcoView NET Server 111 Open the Launcher.exe by double-clicking The start menu opens. 222 Click [EIZO EcoView NET Server] 333 Click [Install] The installer starts. Follow the on-screen instructions to install the software. Tips • If your OS is Windows Vista, the “User Account Control” dialog box may appear.* Click [Allow] to open the menu.
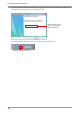
2. Setting Up EIZO EcoView NET After the installation completes, the following screen appears. Click the “Launch EIZO EcoView NET Server” checkbox when performing the network setting continuously. Click the checkbox when performing the network setting continuously When EIZO EcoView NET Server starts, the icon appears in the notification area.
2. Setting Up EIZO EcoView NET Configuring Network 111 Open the EIZO EcoView NET Server main window If the EIZO EcoView NET Server is not started yet, select [Start] - [(All) Programs] - [EIZO] - [EIZO EcoView NET Server] - [EIZO EcoView NET Server] to start it. Then double click the EIZO EcoView NET Server icon in the notification area, or select “Open EIZO EcoView NET Server” by right-clicking the icon.
2. Setting Up EIZO EcoView NET 2-2. Setting Up the Client Computer Set up EIZO EcoView NET Client on all computers to which monitors to be managed are connected. Installing EIZO EcoView NET Client 111 Open the Launcher.exe by double-clicking 222 Click [EIZO EcoView NET Client] 333 Click [Install] The start menu opens. The installer starts. Follow the on-screen instructions to install the software. Tips • The “User Account Control” dialog box may appear.* Click [Allow] to open the menu.
2. Setting Up EIZO EcoView NET Configuring Network 111 Start EIZO EcoView NET Client Select [Start] - [(All) Programs] - [EIZO] - [EIZO EcoView NET Client] - [EIZO EcoView NET Client].
2. Setting Up EIZO EcoView NET 2-3. Refreshing Monitor Information Refresh the client monitor information displayed on the server computer (in EIZO EcoView NET Server). 111 Open the EIZO EcoView NET Server main window Proceed the step 2 if the main window is displayed. If not, double click EIZO EcoView NET Server icon in the notification area, or select “Open EIZO EcoView NET Server” by right-clicking the icon.
2.
2. Setting Up EIZO EcoView NET Uninstalling EIZO EcoView NET Client Windows 8 111 Log on to the user account that has the “Administrators” privilege 222 Right-click the mouse on the “Start” screen at a position where there are no tiles App commands appear at the bottom of the screen.
3. EIZO EcoView NET Server 3. EIZO EcoView NET Server EIZO EcoView NET Server is a system-resident software to operate and control all client monitors with nonpiped mode operation from the server computer. 3-1. Startup and Exit Startup The software starts automatically after the system startup. When opening the main window, double click EIZO EcoView NET Server icon in the notification area, or select “Open EIZO EcoView NET Server” by right-clicking the icon.
3. EIZO EcoView NET Server 3-2. Checking Monitor Information When you start the software, the EIZO EcoView NET Server main window appears, and a list of client monitor information appears in the “Monitor List” view. The Monitor List view Numbers of computers and monitors displayed in “Monitor List” view Tips • The display may take a few minutes, depending on the number of connected client computers.
3. EIZO EcoView NET Server Customizing the Monitor List The items for display in the “Monitor List” can be selected. Note • The columns “No.”, “Computer”, “Manufacturer”, “Monitor”, “Serial No.”, and “Last Operation” cannot be hidden from the list.
3. EIZO EcoView NET Server Monitor Information Item Detail Domain/Workgroup The domain/workgroup to which the client computer belongs Location The location where the client monitor is installed (This can be set to a user-determined value.) Computer The PC name of the client computer Monitor The product name of the client monitor Serial No. The serial number of the client monitor Manufacturer The name of the manufacturer of the client monitor Asset Tag No.
3. EIZO EcoView NET Server Refreshing Information To refresh the information in the “Monitor List” view, from the menu bar, select [View] - [Refresh]. Tips • This action may take a few minutes, depending on the number of client computers that are connected. Searching Monitors Search all monitors in the “Monitor List” meeting your specified condition. Executing Search Operation Enter one or more search conditions in the “Search” box, then click [Search].
3. EIZO EcoView NET Server Deleting a Monitor from the List Delete a monitor not to be managed from the list. 111 Uninstall EIZO EcoView NET Client from the client computer to which the monitor you wish to delete is connected Alternatively, disconnect the monitor for deletion from the client computer See “2-4. Uninstallation” (page 14) for details about uninstallation.
3. EIZO EcoView NET Server 3-3. Operating Monitors Turn the client monitors on and off, configure the Auto EcoView feature, adjust the brightness and Locking Buttons. Note • Operations are applied to all the client monitors connected to the same computer as the selected monitor. • If the client computer is installed with Windows 8 or Windows 7, the monitor cannot be turned on or off while the log on screen is displayed.
3. EIZO EcoView NET Server 333 Select the operation to execute or the setting to configure, and click [Execute] or [Set] Monitor Power Settings dialog box Auto EcoView Settings dialog box Brightness Settings dialog box Locking Buttons Settings dialog box The results of the operation you selected in step 1 are reflected in the monitor.
3. EIZO EcoView NET Server 3-4. Registering a Power Schedule Create a schedule to turn the power of client monitors on or off. Note • The schedule is registered not only with the selected monitor, but also with the other client monitors connected to the same PC. • If you register a schedule with multiple monitors selected, any existing schedules will be overwritten. • When you register a schedule, any schedules set individually for the client computer are overwritten.
3. EIZO EcoView NET Server 333 After the “Register Schedule” dialog box appears, create, edit, or delete a schedule Schedule List Day The day of the week to turn the power on or off Time The time to turn the power on or off Monitor The action to perform on the Power power Run only Set this to “On” if you only wish to once run the scheduled action once. 444 New Create a new schedule (see “Creating a Schedule” (page 26)). Edit Edit the selected schedule (see “Editing a Schedule” (page 27)).
3. EIZO EcoView NET Server Editing a Schedule 111 Click the row of the schedule to edit The selected row is highlighted. 222 Click [Edit] 333 After the “Edit Schedule” dialog box appears, edit the schedule’s settings 444 Click [OK] The edited schedule appears in the Schedule List. Deleting a Schedule 111 Click the row of the schedule to delete The selected row is highlighted.
3. EIZO EcoView NET Server 3-5. Registering Monitor Management Information Register the location and asset tag number of a client monitor. Note • If multiple monitors are selected, all existing management information will be overwritten. 111 Select the target client monitor from the “Monitor List” view Select the checkbox in the “No.” column of the list view. Tips • Click “Select All” to select all the checkboxes at once. 222 • Click “Release All” to clear all the checkboxes at once.
3. EIZO EcoView NET Server 3-6. Displaying the Amount of Power Reduction The amount of power reduction (%) for the client monitor is displayed. Note • The amount of power reduction is displayed only when DDC/CI extended command-compatible monitors are used. • The amount of power reduction (%) is displayed as a reference. 111 Select the target client monitor from the “Monitor List” view Select the checkbox in the “No.” column of the list view.
3. EIZO EcoView NET Server 333 Set the average daily working hours The default setting is 10 hours. Click [Apply] to complete the setting. 444 Set the period for checking 555 Click [Show] The amount of power reduction for the monitor in the list view is displayed. To output to a CSV file, click [Save file...]. Tips • Click on a column heading in the list to sort the monitor information on that column.
3. EIZO EcoView NET Server 3-7. Operating Client Computers Turn the power of client computers on and off. Note • This software can only be used when the server computer and client computers are in the same domain environment. 111 Select the target client computer from the “Monitor List” view Select the checkbox in the “No.” column of the list view. Tips • Click “Select All” to select all the checkboxes at once. • Click “Release All” to clear all the checkboxes at once.
4. EIZO EcoView NET Client 4. EIZO EcoView NET Client EIZO EcoView NET Client is a software for communicating with a server computer in order to control the client monitor. You can use it to configure monitor power and register schedules for the individual client computer. 4-1. Startup and Exit Startup Windows 8 Click the tile displayed as “EIZO EcoView NET Client” in the “Start” Screen. After the screen is switched to the desktop, the software starts up.
4. EIZO EcoView NET Client 4-3. Registering a Power Schedule Note • When a schedule is registered from the server computer (EIZO EcoView NET Server), all the schedules registered from the client computer will be deleted. 111 Click [Schedule Registration] 222 After the “Register Schedule” dialog box appears, create, edit, or delete a schedule Schedule List Registrant The person registering the schedule • Server ... Schedule registered from the server computer • Client Day Time Monitor Power ...
4.
4. EIZO EcoView NET Client Editing a Schedule 111 Click the row of the schedule to edit The selected row is highlighted. 222 Click [Edit] 333 After the “Edit Schedule” dialog box appears, edit the schedule’s settings 444 Click [OK] Deleting a Schedule 111 Click the row of the schedule to delete The selected row is highlighted.
5. Troubleshooting 5. Troubleshooting EIZO EcoView NET Server Problem • The software cannot be installed • • • • • • • Remedy/Check point • Confirm that your computer satisfies the operating requirements (see page 6). The client monitor is not displayed in the “Monitor • Check that all cables, such as network cables, are properly List” view connected. The client monitor cannot be operated • Check that the network settings for the server and client computers are correct.
5. Troubleshooting EIZO Ecoview NET Client Problem • The software cannot be installed Remedy/Check point • Confirm that your computer satisfies the operating requirements (see page 7). • The power-on setting does not operate / the power • Try rebooting the computer with the client monitor switched on. schedule does not operate • When using a non-Windows standard firewall, confirm the setting.
http://www.eizo.com 6th Edition-May, 2013 03V22538F1 (U.