English User’s Manual FlexScan F730 â Color Display Monitor
CONTENTS PRECAUTIONS ................................................................3 INTRODUCTION ...............................................................7 About This Manual ................................................................ 7 Controls & Connectors ......................................................... 7 Package Contents ................................................................ 7 1 INSTALLATION ............................................................
PRECAUTIONS IMPORTANT! * This product has been adjusted specifically for use in the region to which it was originally shipped. The performance of the product, (i.e. picture geometry, picture positioning and color convergence and purity in the case of color monitors) is optimally adjusted to the earth's magnetic field of the specific destination. If operated outside the region to which it was originally shipped, the product may not perform as stated in the specifications.
WARNING • If the monitor begins to emit smoke, smells like something is burning, or makes strange noises, disconnect all power connections immediately and contact your dealer for advice. Attempting to use a malfunctioning monitor can be dangerous. • Do not dismantle the cabinet or modify the monitor. Dismantling the cabinet or modifying the monitor may result in electric shock or burn. • Keep small objects away from the monitor.
• Do not overload your power circuit, as this may result in fire or electric shock. • For proper connections of the power cord, be certain to plug the power cord to the provided monitor connector and directly to a wall outlet. By not doing so may result in fire or electric shock. • Handle the power cord with care. * Do not place the cord underneath the monitor or other heavy objects. * Do not pull on the cord. * Do not attempt to repair a damaged cord. If the power cord becomes damaged, stop using it.
• Do not remove the tilt-swivel stand. The stand is required to maintain clearance for the ventilation slots on the bottom of the cabinet. Removing the stand will block these slots and may result in fire or electric shock. • Do not touch the plug with wet hands. Touching the plug with wet hands is dangerous and can cause electrical shock.
INTRODUCTION About This Manual This manual explains the precautions, specifications, and operation of your EIZO monitor. Please read through this manual as it will help you to get the most out of your monitor. Controls & Connectors: Front QuickSet™ Control Pad (hereinafter “Control Pad”) AUTO-SIZING Button Automatically centers the displayed image, bringing the image borders into alignment with the monitor frame. See page 9.
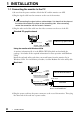
1 INSTALLATION 1-1. Connecting the monitor to the PC 1) Be sure that the power switches of both the PC and the monitor are OFF. 2) Plug the signal cable into the connector at the rear of the monitor. • When connecting the signal cable or cable adapter, first check that the shape at the cable side matches the shape at the connecting side. After connecting, secure the connection with the screw-in fasteners. 3) Plug the other end of the cable into the video connector on the rear of the PC.
WARNING • Use the enclosed power cord. If using the power cord other than the enclosed one, use the following cord. In USA and Canada, use a UL LISTED/CSA LABELED or CERTIFIED power cord set meeting the following specifications: * Rating: min. 125 V, 10 A * Length:max. 2.0 m * Type: SVT * Plug type: NEMA 5-15P, Parallel blade, Grounding type, 125 V, 10 A In Europe, use a proper European standard approved power cord meeting the following specifications: * Rating: min. 250 V, 10 A * Length:max. 2.
1-3. Setting the resolution The following look-up table shows the maximum (Non-interlaced) vertical refresh rates for this model with regard to standard resolutions set forth by VESA. The best way to see if the monitor will work with a given resolution and rate, is to compare the vertical refresh rate of the graphics board to the monitor’s range (Refer to the graphics board manual for specifications). If the refresh rate is within the specified range of the monitor, it should operate properly.
2 SCREEN ADJUSTMENT 2-1. How to use the ScreenManager E Entering the ScreenManager Press the ENTER key to display the ScreenManager Main menu. Enter Key Arrow Key Control Pad Main menu Making the Adjustments and Settings 1) Select the desired icon using the Arrow keys, and then press the ENTER key to display the each adjustment/setting menu. 2) Use the Control pad to make the required adjustments and settings. Save & Exit 1) To save settings and return to the Main menu, press the ENTER key.
Function Position Adjusts: Screen Position Side-Pin Balance/ Side-Pincushion Adjusts: Side-pin Balance/Side-pincushion Parallelogram/ Trapezoidal · Tilts: Image Sides to Sides · Expands: Top Side/Bottom Side, Shrinking the Other Side Tilt Tilts: The Image Uniformity Adjusts: Uniformity Moiré Adjusts: Adjusts: Horizontal Moiré Vertical Moiré What is moiré? Moiré refers to an interference pattern of dark wavy lines on the screen.
Function Color · Standard For routine work and printing. Temperature can be set from 6,500K to mode 10,000K, in 500K increments. (Additionally, industry standard of 9,300K is set as default.) · Custom mode For use when high precision color adjustment is necessary (i.e. when there is a need to obtain identical colors on multiple monitors* or match the display color with printout color**.) Color custom sets color temperature, allows for specific adjustments to Red, Green and Blue (R/G/B).
Function Custom Mode Adjusts: Color Temperature Gain Cutoff Cutoff and Gain adjustments Monitors use red, green and blue (R, G, and B) to convey color information. They use an additive method to combine different amounts of the primary colors to produce a desired color. In other words, monitors start with no light (black) and add percentages of red, green and blue to make colors. White is usually produced by adding the same amount of all three colors, where black is usually produced by adding no color.
Function Cutoff (Custom Mode) Adjusts: Cutoff Cutoff The Cutoff adjustment is the most powerful adjustment. It alters the starting point (the black level) and the ending point (the white level). If the Cutoff level for color is raised or lowered, black, white, and all levels between are raised or lowered by the same degree. Gain (Custom Mode) Adjusts: Gain Gain The Gain adjustment has no effect on the starting point (the black level). It changes only the ending point (the white level).
Others Function VESA DPMS The PowerManager feature automatically reduces the monitor’s power consumption during idle periods. The EIZO PowerManager functions comply with the VESA DPMS standard. · Do your part to conserve energy, turn off the monitor when your finished using it. Complete energy use can only be stopped by disconnecting the monitor from the power supply. · When the monitor is in a power saving mode, the optional EIZO i·Sound speaker unit will turn off.
Function Off Timer E What is Off Timer? The Off Timer function allows the user to set the time in which the monitor will be in operation, called the “On Period” and automatically shifts the operation into the “Off Timer Mode” when the set “On Period” expires. The energy consumption of the monitor in the “Off Timer Mode” is as low as the one of the monitor in “PowerManager Mode 2” although no setting PC to operate the Off Timer function is required. Set-up Procedure 1) Select the “Off Timer” icon.
Function Reset resets all the settings. - Default settings are as follows: · Contrast/Brightness:100 % /50 % · Moiré (Horizontal) (Vertical) · Color: 9300 K · PowerManager VESA DPMS Off Timer · Signal Filter Mode 1 · Video Level 0.7 V 0% 0% On Disable 2-3. Shortcut Keys Before entering the ScreenManager, brightness and contrast can be adjusted directly by moving the Control pad. To record the new setting and exit the ScreenManager, press the Enter key.
3 TROUBLESHOOTING Troubleshooting If a problem persists even after applying the suggested remedies, contact an EIZO dealer. Problems Points to check with possible solutions 1) Indicator status: OFF Check that the power cord is correctly connected. 2) Indicator status: GREEN Check brightness and contrast settings. Minimum settings will cause screen to be blank. 3) Indicator status: GREEN (flashing) Try pressing a key on the keyboard, or clicking the mouse. (The monitor may be in a power saving mode.
Problems 9) The entire screen appears too dark or bright. Points to check with possible solutions Adjust the contrast and brightness using the ScreenManager. See page 11. Output level from the computer may not conform the monitor. Please set the video level using the ScreenManager. See page 17. Some signal timing can be the cause of this problem. To correct this, turn off the monitor, then hold down the AUTO-SIZING button and “down” arrow key while turning on the monitor again.
Problems Points to check with possible solutions 12) The characters and images have a slight shadow on their right side. Chnage the mode of "Signal Filter" function in the ScreenManager "Others" menu. See page 17. 13) Moiré patterns are distracting. Reduce the moiré using the ScreenManager’s “Moiré” adjustment menu following the procedure below. E This may be solved by changing the refresh rate. 1) Set the desktop to an every-other-dot pattern so that moiré will be visible.
Explanation of the Characteristics of CRTs When the monitor is not fully warmed up, the screen may look slightly colored, e.g. reddish or bluish. This phenomenon is due to the unstableness of the electron gun during its warm-up period. Please wait for about 30 minutes until the monitor stabilizes in order to gain its proper color. Problems 16)• Control Pad “ENTER key” does not operate. • AUTO-SIZING button does not operate.
4 CLEANING WARNING E • Keep liquids away from the monitor. Spillage into the cabinet may result in fire, electric shock, or equipment damage. If an object or liquid falls/spills into the cabinet, unplug the monitor immediately. Have the unit checked by a qualified service engineer before using it again. Using the monitor in this condition could cause serious injury or equipment damage. CAUTION • To ensure safety, always unplug the monitor before cleaning it. Failure to do so may result in electric shock.
5 SPECIFICATIONS Electrical Specifications CRT 50 cm (19 inch) class, 90° deflection Invar Shadow Mask with Anti- Reflective SuperErgoCoat® CRT AG Pitch 0.26 mm Scan Frequency(Horizontal): 30 kHz-115 kHz (Automatic) Scan Frequency (Vertical): 50 Hz-160 Hz (Automatic) Max. Active Display Area 363 mm (H) × 272 mm (V) (14.3” (H) × 10.7” (V)) (Viewable image size: 453 mm (17.8”)) * Display size can be set by the user through microprocessor control panel.
Preset Timing E 2 factory presets shown below have been registered in the monitor’s microprocessor. Resolution Frequencies Interlace Sync Polarity fH (kHz) fV (Hz) Video Signal Level VGA (text) 720 × 400 31.47 70.09 Non H/Negative V/Positive 0.7V(p-p)/75 Ohm VESA 1280 × 1024 91.15 85.02 Non H/Positive V/Positive 0.7V(p-p)/75 Ohm Pin Assignment D-Sub mini 15 pin connector Pin No. Signal Pin No.
5 SPECIFICATIONS
Congratulations! You have just purchased a TCO’99 approved and labelled product! Your choice has provided you with a product developed for professional use. Your purchase has also contributed to reducing the burden on the environment and also to the further development of environmentally adapted electronics products.
Environmental requirements Flame retardants Flame retardants are present in printed circuit boards, cables, wires, casings and housings. Their purpose is to prevent, or at least to delay the spread of fire. Up to 30% of the plastic in a computer casing can consist of flame retardant substances. Most flame retardants contain bromine or chloride, and those flame retardants are chemically related to another group of environmental toxins, PCBs.
For U.S.A, Canada, etc. (rated 100-120 Vac) Only FCC Declaration of Conformity We, the Responsible Party EIZO NANAO TECHNOLOGIES INC. 5710 Warland Drive, Cypress, CA 90630 Phone: (562) 431-5011 declare that the product Trade name: EIZO Model: FlexScan F730 is in conformity with Part 15 of the FCC Rules.
Hinweis zur Ergonomie : Dieser Monitor erfüllt die Anforderungen an die Ergonomie nach EK1/59-98, EK1/60-98 mit dem Videosignal, 1280 Punkte x 1024 Zeilen, RGB analog, 0,7 Vp-p und mindestens 85,0 Hz Bildwiederholfrequenz, non interlaced. Weiterhin wird aus ergonomischen Gründen empfohlen, die Grundfarbe Blau nicht auf dunklem Untergrund zu verwenden (schlechte Erkennbarkeit, Augenbelastung bei zu geringem Zeichenkontrast.) PTB Hinweis Eigensichere Kathodestranlröhre nach Anlage III Röntgenverordnung.