Important Please read PRECAUTIONS, this User’s Manual, Setup Guide and Specifications Sheet (separate volumes) carefully to familiarize yourself with safe and effective usage. • Please read the Setup Guide (separate volume). • Please read the Specifications Sheet for details on the specifications of the monitor. • The latest User’s Manual is available for download from our site: http://www.eizo.
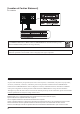
[Location of Caution Statement] Ex. FlexStand As an ENERGY STAR® Partner, EIZO NANAO CORPORATION has determined that this product meets the ENERGY STAR guidelines for energy efficiency. Product specification may vary with sales areas. Confirm the specification in the manual written in language of the region of purchase. Copyright© 2009 EIZO NANAO CORPORATION All rights reserved.
Notice for this monitor This product is suited to creating documents, viewing multimedia content, and other general purposes. This product has been adjusted specifically for use in the region to which it was originally shipped. If the product is used outside the region, it may not operate as specified in the specifications. This product may not be covered by warranty for uses other than those described in this manual.
Cleaning Attention • Never use any solvents or chemicals, such as thinner, benzene, wax, alcohol, and abrasive cleaner, which may damage the cabinet or LCD panel. NOTE • Optional ScreenCleaner is recommended for cleaning the panel surface. [LCD Panel] • Clean the LCD panel with a soft cloth such as cotton cloth or lens cleaning paper. • Remove persistent stains gently with a cloth dampened with a little water, and then clean the LCD panel again with a dry cloth for better finishing.
CONTENTS Notice for this monitor............................................... 3 CONTENTS.............................................................. 5 2-10 Setting On/Off for the power saving level indicator [EcoView Index].............................. 23 2-11 Screen Size Selection..................................... 24 ● To change screen size [Screen Size]................ 24 Chapter 1 Features and Overview...................... 7 1-1 Features.......................................................
CONTENTS Chapter 5 Reference.......................................... 34 5-1 Attaching an Arm............................................ 34 5-2 Attaching the FlexStand................................. 36 5-3 Folding the TriStand....................................... 37 5-4 Folding the TriStand....................................... 38 5-5 Glossary.......................................................... 40 5-6 Preset Timing..................................................
Chapter 1 Features and Overview Thank you very much for choosing an EIZO color LCD monitor. 1-1 Features • 20” wide format LCD (EV2023W)/23” wide format LCD (EV2303W) • Applicable to the resolution of 1600 × 900 (EV2023W)/Applicable to the resolution of 1920 × 1080 (EV2303W) • Power saving function Suppressing the power consumption* reduces the carbon dioxide emissions. This product is equipped with various power saving functions.
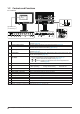
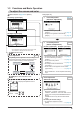
1-2 Controls and Functions Ex.
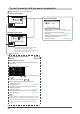
1-3 Functions and Basic Operation To adjust the screen and color Main menu (Refer to page 12 for operation) Analog input only [At analog signal input] 1 [At digital signal input] ● To adjust flickering and position [Screen]………………………………… see page 14 ● To adjust color gradation automatically [Range]………………………………… see page 16 2 Screen Adjustment (Automatic Adjustment) Screen Adjustment (Advanced Adjustment) [At analog signal input] Page 14 Page 15 [At digital signal input] • The Adjustment menu a
To use the monitor with low power consumption Main menu (Refer to page 12 for operation) [At analog signal input] Power-save Settings ● Setting On/Off for Power Saving mode [Power Save] … ………………………see page 21 ● Turning off the monitor automatically [Off Timer] … …………………………see page 21 ● Shifting to the power saving mode when a person leaves the monitor [EcoView Sense]………………………see page 22 [At digital signal input] • The Adjustment menu and the EcoView menu cannot be displayed at the same time.
To make useful settings/adjustments Adjustment menu (Refer to page 12 for operation) [At analog signal input] Other Settings ● To set input signal selection [Input Signal]… ……………………… see page 30 ● To change screen size [Screen Size]… ……………………… see page 24 ● To adjust brightness of non-display area [Border Intensity]……………………… see page 24 ● To update menu settings [Menu Size/Menu Position/Menu Off Timer/ Translucent]…………………………… see page 25 ● To set the orientation of the Adjustment menu [Orientation]…………………
Basic operation of Adjustment menu [Displaying Adjustment menu and selecting function] . The Main menu appears. (1) Press (2) Select a function with / / / , and press . The Sub menu appears. (3) Select a function with / / / , and press . The adjustment/setting menu appears. (4) Adjust the selected item with / / / , and press . The setting is saved. [Exiting Adjustment menu] (1) Choose from the Sub menu and press (2) Choose from the Main menu and press . The Main menu appears. .
Chapter 2 Settings and Adjustments 2-1 Utility Disk An “EIZO LCD Utility Disk” (CD-ROM) is supplied with the monitor. The following table shows the disk contents and the overview of the software programs. ● Disk contents and software overview The disk includes software programs for adjustment, and User's Manual. Refer to “Readme.txt” or the “read me” file on the disk for software startup procedures or file access procedures. Item Overview OS A “Readme.
2-2 Screen Adjustment Digital Input When digital signals are input, images are displayed correctly based on the preset data of the monitor, but if characters and/or lines appear blurred, go to step 6 “To modify blurred characters/lines [Smoothing]”. When performing more advanced adjustment, see “2-3 Color Adjustment” (page 17) and subsequent pages.
3 Perform the auto adjustment again with the analog screen adjustment pattern displayed. ● To adjust flickering, screen position, and screen size automatically [Screen] (1) Display Pattern 1 in full screen on the monitor using the “Screen Adjustment Utility” or the screen adjustment pattern files. (2) Choose from the menu, and press . The menu appears. (3) Choose with or .
● To correct screen position [Position] (1) Choose from the menu, and press NOTE . The menu appears. (2) Adjust the position with / / / to display the image properly in the display area of the monitor, and press The adjustment is completed. 5 • Since the number of pixels and the pixel positions are fixed on the LCD monitor, only one position is provided to display images correctly. The position adjustment is made to shift an image to the correct position.
2-3 Color Adjustment ● To select the display mode (FineContrast mode) FineContrast allows you to select the best display mode easily according to the monitor’s application. FineContrast mode Mode Purpose Custom Available to change all setting values. sRGB Suitable for color matching with sRGB compatible peripherals. Text Suitable for displaying texts for word processing or spreadsheets. Picture Suitable for displaying images such as photos or picture images.
● To perform advanced adjustments Attention Independent setting and saving of color adjustment are available for each FineContrast mode. ● Adjustment items in each mode According to the FineContrast mode selected, the adjustable function differs.
● To adjust the color temperature [Temperature] NOTE The color temperature can be adjusted. The color temperature is normally used to express the hue of “White” and/or “Black” by a numerical value. The value is expressed in degrees “K” (Kelvin). In the same way as the flame temperature, the image on the monitor is displayed reddish if the color temperature is low and is bluish if the color temperature is high. The gain preset values are set for each color temperature setting value.
● To adjust the hue [Hue] Attention This function allows you to adjust the hue. If you set the hue to a high value, the image turns greenish. If low, the image turns purplish. Adjustable range: -32 to 32 (1) Choose from the Adjustment menu, and press (2) Choose from the menu, and press . . The adjustment menu appears. (3) Adjust the hue with or , and press . • This function does not enable to display every color gradation.
2-6 Setting On/Off for Power Saving mode [Power Save] This function allows you to set the monitor into the power saving mode according to the PC status. When the monitor has shifted to the power saving mode, the images on the screen are not displayed. (1) Choose from the Adjustment menu, and press . (2) Choose from the menu, and press . The setting menu appears. (3) Select “On” or “Off” with or . , and press The setting is completed.
2-8 Setting On/Off for the automatic brightness adjustment function [Auto EcoView] The sensor on the front side of the monitor detects the environmental brightness to adjust the screen brightness automatically and comfortably by using the Auto EcoView function. . (1) Press NOTE • Be careful not to block the sensor on the lower side of the monitor when using the Auto EcoView function. The setting menu appears. (2) Choose "Auto EcoView" with or .
(1) Choose from the Adjustment menu, and press . (2) Choose from the menu, and press . The setting menu appears. (3) Select "Auto" or "Manual" with or . When selecting "Manual", select 1, 2 or 3 for the detection level of the sensor with or . (4) Press . The setting is completed.
2-11 Screen Size Selection ● To change screen size [Screen Size] The image with the resolution other than the recommended resolution is displayed in full screen automatically. You can change the screen size by using from menu. Menu Function Full Screen (default setting) Displays an image in full screen. Images are distorted in some cases because the vertical rate is not equal to the horizontal rate. Enlarged Displays an image in full screen.
2-12 Setting Adjustment Menu Display ● To update menu settings [Menu Size/Menu Position/Menu Off Timer/Translucent] Menu Size Change the Adjustment menu size using the following procedure. (1) Choose from the Adjustment menu, and press . (2) Choose
NOTE 2-13 Setting Orientation ● To set the orientation of the Adjustment menu [Orientation] This function allows you to change the orientation of the Adjustment menu when using the monitor screen in vertical display position. (1) Choose from the Adjustment menu, and press (2) Choose from the Others menu, and press . . The menu appears. (3) Select “Landscape” or “Portrait” with or , and press .
NOTE 2-16 Enabling/Disabling DDC/CI communication [DDC/CI] • You can check the DDC/CI setting in the menu. This function allows you to enable/disable the DDC/CI communication. (1) Press to turn off the monitor. (2) Press holding down to turn on the monitor. The Enable/Disable setting is toggled by performing the operation in step 2. 2-17 Setting Power Indicator ON/OFF [Power Indicator] This function allows you to set the power indicator (blue) ON/OFF in the monitor ON condition.
2-20 Resuming the Default Setting [Reset] There are two types of Reset. One is to reset the color adjustment only to the default settings, and the other is to reset all the settings to the default settings. Attention • After resetting, you cannot undo the operation. ● To reset color adjustment values Only the adjustment values in the current FineContrast mode will revert to the default settings (factory settings). (1) Choose from the Adjustment menu, and press .
Chapter 3 Connecting Cables 3-1 Connecting Two PCs to the Monitor Two PCs can be connected to the monitor through the DVI-D and the D-Sub mini 15 pin connector on the back of the monitor. Connection examples DVI-D connector To PC 1 DVI-D connector Signal cable (Digital) FD-C39 D-Sub mini 15-pin Connector To PC 2 D-Sub mini 15-pin Connector Signal cable MD-C87 ● To switch the input signal The input signal switches each time is pressed.
● To set input signal selection [Input Signal] NOTE The monitor recognizes the connector through which PC signals are input. When either PC is turned off or enters the power-saving mode, the monitor automatically displays signals of another PC. Priority setting Function Auto When either PC is turned off or enters the powersaving mode, the monitor automatically displays signals of another PC. Manual The monitor detects only the PC’s signals currently displaying automatically.
Chapter 4 Troubleshooting If a problem still remains after applying the suggested remedies, contact your local dealer. • • • • No-picture problems → See No.1 - No.2. Imaging problems (digital input) → See No.3 - No.8. Imaging problems (analog input) → See No.3 - No.12. Other problems → See No.13 - No.18. Problems 1. 2. Possible cause and remedy No picture • Power indicator does not light. • Check whether the power cord is connected correctly.
Problems Possible cause and remedy • Use a screen saver or off timer function for a long-time image display. • Afterimages are particular to LCD monitors. Avoid displaying the same image for a long time. 5. Afterimages appear. 6. Green/red/blue/white dots or defective dots remain • This is due to LCD panel characteristics and is not a on the screen. failure. 7. Interference patterns or pressure marks remain on • Leave the monitor with a white or black screen. The the screen. symptom may disappear.
Problems Possible cause and remedy • Check the setting environment of the monitor. 18. (When using EcoView Sense) The images remains to be displayed when you EcoView Sense may not work correctly in the following move away from the monitor. The images does not environments. reappear when you come near it. • There is something that reflects the light such as mirror or glass in front of the sensor. • The monitor is located in a place that receive direct sunlight.
Chapter 5 Reference 5-1 Attaching an Arm The stand can be removed and replaced with an arm (or another stand) to be attached to the monitor. Use an arm or stand of EIZO option. 1 2 34 When using the monitor with "Portrait" position, change the position to "Landscape". Lay the LCD monitor on a soft cloth spread over on a stable surface with the panel surface facing down. Chapter 5 Reference Attention • When attaching an arm or stand, follow the instructions of their user’s manual.
3 Remove the stand. ● FlexStand Remove the stand from the monitor while releasing the lock. ● TriStand Prepare a screwdriver. Loosen the screw securing the unit and the stand with the screwdriver. 4 Attach the monitor to the arm or stand. Secure the monitor to the arm or stand using the screws specified in the user’s manual of the arm or stand.
5-2 Attaching the FlexStand The once removed the FlexStand can be attached to the monitor again with the following procedures. 1 Put the insertion part of the stand in the slot of the monitor. At the time, use as a guide that the marks (1) on the stand match to the screw holes (2) of the monitor. Screw holes Marks 2 Attach the stand moving the monitor toward the stand. Make sure that the lock is latched with clicking sound.
5-3 Attaching the TriStand The once removed the TriStand can be attached to the monitor again with the following procedures. 1 2 3 Lay the LCD monitor on a soft cloth spread over on a stable surface with the panel surface facing down. Put the insertion part of the stand in the slot of the monitor. Prepare a screwdriver. Press the upper part of the stand against the unit and tighten the screw with the screwdriver to fix the stand to the unit.
5-4 Folding the TriStand Perform the following procedures to remove the stand base and fold the stand when re-packing a monitor with a TriStand. 1 2 3 4 38 Open the cable holder. Adjust the monitor to its lowest position, and insert a pin into the stand. Lay the LCD monitor on a soft cloth spread over on a stable surface with the panel surface facing down. Open the cover of stand base.
5 Rotate the stand base in a counterclockwise direction while holding down the protrusion, and then remove the stand base.
5-5 Glossary Clock The analog input monitor needs to reproduce a clock of the same frequency as the dot clock of the graphics system in use, when the analog input signal is converted to a digital signal for image display. This is called clock adjustment. If the clock pulse is not set correctly, some vertical bars appear on the screen. DDC/CI (Display Data Channel/Command Interface) VESA provides the standardization for the interactive communication of the setting information, etc.
sRGB (Standard RGB) International standard for “color reproduction and color space” among peripheral devices (such as monitors, printers, digital cameras, scanners). sRGB allows Internet users to closely match colors as a simple color matching means for the Internet use. Temperature Color temperature is a method to measure the white color tone, generally indicated in degrees Kelvin. The screen becomes reddish at a low temperature, and bluish at a high temperature, like the flame temperature.
5-6 Preset Timing The following table shows factory preset video timing (for analog signal only). Mode Dot clock VGA 640×480@60Hz 25.2 MHz VGA TEXT 720×400@70Hz 28.3 MHz VESA 640×480@73Hz 31.5 MHz VESA 640×480@75Hz 31.5 MHz VESA 800×600@56Hz 36.0 MHz VESA 800×600@60Hz 40.0 MHz VESA 800×600@72Hz 50.0 MHz VESA 800×600@75Hz 49.5 MHz VESA 1024×768@60Hz 65.0 MHz VESA 1024×768@70Hz 75.0 MHz VESA 1024×768@75Hz 78.8 MHz VESA 1152×864@75Hz 108.0 MHz VESA 1280×720@60Hz 74.
For U.S.A. , Canada, etc. (rated 100-120 Vac) Only FCC Declaration of Conformity We, the Responsible Party EIZO NANAO TECHNOLOGIES INC. 5710 Warland Drive, Cypress, CA 90630 Phone: (562) 431-5011 declare that the product Trade name: EIZO Model: FlexScan EV2023W/EV2303W is in conformity with Part 15 of the FCC Rules.
Hinweise zur Auswahl des richtigen Schwenkarms für Ihren Monitor Dieser Monitor ist für Bildschirmarbeitsplätze vorgesehen. Wenn nicht der zum Standardzubehör gehörige Schwenkarm verwendet wird, muss statt dessen ein geeigneter anderer Schwenkarm installiert werden.