English User’s Manual FlexScan F35/FX·B5 â Color Display Monitor
CONTENTS PRECAUTIONS i INTRODUCTION 5 About This Manual ............................................... 5 Package Contents ............................................... 5 1 FEATURES 6 Features .............................................................. 6 Functions ............................................................. 7 2 IMAGING ADJUSTMENT 8 - Screen menu Brightness, Contrast, Size, Position .................... 8 Geometry, Tilt ......................................................
5 OTHER SETTINGS 20 - Others, Information and Language menus Degaussing ....................................................... 20 Beep .................................................................. 21 Menu Position, Menu Contrast .......................... 21 Reset ................................................................. 21 Information status report ................................... 22 Language menu .................................................
Copyright© 2000 by EIZO NANAO CORPORATION. All rights reserved. No part of this manual may be reproduced, stored in a retrieval system, or transmitted, in any form or by any means, electronic, mechanical, or otherwise, without the prior written permission of Eizo Nanao Corporation. Eizo Nanao Corporation is under no obligation to hold any submitted material or information confidential unless prior arrangements are made pursuant to Eizo Nanao Corporation's receipt of said information.
D SICHERHEITSHINWEISE F PRECAUTIONS PRECAUTIONS SICHERHEITSHINWEISE PRÉCAUTIONS PRECAUTIONS i
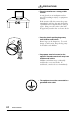
E PRECAUTIONS Location of the caution statements Jordet stikkontakt skal benyttes når apparatet tilkobles datanett. Apparaten skall anslutas till jordat nätuttag. The equipment must be connected to a grounded main outlet. IMPORTANT! To ensure personal safety and proper maintenance. Please read this section and the caution statements on the monitor (refer to the figure above). This manual uses the safety symbols below. They denote critical information. Please read them carefully.
D SICHERHEITSHINWEISE F PRECAUTIONS Position des WarnhinweisAufklebers Emplacement de l’étiquette de sécurité WICHTIG! IMPORTANT! Zu Ihrer eigenen Sicherheit und um ordnungsmäße Handhabung Ihres Systems zu gewährleisten, sollten Sie unbedingt diesen Abschnitt und die Warnhinweise auf Ihrem Monitor lesen (siehe obige Abbildung). Pour votre sécurité et pour assurer un entretien correct, veuillez lire cette section ainsi que les avertissements sur votre moniteur.
E PRECAUTIONS WARNING • If the monitor begins to emit smoke, smells like something is burning, or makes strange noises, disconnect all power connections immediately and contact your dealer for advice. Attempting to use a malfunctioning monitor can be dangerous. • Do not dismantle the cabinet or modify the monitor. Dismantling the cabinet or modifying the monitor may result in electric shock or burn. • Keep small objects away from the monitor.
D SICHERHEITSHINWEISE WARNUNG F PRECAUTIONS AVERTISSEMENT • Tritt Rauch aus dem Monitor aus oder werden ungewöhnliche Geräusche oder Gerüche wahrgenommen, sind umgehend sämtliche Netzverbindungen zu lösen. Wenden Sie sich in diesem Fall an Ihren Händler. Der Einsatz eines defekten Monitors kann gefährlich sein. • Si le moniteur commence à fumer ou produit un bruit ou une odeur anormale, débranchez immédiatement tous les câbles secteur et prenez contact avec votre revendeur.
E PRECAUTIONS • Place the monitor on a strong, stable surface. A unit placed on an inadequate surface may fall, resulting in injury or equipment damage. OK If the monitor falls, disconnect the power immediately and have the unit checked by a qualified service engineer before using it again. Using a monitor after it has been dropped may result in fire or electric shock. • Keep the plastic packing bags away from children and infants. Plastic bags can be dangerous.
D SICHERHEITSHINWEISE • Stellen Sie den Monitor auf eine stabile ebene Fläche. Wird das Gerät nicht ordnungsgemäß aufgestellt, kann es herunterfallen und jemanden verletzen bzw. selbst beschädigt werden. Nach einem Sturz muß der Monitor umgehend vom Netz getrennt und vor dem nächsten Einsatz durch einen Fachmann überprüft werden. Bei Einsatz eines defekten Geräts besteht Brand- und Stromschlaggefahr. F PRECAUTIONS • Placez le moniteur sur une surface stable et solide.
E PRECAUTIONS • Use the enclosed power cord. If using the power cord other than the enclosed one, use the following cord. In USA and Canada: * Rating: min. 125 V, 10 A * Length: max. 2.1 m * Type: SVT * Plug type: NEMA 5-15P, Parallel blade, Grounding type, 125 V, 10 A In Europe: * Rating: min. 250 V, 10 A * Length: max. 2.1 m * Type: H05VV-F 3G 1 mm2 Use a plug type approved by the country where you use. Failure to do so may cause fire or electric shock.
D SICHERHEITSHINWEISE F PRECAUTIONS • Verwenden Sie das mitgelieferte Netzkabel. Bei Einsatz anderer Netzkabel sind folgende Spezifikationen einzuhalten. In den Vereinigten Staaten und Kanada: * Leistung: min. 125 V, 10 A * Länge: max. 2,1 m * Typ: SVT * Steckertyp: NEMA 5-15P, ParallelFlachstift, Erdungstyp, 125 V, 10 A In Europa: * Leistung: min. 250 V, 10 A * Länge: max. 2,1 m * Typ: H05VV-F 3G 1 mm Verwenden Sie unbedingt einen Steckertyp, der für das jeweilige Einsatzland zugelassen ist.
E PRECAUTIONS • To disconnect the power cord, grasp the plug firmly and pull. Never tug on the cord, doing so may cause damage and could result in fire or electric shock.
D SICHERHEITSHINWEISE • Zum Lösen der Netzverbindung Netzstecker fest greifen und aus der Wandsteckdose ziehen. Niemals ruckartig am Netzkabel ziehen, da das Kabel hierdurch beschädigt werden könnte, was wiederum mit Brand- oder Stromschlaggefahr verbunden ist. F PRECAUTIONS • Pour débrancher le câble secteur, tirez seulement sur le connecteur ou la fiche. Ne tirez jamais sur le câble, ceci pourrait l’endommager ou entraîner un incendie ou un choc électrique.
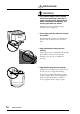
E PRECAUTIONS CAUTION Be careful when taking the monitor out of the carton: • Disconnect the power cord, signal cables and remove the optional i·Soundä sound unit and i·Stationä USB hub (if applicable) when moving the monitor. Moving the monitor with the cord attached or lifting it by the i·Sound sound unit or i·Station USB hub is dangerous. It may result in injury or equipment damage. • Handle with care when carrying the monitor Note that the monitor is heavier at the front than at the rear.
D SICHERHEITSHINWEISE ACHTUNG Beim Herausheben des Monitors aus dem Verpackungskarton ist folgendes zu beachten: • Lösen Sie vor dem Transport des Monitors das Netzkabel und die Signalkabel, und entfernen Sie das optionale i·SoundÔ Lautsprechersystem sowie den i·StationÔ -USB-Hub (sofern verfügbar).
E PRECAUTIONS • Do not sit on the cabinet or place any heavy objects on the cabinet. A unit with heavy objects on it may fall or be damaged and result in injury. • Do not block the ventilation slots on the cabinet. * Do not place books or any other papers on the ventilation slots. * Do not install the monitor in a closed space. * Do not use the monitor laying down or upside down. * Do not remove the tilt-swivel stand.
D SICHERHEITSHINWEISE F PRECAUTIONS • Ne vous asseyez pas sur le moniteur et • Nicht auf das Gehäuse setzen und n’y posez jamais d’objets lourds. keine schweren Gegenstände darauflegen. Une surcharge pourrait déséquilibre le Ein Monitor, auf dem schwere Gegenstände moniteur et vous exposer à des blessures. abgelegt werden, kann herunterfallen oder beschädigt werden. Hierbei besteht Verletzungsgefahr. • Verdecken Sie keinesfalls die Lüftungsschlitze des Gehäuses.
E PRECAUTIONS • Unplug the monitor before cleaning it. Cleaning the monitor while it is plugged into a power outlet may result in electric shock. For users of the EIZO optional i·Soundä sound unit and i·Stationä USB hub • When adjusting the viewing angle of the monitor, do not do so by handling the sound unit or USB hub. Adjusting the monitor in this way may break the unit or cause bodily injury.
D SICHERHEITSHINWEISE F PRECAUTIONS • Ziehen Sie vor dem Reinigen des Monitors den Netzstecker. Ist der Monitor während der Reinigung mit der Wandsteckdose verbunden, besteht Stromschlaggefahr. • Débranchez le moniteur avant de le nettoyer.
E PRECAUTIONS IMPORTANT! * This product has been adjusted specifically for use in the region to which it was originally shipped. The performance of the product, (i.e. picture geometry, picture positioning and color convergence and purity in the case of color monitors) is optimally adjusted to the earth's magnetic field of the specific destination. If operated outside the region to which it was originally shipped, the product may not perform as stated in the specifications.
D SICHERHEITSHINWEISE F PRECAUTIONS WICHTIG! IMPORTANT! * Dieses Produkt wurde werkseitig speziell für den Einsatz am vorgesehenen Bestimmungsort konfiguriert. Die Monitorleistung (d. h. Bildgeometrie, Bildposition sowie Farbkonvergenz und Farbreinheit bei Farbmonitoren) ist optimal auf das Magnetfeld der Erde am Einsatzort abgestimmt. Wird das Gerät nicht am vorgesehenen Bestimmungsort betrieben, sind Abweichungen von den spezifizierten Gerätedaten möglich.
E PRECAUTIONS xx PRECAUTIONS
INTRODUCTION About This Manual E This manual explains the precautions, features, specifications, and operation of your EIZO monitor. The separately bound 'Quick Setup Guide' explains how to install your monitor, and how to implement basic adjustments with the ScreenManager utility. Package Contents: • • • • • • • Monitor .................................................................. Power Cord ............................................................. User’s Manual ...............................
1 FEATURES Features FlexScan® for wide compatibility • 27 to 70 kHz horizontal scanning, 50 to 120 Hz vertical scanning with automatic adjustment. • The built-in microprocessor allows user-adjustable color control adjustments to control screen distortion, and memorization of useradjusted settings. • High resolution 1024 dots ´ 768 lines with flicker free 86 Hz (Max) refresh rate. High Resolution Color CRT • 39 cm (15 inch) class, Actual Viewing Diagonal 35.0 cm (13.7 inches), 90° deflection, 0.
Functions Windows 95/98 Plug & Play .... Readme.txt in the EIZO Utility Disk • This model complies with VESA DDC1/DDC2B standards and supports the Plug & Play function proposed in Windows 95/98. ScreenManager™ ......................... Quick Setup Guide & Pages 8-22 • ScreenManager allows the setting and adjustment of the displayed image using the QuickSet™ Control Pad and intuitive graphic icons for easy identification of each function. Auto-Sizing Function .........................................
2 IMAGING ADJUSTMENT - Screen menu - All of the icons shown in the ScreenManager 'Screen' menu are described below. • Allow the monitor to stabilize for at least 30 minutes before making image adjustments. Brightness, Contrast, Size, Position These functions are used to adjust the brightness, contrast, size and position of the screen. For more information about how to adjust each of them, please refer to the 'Quick Setup Guide', page 8.
Moiré Reduction E What is moiré? Moiré refers to an interference pattern of dark wavy lines on the screen. It is not a defect, but rather an interference phenomenon caused by the relationship between the phosphor layout and the imaging signal. Moiré is often an indication of a good focus level. Moiré is particularly noticeable when using a light-gray or everyother-dot pattern background. Although moiré can not be eliminated, it can be reduced with the moiré reduction feature.
3 COLOR ADJUSTMENT - Color menu - Outline EIZO monitors have incorporated two color adjustment mode, standard and custom. The “Standard” mode allows the adjustment of the color spectrum. The “Custom” mode allows extensive controls over the colors of the displayed image on the screen. All adjustments for either mode can be made quickly and easily through the ScreenManager 'Color' Menu - offering a tool to create customized color environment.
Adjusting the Standard mode E Color Temprature • Users should allow at least 30 minutes for the monitor to stabilize before setting the color adjustments or color matching. Procedure 1) Go to the 'Color' menu. 2) Select the “Standard mode” setting from the 'Color mode' menu. 3) Select the 'Temperature' icon. A color temperature bar will appear. 4) Adjust the temperature by using the right or left Arrow keys. 5) Press the ENTER key to save the data.
Adjusting the Custom mode Cutoff and Gain adjustments Monitors use red, green and blue (R, G, and B) to convey color information. They use an additive method to combine different amounts of the primary colors to produce a desired color. In other words, monitors start with no light (black) and add percentages of red, green and blue to make colors. White is usually produced by adding the same amount of all three colors, where black is usually produced by adding no color.
a) Select the 'Temperature' icon from the sub menu. b) Select the temperature as desired by moving the arrow keys in any direction. E 4) Adjust the Cutoff Cutoff The Cutoff adjustment is the most powerful adjustment. It alters the starting point (the black level) and the ending point (the white level). If the Cutoff level for color is raised or lowered, black, white, and all levels between are raised or lowered by the same degree.
• These diagram explains how the color curves were changed for the best adjustment in steps 4 and 5. Adjust the black level so that the low end of the curve for each color (R,G,B) is equal as see picture 2. Adjust the white level so that the high end of the curve for each color (R,G,B) is equal as see picture 3. This setup gives the best color balance.
4 POWER-SAVE SETUP - PowerManager menu - E What is PowerManager? The PowerManager feature automatically reduces the monitor’s power consumption during idle periods, in accordance with the PCs ScreenSaver software. There are two PowerSaving modes in the EIZO PowerManager: Mode 1 and Mode 2 (maximum reduction). Even if the monitor is in a power saving mode, it will return to a normal display immediately when the mouse or keyboard is operated.
Set-up Procedure Set the monitor’s power-save environment to match the PC’s ScreenSaver software. • For the PC setup, please refer to the user’s manuals for the PC and graphics board. There are two power-save settings for the monitor. ‘VESA DPMS’ system works with the VESA DPMS signal. ‘NUTEK’s system works with a screen saver software and Energy Saver for Macintosh which blanks the screen (totally black screen). Set the monitor to match the PC’s power-saving software, as follows.
VESA DPMS System E 1) First, make the appropriate settings for the PC. 2) Then select ‘VESA DPMS’. 3) Set the delay period, which is the interval that the monitor will wait after receiving a power-save signal from the PC, before entering into Mode 1 or Mode 2. VESA DPMS power-saving method VESA DPMS utilizes four signals: ON, STANDBY, SUSPEND, and OFF. The monitor detects these signals from the graphics board and executes power-saving accordingly, as illustrated below.
NUTEK System 1) First make the appropriate ScreenSaver settings (Macintosh/Energy Saver) for the PC. 2) Then select ‘NUTEK’. 3) Set the delay time, which is the interval between the time that the ScreenSaver (Macintosh/EnergySaver) blanks the screen and the time that the monitor enters Mode 1. 4) Set the Mode 1 duration time which is the user definable time (0-60 minutes) before the monitor enters Mode 2.
What is VESA DPMS? The acronym VESA stands for “Video Electronics Standards Association,” and DPMS stands for “Display Power Management Signaling.” DPMS is a communication standard that PCs and graphics boards use to implement power savings at the monitor side. What is NUTEK? NUTEK is the acronym for the “Swedish National Board for Industrial and Technical Development,” an organization that works to promote power-saving technologies.
5 OTHER SETTINGS - Others, Information and Language menus - All of the icons shown in the ScreenManager 'Others' menu are described below. Degaussing The monitor automatically degausses every time the power is turned ON and every time it is reactivated from the PowerManager power-saving Mode 2. A degaussing function is provided in the ScreenManager for use at other times. Note that the image vibrates slightly while degaussing is in progress, but will return to normal when degaussing is completed.
Beep Use this feature to set the beeper ON or OFF. If the beeper is ON, the monitor will generate beep signals as shown below. If the beeper is OFF, the monitor will not beep. Short beep Long beep • ScreenManager item selected. • ScreenManager parameter adjusted to minimum or maximum limit. • AUTO-SIZING button pressed. • ScreenManager data-save executed. Four short beeps • Monitor not connected correctly. • PC turned off. • Monitor received unsupported signal frequency.
Information status report Use this feature to review the current ScreenManager settings. The menu contains four pages. Pressing the ENTER key selects the different pages in order. The information displayed on each page is as follows. • Page 1: Input port, horizontal and vertical frequencies, moiré reduction setting • Page 2: Color-adjustment settings • Page 3: PowerManager settings • Page 4: Beep settings Language menu Use this menu to select the ScreenManager language.
6 GETTING THE MOST FROM YOUR MONITOR Adjustment Lock E The ScreenManager operation can be disabled by holding down the AUTO-SIZING button while switching on the monitor’s power. This will disable (“lock”) the ScreenManager and AUTO-SIZING button, protecting from accidental changes. To unlock the buttons: switch the power off, then hold down AUTO-SIZING button once again and turn the power back on.
7 TROUBLESHOOTING Troubleshooting This page presents problems that can be corrected by the user. If a problem persists even after applying the suggested remedies, contact an EIZO dealer. Problems Points to check with possible solutions No picture 1) Indicator status: OFF • Check that the power cord is correctly connected. 2) Indicator status: GREEN • Try pressing a key on the keyboard, or clicking the mouse. (The screen-saver software may be active.) • Check brightness and contrast settings.
5) “Out of range” error message appears. (Example) • Use the graphics board’s utility software to change the frequency setting. (Refer to the manual of the graphics board.) • Whenever an error signal message appears, the signal frequency will be displayed in red. • Error messages will remain on the screen for 30 seconds, and then disappear. An error message may not appear at all if the signal frequency is extremely high or extremely low. Imaging problems 1) Display size and/or position is incorrect.
• If the volume level of the EIZO optional i·Sound speaker is too high, it may, in some cases, cause a slight vibration. To eliminate, turn down the volume of the speaker. • A unstable signal from the graphics board may be the cause of the above problem when using the monitor with a high resolution or in a high refresh mode. (The video signal from the graphics board might be made irregular due to the use of a high speed dot clock.) Change the resolution or the refresh rate to another setting.
Color problems 1) The entire screen appears bluish or reddish. • The CRT is not warmed up. Allow 30 minutes for the monitor to stabilize. 2) Color purity is not uniform. • Allow 30 minutes for the monitor to warm up. • Degauss the screen. (Use the degaussing feature in the ScreenManager’s 'Others' menu. See page 22.) Explanation of the Characteristics of CRTs When the monitor is not fully warmed up, the screen may look slightly colored, e.g. reddish or bluish.
4) AUTO-SIZING button does not work properly. • The Auto-sizing function is intended for use on the Macintosh and on IBM compatibles running Windows. It may not work properly if either of the following applies. - You are running an AT-compatible PC on MS-DOS (not Windows). - The background color for the “wallpaper” or “desktop” pattern is set to black. • Some signals from graphics boards may not function properly. • A solid-color screen (i.e.
8 CLEANING WARNING E • Keep liquids away from the monitor. Spillage into the cabinet may result in fire, electric shock, or equipment damage. If an object or liquid falls/spills into the cabinet, unplug the monitor immediately. Have the unit checked by a qualified service engineer before using it again. Using the monitor in this condition could cause serious injury or equipment damage. CAUTION • To ensure safety, always unplug the monitor before cleaning it. Failure to do so may result in electric shock.
9 SPECIFICATIONS Electrical Specifications CRT Dot Pitch CRT Size 0.28 mm 39 cm (15 inch) class 90° deflection FS type Anti-Reflective SuperErgoCoat® CRT Surface Scan Frequency Horizontal: 27 kHz-70 kHz (Automatic) Vertical: 50 Hz-120 Hz (Automatic) Max. Active Display Area 280 mm (H) x 210 mm (V) (11.0" (H) x 8.2" (V)) (Viewable image size: 350 mm (13.7")) * Display size can be set by the user through microprocessor control panel.
APPENDIX Pin Assignment Pin-Belegung Affectation des Broches D-Sub mini 15 pin connector Pin No. 100 APPENDIX Signal Pin.No. Signal 1 Red video 9 No pin 2 Green video 10 Ground 3 Blue video 11 (shorted) 4 Ground 12 Data 5 No pin 13 H.Sync 6 Red ground 14 V.
Timing Charts Timing-Übersichten Synchronisation des Signaux Based on the signal diagram shown below, 4 factory presets have been registered in the monitor's microprocessor. Der integrierte Mikroprozessor des Monitors unterstützt 4 werkseitige Standardeinstellungen (siehe hierzu die nachfolgenden Diagramme). 4 signaux ont été enregistrés en usine dans le microprocesseur du moniteur, conformément au diagramme de synchronisation ci-dessous.
VGA (text) T 720 dots x 400 lines mode Unit H V µs A B C D E F 0.636 3.813 1.907 6.356 25.422 31.778 Dot 18 108 54 180 720 900 ms 0.381 0.064 1.111 1.556 12.712 14.268 12 2 35 49 400 449 Line Frequencies: Interlace: Sync Polarity: Video Signal Level: fd/28.322MHz, fH/31.468kHz, fV/70.087Hz Non H/Negative, V/Positive 0.7Vp-p/75Ohm VESA T 1024 dots x 768 (85Hz) lines mode Unit H V µs A B C D E F 0.508 1.016 2.201 3.725 10.836 14.
T 832 dots x 624 lines mode Unit H V µs A B 0.559 C 1.115 D 3.910 5.586 E F 14.524 20.111 Dot 32 64 224 320 832 1152 ms 0.020 0.060 0.784 0.865 12.549 13.414 1 3 39 43 624 667 Line Frequencies: Interlace: Sync Polarity: Video Signal Level: fd/57.28MHz, fH/49.73kHz, fV/74.55Hz Non Separate sync, TTL, Negative 0.
Congratulations! You have just purchased a TCO’95 approved and labelled product! Your choice has provided you with a product developed for professional use. Your purchase has also contributed to reducing the burden on the environment and also, to the further development of environmentally adapted electronics products.
TCO’95 is a co-operative project between Environmental Requirements Brominated flame retardants Brominated flame retardants are present in printed circuit boards, cables, wires, casings and housings. In turn, they delay the spread of fire. Up to thirty percent of the plastic in a computer casing can consist of flame retardant substances.
For U.S.A, Canada, etc. (100-120 Vac) Only WARNING! This equipment has been tested and found to comply with the limits for a Class B digital device, pursuant to Part 15 of the FCC Rules. These limits are designed to provided reasonable protection against harmful interference in a residential installation. This equipment generates, uses, and can radiate radio frequency energy and, if not installed and used in accordance with the instructions, may cause harmful interference to radio communications.
Hinweis zur Ergonomie : Dieser Monitor erfüllt die Anforderungen an die Ergonomie nach ZH1/618/10.80 mit dem ideosignal, 1024 Punkte x 768 Zeilen, RGB analog, 0,7Vp-p und mindestens 85,0Hz Bildwiederholfrequenz, non interlaced. Die Übereinstimmung mit den Ergonomie-Vorschriften ZH1/618 kann nur dann garantiert werden, wenn dieser Monitor mit den Werkseinstellungen verwendet wird.