Important Please read PRECAUTIONS, this User’s Manual and Setup Guide (separate volume) carefully to familiarize yourself with safe and effective usage. • Please read the Setup Guide (separate volume) • The latest User’s Manual is available for download from our site: http://www.eizo.
[Location of Caution Statement] Ex. Height adjustable stand As an ENERGY STAR® Partner, EIZO NANAO CORPORATION has determined that this product meets the ENERGY STAR guidelines for energy efficiency. This product has acquired TCO standard that relates to safety, ergonomics, environment and so forth of office equipment.For overview of the TCO, refer to our website. http://www.eizo.com Product specification may vary with sales areas.
Notice for this monitor This product is suited to creating documents, viewing multimedia content, and other general purposes. This product has been adjusted specifically for use in the region to which it was originally shipped. If the product is used outside the region, it may not operate as specified in the specifications. This product may not be covered by warranty for uses other than those described in this manual.
Cleaning Attention • Never use any solvents or chemicals, such as thinner, benzene, wax, alcohol, and abrasive cleaner, which may damage the cabinet or LCD panel. NOTE • Optional ScreenCleaner is recommended for cleaning the panel surface. [LCD Panel] • Clean the LCD panel with a soft cloth such as cotton cloth or lens cleaning paper. • Remove persistent stains gently with a cloth dampened with a little water, and then clean the LCD panel again with a dry cloth for better finishing.
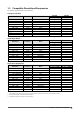
CONTENTS Notice for this monitor............................................... 3 2-11 Screen Size Selection..................................... 23 ● To change screen size [Screen Size]................ 23 CONTENTS.............................................................. 5 ● To adjust brightness of non-display area [Border Intensity]............................................... 23 Chapter 1 Features and Overview...................... 7 1-1 Features................................................
CONTENTS Chapter 4 Troubleshooting................................ 31 Chapter 5 Reference.......................................... 34 5-1 Attaching an Arm............................................ 34 5-2 Folding the EZ-UP stand................................ 35 5-3 Specifications................................................. 36 5-4 Glossary.......................................................... 44 5-5 Preset Timing..................................................
Chapter 1 Features and Overview Thank you very much for choosing an EIZO color LCD monitor. 1-1 Features • 22” wide format LCD Applicable to WSXGA+ (1680×1050) (S2233W)/ 22” wide format LCD Applicable to WUXGA (1920×1200) (S2243W) • Built-in speakers and headphone jack 1-2 “Controls and Functions” (page 8) • Power saving function Suppressing the power consumption*1 reduces the carbon dioxide emissions. This product is equipped with various power saving functions.
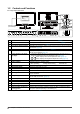
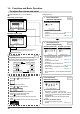
1-2 Controls and Functions Ex.
1-3 Compatible Resolutions/Frequencies The monitor supports the following resolutions.
1-4 Functions and Basic Operation To adjust the screen and color Main menu (Refer to page 12 for operation) Analog input only [At analog signal input] 1 [At digital signal input] ● To adjust flickering and position [Screen]………………………………… see page 14 ● To adjust color gradation automatically [Range]………………………………… see page 16 2 Screen Adjustment (Automatic Adjustment) Screen Adjustment (Advanced Adjustment) [At analog signal input] Page 14 Page 15 [At digital signal input] • The Adjustment menu a
To make useful settings/adjustments Adjustment menu (Refer to page 12 for operation) [At analog signal input] Power-save Settings ● Setting On/Off for Power Saving mode [Power Save] … ………………………see page 21 ● Turning off the monitor automatically [Off Timer] … …………………………see page 22 ● Displaying the level of power saving by EcoView Index [EcoView Index]… ……………see page 22 [At digital signal input] Other Settings Information Page 25 ● Displaying Monitor Information [Information] Language Page 26 ● To
Basic operation of Adjustment menu [Displaying Adjustment menu and selecting function] . The Main menu appears. (1) Press (2) Select a function with / / / , and press . The Sub menu appears. (3) Select a function with / / / , and press . The adjustment/setting menu appears. (4) Adjust the selected item with / / / , and press . The setting is saved.
Chapter 2 Settings and Adjustments 2-1 Utility Disk An “EIZO LCD Utility Disk” (CD-ROM) is supplied with the monitor. The following table shows the disk contents and the overview of the software programs. ● Disk contents and software overview The disk includes application software programs for adjustment, and User’s Manual. Refer to “Readme. txt” file on the disk for software startup procedures or file access procedures. Item Overview OS A “Readme.
2-2 Screen Adjustment Digital Input When digital signals are input, images are displayed correctly based on the preset data of the monitor, but if characters and/or lines appear blurred, go to step 6 “To modify blurred characters/lines [Smoothing]”. When performing more advanced adjustment, see “2-3 Color Adjustment” (page 17) and subsequent pages.
3 Perform the auto adjustment again with the analog screen adjustment pattern displayed. ● To adjust flickering, screen position, and screen size automatically [Screen] (1) Display Pattern 1 of the screen adjustment pattern files in full screen on the monitor. (2) Choose from the menu, and press . The menu appears. (3) Choose with or , and press . Flickering, screen position, and screen size are corrected by the autoadjustment function.
● To correct screen position [Position] (1) Choose from the menu, and press NOTE . The menu appears. (2) Adjust the position with / / / to display the image properly in the display area of the monitor, and press The adjustment is completed. 5 • Since the number of pixels and the pixel positions are fixed on the LCD monitor, only one position is provided to display images correctly. The position adjustment is made to shift an image to the correct position.
2-3 Color Adjustment ● To select the display mode (FineContrast mode) FineContrast allows you to select the best display mode easily according to the monitor’s application. FineContrast mode Mode Purpose Custom Available to change all setting values. EyeCare Allows the brightness to be set lower than possible with other modes. sRGB Suitable for color matching with sRGB compatible peripherals. Text Suitable for displaying texts for word processing or spreadsheets.
● To perform advanced adjustments Attention Independent setting and saving of color adjustment are available for each FineContrast mode. ● Adjustment items in each mode According to the FineContrast mode selected, the adjustable function differs.
● To adjust the color temperature [Temperature] NOTE The color temperature can be adjusted. The color temperature is normally used to express the hue of “White” and/or “Black” by a numerical value. The value is expressed in degrees “K” (Kelvin). In the same way as the flame temperature, the image on the monitor is displayed reddish if the color temperature is low and is bluish if the color temperature is high. The gain preset values are set for each color temperature setting value.
● To adjust the hue [Hue] Attention • This function does not enable to display every color gradation. This function allows you to adjust the hue. If you set the hue to a high value, the image turns greenish. If low, the image turns purplish. Adjustable range: -32 to 32 (1) Choose from the Adjustment menu, and press (2) Choose from the menu, and press . NOTE • You cannot adjust the value if the icon is not displayed, depending on the FineContrast mode selected.
2-6 Turning off the audio output at Power Saving mode [Power Save] NOTE • No audio is output while the monitor is in the Power Saving mode, if input signal and sound source are of DisplayPort. This monitor allows you to turn off the audio output from the speakers/ headphone at the power saving mode. (1) Choose from the Adjustment menu, and press . (2) Choose from the menu, and press . The setting menu appears. (3) Select “On” or “Off” with or , and press .
[Power Saving System] The monitor enters the power saving mode in five seconds in connection with the PC setting. PC Operating Power saving 2-9 Monitor Operating Power saving Power Indicator Blue Orange Turning off the monitor automatically [Off Timer] This function allows you to switch the setting to turn off the monitor automatically after a specified time has passed at the power saving mode.
2-11 Screen Size Selection ● To change screen size [Screen Size] The image with the resolution other than the recommended resolution is displayed in full screen automatically. You can change the screen size by using from menu. Menu Function Full Screen (default setting) Displays an image in full screen. Images are distorted in some cases because the vertical rate is not equal to the horizontal rate. Enlarged Displays an image in full screen.
2-12 Setting Adjustment Menu Display ● To update menu settings [Menu Size/Menu Position/Menu Off Timer/Translucent] Menu Size Change the Adjustment menu size using the following procedure. . (1) Choose from the Adjustment menu, and press (2) Choose
2-13 Setting Orientation NOTE ● To set the orientation of the Adjustment menu [Orientation] This function allows you to change the orientation of the Adjustment menu when using the monitor screen in vertical display position. (1) Choose from the Adjustment menu, and press (2) Choose from the Others menu, and press . . The menu appears. (3) Select “Landscape” or “Portrait” with or , and press .
2-16 Enabling/Disabling DDC/CI communication NOTE • You can check the DDC/CI setting in the menu. This function allows you to enable/disable the DDC/CI communication. (1) Press to turn off the monitor. (2) Press holding down to turn on the monitor. The Enable/Disable setting is toggled by performing the operation in step 2. 2-17 Setting Power Indicator ON/OFF [Power Indicator] This function allows you to set the power indicator (blue) ON/OFF in the monitor ON condition.
2-20 Resuming the Default Setting [Reset] Attention There are two types of Reset. One is to reset the color adjustment only to the default settings, and the other is to reset all the settings to the default settings. • After resetting, you cannot undo the operation. ● To reset color adjustment values Only the adjustment values in the current FineContrast mode will revert to the default settings (factory settings). (1) Choose from the Adjustment menu, and press .
Chapter 3 Connecting Cables 3-1 Connecting More than Two PCs to the Monitor More than two PCs can be connected to the monitor through the D-Sub mini 15 pin, the DVI-D and the DisplayPort connector on the back of the monitor.
● To set input signal selection [Input Signal] NOTE The monitor recognizes the connector through which PC signals are input. When a PC is turned off or enters the powersaving mode, the monitor automatically displays another signal. Priority setting • When “Auto” is selected for , the monitor’s power-saving function works only when the two PCs are in the power-saving mode.
3-3 Connecting Peripheral USB Devices This monitor has a hub compatible with USB. Connected to a PC compatible with USB or another USB hub, this monitor functions as a USB hub allowing connection to peripheral USB devices. ● Required System Environment (1) A PC equipped with a USB port or another USB hub connected to a USB compatible PC (2) Windows 2000/XP/Vista or Mac OS 9.2.2 and Mac OS X 10.
Chapter 4 Troubleshooting If a problem still remains after applying the suggested remedies, contact your local dealer. • • • • • No-picture problems → See No.1 - No.2. Imaging problems (digital input) → See No.3 - No.8. Imaging problems (analog input) → See No.3 - No.12. Other problems → See No.13 - No.16. USB problems → See No.17. Problems 1. 2. 3. Possible cause and remedy No picture • Power indicator does not light. • Check whether the power cord is connected correctly.
Problems Possible cause and remedy 4. Characters are blurred. • Check whether the signal setting of your PC matches the resolution and the vertical frequency settings for the monitor. (see page 9) • Adjust using [Smoothing]. (see page 16) 5. Afterimages appear. • Use a screen saver or off timer function for a long-time image display. • Afterimages are particular to LCD monitors. Avoid displaying the same image for a long time. 6.
Problems Possible cause and remedy 16. No audio output. • Check whether the mini jack cable is correctly connected. • Check whether volume is set to 0. • Check the setting of the PC and the audio playback software. • During DisplayPort signal input, check the [Source] setting. (see page 20) 17. The monitor connected with the USB cable is not detected. / USB devices connected to the monitor does not work. • Check whether the USB cable is connected correctly.
Chapter 5 Reference 5-1 Attaching an Arm The stand can be removed and replaced with an arm (or another stand) to be attached to the monitor. Use an arm or stand of EIZO option. 1 Lay the LCD monitor on a soft cloth spread over on a stable surface with the panel surface facing down. 2 Remove the stand. (Prepare a screwdriver.) 3 Attach the monitor to the arm or stand. 34 Unscrew the four screws securing the unit and the stand with the screwdriver.
5-2 Folding the EZ-UP stand Perform the following procedures to fold the stand when re-packing a monitor with an EZ-UP stand. 1 2 Remove the cable holder. Lower the monitor screen position until the hinge of the stand touches the stand base, and attach the lock metal fitting. Adjust the monitor angle so as the monitor screen not to touch the stand base. Lock metal fitting Hinge 3 Stand Base Fall the monitor screen backward with keeping slide-up the “Unlock” knob.
5-3 Specifications S2233W LCD Panel 22.0-inch (560 mm) TFT color LCD with anti-glare hard coating Viewing angle: Horizontal 178°, Vertical 178° (CR:10 or more) Dot Pitch 0.282 mm Horizontal Scan Frequency Analog: 31-82 kHz Digital (DVI-D/DisplayPort) : 31-65 kHz Vertical Scan Frequency Analog: 55-76 Hz (Non-interlace) (1680 × 1050: 55-61 Hz) Digital (DVI-D/DisplayPort) : 59-61 Hz (Non-interlace) (VGA TEXT: 69-71 Hz) Resolution 1680 dots × 1050 lines Max.
Mass Main unit (including Approx. 9.6 kg (21.2 lbs.) Height adjustable stand) Main unit (including EZUP stand) Approx. 11.4 kg (25.1 Ibs.) Main unit (includeing FlexStand) Approx. 9.6 kg (21.2 Ibs.) Main unit (without stand) Approx. 6.6 kg (14.6 lbs.) Movable range Environmental Conditions USB Height adjustable stand Tilt: 40° Up, 0° Down Swivel: 35° Right, 35° Left Adjustable height: 82 mm (3.
Power Consumption Screen Display On 90W or less (with USB load, Speaker working) 80W or less (without USB load, Speaker not working) Power saving mode 1.
Environmental Conditions USB Temperature Operating temperature: 5 °C - 35 °C (41 °F - 95 °F) Storage temperature: -20 °C - 60 °C (-4 °F - 140 °F) Humidity Operating humidity: 20% - 80% R.H. (no condensation) Storage humidity: 10% - 80% R.H. (no condensation) Pressure Operating: 700 to 1,060 hPa Storage: 200 to 1,060 hPa Standard USB Specification Revision 2.0 Port Upstream port × 1, Downstream port × 2 Supply current Downstream: Max.
Outside Dimensions S2233W/S2243W (Height adjustable stand) unit : mm (inch) 53.8 (2.12) 85 (3.35) 481.5(19) 168(6.6) 35° 35° SWIVEL 240.5(9.5) 325(12.8) 264.5(10.4) 511(20.1) 475.8(18.7) 17.6(0.69) 40° 205.5(8.1) 205.5(8.1) 116.5(4.6) 100(3.9) 116.5(4.6) 82(3.23) 272.5(10.7) 491(19.3) 20 (0.79) 14.6 (0.57) 17.45 (0.69) 17~99(0.67~3.9) PIVOT 100(3.9) 106(4.2) 8(0.31) 528(20.8) 90° 298.1(11.7) 333(13.1) 439~521(17.3~20.5) 17.45 (0.69) 17.6(0.69) 208.5(8.
14.5 (0.57) φ220 36.2 (1.43) 235.5 (9.3) 347.5 (13.7) 411.1 (16.2) 355 (13.0) 116.5 (4.6) 235 (9.3) 116.5 (4.6) 324.1 (12.8) 100 (3.9) 564.2 (22.2) 17.45 (0.69) 511 (20.1) 181 (7.1) 9.5 (0.37) 188.5 (7.4) 249 (9.8) 521.5 (20.5) PIVOT 333 (13.1) 475.8 (18.7) 298.1 (11.7) 17.6 (0.69) 17.45 (0.69) 610.5 (24.0) ° 90 99.5 (3.92) 53.8 85 (3.35) (2.12) S2233W/S2243W (FlexStand) 481.5 (18.0) unit : mm (inch) 172 ° SWIVEL 17.6 (0.69) 285 (11.2) 30° 205.5 (8.1) 100 (3.9) 205.5 (8.
Connector Pin Assignment • DVI-D connector Pin No. Signal Pin No. Signal Pin No. Signal 1 T.M.D.S. Data 2- 9 T.M.D.S. Data1- 17 T.M.D.S. Data0- 2 T.M.D.S. Data 2+ 10 T.M.D.S. Data1+ 18 T.M.D.S. Data0+ 3 T.M.D.S. Data2/4 Shield 11 T.M.D.S. Data1/3 Shield 19 T.M.D.S. Data0/5 Shield 4 NC* 12 NC* 20 NC* 5 NC* 13 NC* 21 NC* 6 DDC Clock (SCL) 14 +5V Power 22 T.M.D.S. Clock shield 7 DDC Data (SDA) 15 Ground (return for +5V, Hsync, and Vsync) 23 T.M.D.S.
• USB port Upstream Upstream Series B connector Series A connector Contact No. Signal Remarks 1 VCC Cable power 2 – Data Serial data 3 + Data Serial data 4 Ground Cable ground Accessories List Cleaning Kit EIZO ScreenCleaner Speaker Unit i•Sound L3* Signal Cable PP200 * May not allowed to attach the option speaker depending on the stand type. For the latest information about the accessories, refer to our web site. http://www.eizo.
5-4 Glossary Clock The analog input monitor needs to reproduce a clock of the same frequency as the dot clock of the graphics system in use, when the analog input signal is converted to a digital signal for image display. This is called clock adjustment. If the clock pulse is not set correctly, some vertical bars appear on the screen. DDC/CI (Display Data Channel/Command Interface) VESA provides the standardization for the interactive communication of the setting information, etc.
Resolution The LCD panel consists of numerous pixels of specified size, which are illuminated to form images. This monitor consists of 1680 (S2233W) / 1920 (S2243W) horizontal pixels and 1050 (S2233W) / 1200 (S2243W) vertical pixels. At a resolution of 1680×1050 (S2233W) / 1920×1200 (S2243W), all pixels are illuminated as a full screen (1:1). sRGB (Standard RGB) International standard for “color reproduction and color space” among peripheral devices (such as monitors, printers, digital cameras, scanners).
5-5 Preset Timing The following table shows factory preset video timing (for analog signal only). Mode VGA 640×480@60Hz 25.2 MHz VGA TEXT 720×400@70Hz 28.3 MHz VESA 640×480@73Hz 31.5 MHz VESA 640×480@75Hz 31.5 MHz VESA 800×600@56Hz 36.0 MHz VESA 800×600@60Hz 40.0 MHz VESA 800×600@72Hz 50.0 MHz VESA 800×600@75Hz 49.5 MHz VESA 1024×768@60Hz 65.0 MHz VESA 1024×768@70Hz 75.0 MHz VESA 1024×768@75Hz 78.8 MHz VESA 1152×864@75Hz 108.0 MHz VESA 1280×960@60Hz 108.
For U.S.A. , Canada, etc. (rated 100-120 Vac) Only FCC Declaration of Conformity We, the Responsible Party EIZO NANAO TECHNOLOGIES INC. 5710 Warland Drive, Cypress, CA 90630 Phone: (562) 431-5011 declare that the product Trade name: EIZO Model: FlexScan S2233W/S2243W is in conformity with Part 15 of the FCC Rules.
Hinweise zur Auswahl des richtigen Schwenkarms für Ihren Monitor Dieser Monitor ist für Bildschirmarbeitsplätze vorgesehen. Wenn nicht der zum Standardzubehör gehörige Schwenkarm verwendet wird, muss statt dessen ein geeigneter anderer Schwenkarm installiert werden.
关于电子信息产品污染控制标识 本标识根据「电子信息产品污染控制管理办法」,适用于在中华人民共和国销售的电子信息产品。 标识中央的数字为环保使用期限的年数。只要您遵守该产品相关的安全及使用注意事项,在自制 造日起算的年限内,不会产生对环境污染或人体及财产的影响。上述标识粘贴在机器背面。 • 有毒有害物质或元素的名称及含量 部件名称 印刷电路板 机箱 液晶显示器 其他 铅 (Pb) × ○ × × 汞 (Hg) ○ ○ × ○ 有毒有害物质或元素 镉 六价铬 多溴联苯 (Cd) (Cr(VI)) (PBB) ○ ○ ○ ○ ○ ○ ○ ○ ○ ○ ○ ○ 多溴二苯醚 (PBDE) ○ ○ ○ ○ ○ :表示该有毒有害物质在该部件所有均质材料中的含量均在 SJ/T 11363-2006 规定的限量要求以下。 ×: 表示该有毒有害物质至少在该部件的某一均质材料中的含量超出 SJ/T 11363-2006 规定的限量要求。( 企业可 在此处 , 根据实际情況对上表中打“×” 的技术原因进行进一步说明 )