CONTENTS Chapter 1 Features and Overview 1-1 Features 1-2 Buttons and Indicators 1-3 Functions and Basic Operation Chapter 2 Settings and Adjustments 2-1 Utility Disk 2-2 Screen Adjustment 2-3 Color Adjustment 2-4 Off Timer/Power Saving Settings 2-5 Screen Size Selection Important Please read PRECAUTIONS, this User’s Manual and Setup Manual (separate volume) carefully to familiarize yourself with safe and effective usage.
Product specification may vary with sales areas. Confirm the specification in the manual written in language of the region of purchase. Copyright© 2007 EIZO NANAO CORPORATION All rights reserved. No part of this manual may be reproduced, stored in a retrieval system, or transmitted, in any form or by any means, electronic, mechanical, or otherwise, without the prior written permission of EIZO NANAO CORPORATION.
Notice for this monitor In order to suppress the luminosity change by long-term use and to maintain the stable luminosity, use of a monitor in lower brightness is recommended. The LCD panel is manufactured using high-precision technology. However, note that the appearance of any missing pixels or lit pixels does not indicate damage to the LCD monitor. Percentage of effective pixels: 99.9994% or higher. The backlight of the LCD panel has a fixed life span.
CONTENTS Notice for this monitor .............................................. 1 2-8 Locking Buttons ............................................ 18 ● To lock operation [Adjustment Lock]................. 18 To use the monitor comfortably ............................... 1 2-9 Chapter 1 Features and Overview ..................... 3 Setting Adjustment Menu Display ................ 18 ● To update menu settings [Menu Size/Menu Position/Menu Off Timer/Translucent] .............. 18 1-1 Features ..........
Chapter 1 Features and Overview Thank you very much for choosing an EIZO color LCD monitor. 1-1 • • • • • Features 24.1 (SX2461W) / 27.
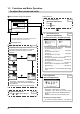
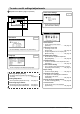
1-3 Functions and Basic Operation To adjust the screen and color Main menu (Refer to page 6 for operation) Analog input only 1 2 • The Adjustment menu and the FineContrast menu cannot be displayed at the same time. Screen Adjustment (Automatic Adjustment) Press . Press again.
To make useful settings/adjustments Adjustment menu (Refer to page 6 for operation) Power-save Settings Page 15 ● To set monitor power-saving [VESA DPMS/DVI DMPM] Information Page 19 Set the off timer ● To set monitor power-off time [Off Timer] …………………………… see page 14 ● To check settings, usage time, etc.
Basic operation of Adjustment menu [Displaying Adjustment menu and selecting function] (1) Press . The Main menu appears. (2) Select a function with / / / , and press . The Sub menu appears. (3) Select a function with / / / , and press . The adjustment/setting menu appears. (4) Adjust the selected item with / / / , and press . The setting is saved. [Exiting Adjustment menu] (1) Choose from the Sub menu and press (2) Choose from the Main menu and press . The Main menu appears. .
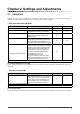
Chapter 2 Settings and Adjustments 2-1 Utility Disk “EIZO LCD Utility Disk” (CD-ROM) and “UniColor Pro” (CD-ROM) are supplied with the monitor. The following table shows the disk contents and the overview of the application software programs. ● EIZO LCD Utility Disk (CD-ROM) Item Overview A “Readme.txt” or “read me” file For Windows For Macintosh ✓ ✓ Color Profiles (ICC Profiles) A specific file including the color characteristic information for the monitor.
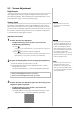
2-2 Screen Adjustment Digital Input When digital signals are input, images are displayed correctly based on the preset data of the monitor. When performing the advanced adjustment, see “2-3 Color Adjustment” (page 11) and its subsequence pages. Analog Input Attention The monitor screen adjustment is used to suppress flickering of the screen or adjust screen position and screen size correctly according to the PC to be used.
(2) Press . A message “Your setting will be lost, if you press again now” appears for five seconds. (3) Press again while the message is displayed. The Auto Adjustment function begins (showing a running status icon) to adjust flickering, screen position, and screen size automatically. • If the screen is displayed correctly : go to step 5 • If the screen is not displayed correctly : go to step 4 4 Perform advanced adjustments for the following using the menu of the Adjustment menu.
● To adjust extra or cut image [Resolution] This adjustment is available to equalize the resolution shown on the Setting menu and the resolution of input signal. (1) Choose from the menu, and press . The menu appears. (2) Adjust the vertical resolution with or resolution with or , and press . , and then horizontal The adjustment is completed. Extra image is displayed due to excessive dots. A part of image is cut due to short dots. 5 Adjust the color gradation.
2-3 Color Adjustment Simple adjustment [FineContrast mode] This function allows you to select the best display mode for monitor brightness, etc. ● FineContrast Mode An appropriate display mode is selectable out of five modes. Mode Purpose Custom Available for making desired setting. sRGB Suitable for color matching with sRGB compatible peripherals. Text Suitable for displaying texts for word processing or spreadsheets. Picture Suitable for displaying images such as photos or picture images.
Advanced Adjustments [Adjustment menu] Attention Independent setting and saving of color adjustment are available for each FineContrast mode.
Menu Gain Description Adjustment range To adjust red, green, and 0 to 100% blue to a desired color tone Adjust the respective brightness of respectively red/green/blue to make a desired color tone. Display an image with white or gray background for adjustment. NOTE • The values shown in the “%” are available only as reference. • When using the setting, the setting is set to “Off.
2-4 Off Timer/Power Saving Settings ● To set monitor power-off time [Off Timer] This function allows the monitor to automatically turn off after a specified time has passed. This function serves to reduce afterimages caused when the monitor screen is left on for a long time period without use. Use this function when an image is displayed throughout the day. [Off Timer System] Timer ON time (1H - 23H) Monitor Power Indicator Operating Blue Last 15 min.
● To set monitor power-saving [VESA DPMS/DVI DMPM] ■ Analog input This monitor complies with the VESA DPMS standard. [Power Saving System] Attention PC Operating Power saving Power Indicator Monitor STAND-BY SUSPENDED OFF Operating Blue Power saving Orange [Procedure] (1) Choose from the Adjustment menu, and press • Unplugging the power cord completely shuts off power supply to the monitor.
2-5 Screen Size Selection ● To change screen size [Screen Size] The image with the resolution other than the recommended resolution is displayed in full screen automatically. You can change the screen size by using from menu. Menu Function Full Screen (default setting) Displays an image in full screen. Images are distorted in some cases because the vertical rate is not equal to the horizontal rate. Enlarged Displays an image in full screen.
2-6 Power Indicator/EIZO Logo Display Setting ● To turn off the Power indicator while a screen is displayed [Power Indicator] NOTE • The Power indicator lights up at power on with the default setting. This function enables to turn off the Power indicator (blue) while a screen is displayed. (1) Choose from the Adjustment menu, and press . (2) Choose from the menu, and press . The menu appears. (3) Select “Disable” with or , and press .
2-8 Locking Buttons ● To lock operation [Adjustment Lock] This function locks the buttons to retain the status adjusted or set once. Buttons that can be locked • • • • (Enter button) (Auto button) (Mode button) / / / / (Control buttons) Buttons that cannot be locked • • • (Power button) (Input signal selection) (Adjustment Lock button) (1) Press for more than two seconds. The adjustment lock setting is completed. [Unlocking] (1) Press again for more than two seconds.
Translucent Set the transparency for menu display using the following procedure. (1) Choose from the Adjustment menu, and press . (2) Choose
2-12 Setting BrightRegulator ● To set automatic brightness adjustment [BrightRegulator] The sensor on the front side of the monitor detects the environmental brightness to adjust the screen brightness automatically and comfortably. (1) Choose from the Adjustment menu, and press . (2) Choose < BrightRegulator> from the menu, and press NOTE • Be careful not to block the sensor on the lower side of the monitor when using the BrightRegulator function. .
Chapter 3 Connecting Cables 3-1 Connecting Two PCs to the Monitor Two PCs can be connected to the monitor through the DVI-I connector on the back of the monitor.
● To set priority of PC to be displayed [Input Priority] NOTE When two PCs are connected, either one can be displayed preferentially. The monitor senses the input signal regularly. When the signal that is given priority with the setting is input, signal input switches automatically to the prior signal. Priority setting 1 Input from Signal 1 2 Input from Signal 2 Manual Function The input signal from “Signal 1” is displayed in the following cases. • When the monitor is turned on.
3-2 Connecting Peripheral USB Devices This monitor has a hub compatible with USB. Connected to a PC compatible with USB or another USB hub, this monitor functions as a USB hub allowing connection to peripheral USB devices. ● Required System Environment (1) A PC equipped with a USB port or another USB hub connected to a USB compatible PC (2) Windows 2000/XP/Vista or Mac OS 9.2.2 and Mac OS X 10.
Chapter 4 Troubleshooting If a problem still remains after applying the suggested remedies, contact your local dealer. • • • • • No-picture problems → See No.1 - No.2. Imaging problems (digital input) → See No.3 - No.8. Imaging problems (analog input) → See No.3 - No.13. Other problems → See No.14 - No.17. USB problems → See No.18. Problems 1. Possible cause and remedy No picture • Power indicator does not light. • Check whether the power cord is connected correctly.
Problems 9. Display position is incorrect. Possible cause and remedy • Adjust image position so that it is displayed properly within the display area using the adjustment. (See page 9) • If the problem persists, use the graphics board’s utility if available to change the display position. 10. Screen image displayed is smaller or larger than the actual screen image.
Chapter 5 Reference 5-1 Attaching an Arm The stand can be removed and replaced with an arm (or another stand) to be attached to the monitor. Use an arm or stand of EIZO option. [Attaching] 1 2 3 26 Lay the LCD monitor on a soft cloth spread over on a stable surface with the panel surface facing down. Remove the stand. (Prepare a screwdriver.) Unscrew the four screws securing the unit and the stand with the screwdriver. Attach the monitor to the arm or stand.
5-2 Cleaning Clean the monitor periodically to keep the monitor clean and extend its life. Cabinet Clean the cabinet with a soft cloth dampened with little mild detergent. LCD Panel • Clean the LCD panel with a soft cloth such as cotton cloth or lens cleaning paper. • Remove persistent stains gently with a cloth dampened with little water, and then clean the LCD panel again with a dry cloth for better finishing.
5-3 Specifications SX2461W LCD Panel 24.1-inch (610 mm) TFT color LCD with anti-glare hard coating Viewing angle: Horizontal 178°, Vertical 178° (CR:10 or more) Dot Pitch 0.270mm Horizontal Scan Frequency Analog: 24-94kHz Digital: 31-76kHz Vertical Scan Frequency Analog: 49-86Hz (Non-interlace) (1600 × 1200: 49-76Hz) (1920 × 1200: 49-61Hz) Digital: 59-61Hz (Non-interlace) (VGA TEXT: 69-71Hz) Resolution 1920 dots × 1200 lines Max. Dot Clock Analog: 202.5MHz Digital: 162MHz Max.
USB Standard USB Specification Revision 2.0 Port Upstream port × 1, Downstream port × 2 Supply current Downstream: Max. 500mA/1 port SX2761W LCD Panel 27.0-inch (690 mm) TFT color LCD with anti-glare hard coating Viewing angle: Horizontal 178°, Vertical 178° (CR:10 or more) Dot Pitch 0.
Environmental Conditions USB Temperature Operating temperature: 0 °C - 35 °C (32 °F - 95 °F) Storage temperature: -20 °C - 60 °C (-4 °F - 140 °F) Humidity Relative humidity: 30% - 80% (no condensation) Standard USB Specification Revision 2.0 Port Upstream port × 1, Downstream port × 2 Supply current Downstream: Max.
Outside Dimensions SX2461W 190(7.5) unit : mm (inch) 35 ° 35° SWIVEL 566(22.3) 520.4(20.5) 12~71.5 (0.47~2.81) 233(9.2) 100(3.9) 133.5(5.3) 532(20.9) 100(3.9) 222.5(8.8) 133.5(5.3) 162.5(6.4) 33(1.3) 398.5(15.7) 233(9.2) 69.8 (2.75) 301.5~383.5(11.9~15.1) 326(12.8) 367(14.4) 456~538(18.0~21.2) 272.5~354.5(10.7~14.0) 89~171(3.5~6.7) TILT 40 ° 85(3.35) 56.3 (2.22) 230(9.1) Outside Dimensions SX2761W 240(9.4) unit : mm (inch) 35 ° 35 ° SWIVEL 630(24.8) 587.2(23.1) TILT 40 ° 86(3.39) 13.
Connector Pin Assignment • DVI-I connector 1 2 3 4 5 6 7 8 9 10 11 12 13 14 15 16 17 18 19 20 21 22 23 24 Pin No. C1 C2 C3 C4 C5 Signal Pin No. Signal Pin No. Signal 1 T.M.D.S. Data 2- 11 T.M.D.S. Data1/3 Shield 21 NC* 2 T.M.D.S. Data 2+ 12 NC* 22 T.M.D.S. Clock shield 3 T.M.D.S. Data2/4 Shield 13 NC* 23 T.M.D.S. Clock+ 4 NC* 14 +5V Power 24 T.M.D.S.
5-4 Glossary Clock The analog input monitor needs to reproduce a clock of the same frequency as the dot clock of the graphics system in use, when the analog input signal is converted to a digital signal for image display. This is called clock adjustment. If the clock pulse is not set correctly, some vertical bars appear on the screen. DVI (Digital Visual Interface) DVI is a digital interface standard. DVI allows direct transmission of the PC’s digital data without loss.
Temperature Color temperature is a method to measure the white color tone, generally indicated in degrees Kelvin. The screen becomes reddish at a low temperature, and bluish at a high temperature, like the flame temperature. 5000K: Slightly reddish white 6500K: Warm white like paper white 9300K: Slightly bluish white TMDS (Transition Minimized Differential Signaling) A signal transmission system for digital interface.
5-5 Preset Timing The following table shows factory preset video timing (for analog signal only). Mode Dot clock VGA 640×480@60Hz 25.2 MHz VGA 720×400@70Hz 28.3 MHz Macintosh 640×480@67Hz 30.2 MHz Macintosh 832×624@75Hz 57.3 MHz Macintosh 1152×870@75Hz 100.0 MHz Macintosh 1280×960@75Hz 126.2 MHz VESA 640×480@72Hz 31.5 MHz VESA 640×480@75Hz 31.5 MHz VESA 640×480@85Hz 36.0 MHz VESA 800×600@56Hz 36.0 MHz VESA 800×600@60Hz 40.0 MHz VESA 800×600@72Hz 50.0 MHz VESA 800×600@75Hz 49.
Mode Dot clock VESA 1600×1200@70Hz 189.0 MHz VESA 1600×1200@75Hz 202.5 MHz VESA CVT 1680×1050@60Hz 146.3 MHz VESA CVT 1920×1200 193.3 MHz VESA CVT RB 1920×1200 154.0 MHz 36 Chapter 5 Reference Horizontal Vertical Horizontal Vertical Horizontal Vertical Horizontal Vertical Horizontal Vertical Frequency Horizontal: kHz Vertical: Hz 87.50 70.00 93.80 75.00 65.29 59.95 74.56 59.89 74.04 59.
For U.S.A. , Canada, etc. (rated 100-120 Vac) Only FCC Declaration of Conformity We, the Responsible Party EIZO NANAO TECHNOLOGIES INC. 5710 Warland Drive, Cypress, CA 90630 Phone: (562) 431-5011 declare that the product Trade name: EIZO Model: FlexScan SX2461W/SX2761W is in conformity with Part 15 of the FCC Rules.
Hinweise zur Auswahl des richtigen Schwenkarms für Ihren Monitor Dieser Monitor ist für Bildschirmarbeitsplätze vorgesehen. Wenn nicht der zum Standardzubehör gehörige Schwenkarm verwendet wird, muss statt dessen ein geeigneter anderer Schwenkarm installiert werden.