Important Please read PRECAUTIONS, this User’s Manual, and the Setup Guide (separate volume) carefully to familiarize yourself with safe and effective usage. • Please refer to the Setup Guide for basic information ranging from connection of the monitor to a PC to using the monitor. • The latest User’s Manual is available for download from our web site: http://www.eizo.
Location of Caution Statement This product has been adjusted specifically for use in the region to which it was originally shipped. If operated outside this region, the product may not perform as stated in the specifications. No part of this manual may be reproduced, stored in a retrieval system, or transmitted, in any form or by any means, electronic, mechanical, or otherwise, without the prior written permission of EIZO NANAO CORPORATION.
Notice for this monitor Aside from general purposes like creating documents, viewing multimedia content, this product is also suited to applications such as creations of images and graphics, and digital photo processing, where accurate color reproduction is a priority. This product has been adjusted specifically for use in the region to which it was originally shipped. If the product is used outside the region, it may not operate as specified in the specifications.
Cleaning Attention • Chemicals such as alcohol and antiseptic solution may cause gloss variation, tarnishing, and fading of the cabinet or panel, and also quality deterioration of the image. • Never use any thinner, benzene, wax, and abrasive cleaner, which may damage the cabinet or panel. If necessary, the stains on the cabinet and panel surface can be removed by using the provided ScreenCleaner. To use the monitor comfortably • An excessively dark or bright screen may affect your eyes.
CONTENTS Cover....................................................................... 1 2-7. Specifying Color Space.............................. 27 Notice for this monitor.......................................... 3 2-8. Setting HDMI................................................. 28 Cleaning..................................................................... 4 To use the monitor comfortably.............................. 4 CONTENTS..............................................................
7-3. Making Use of USB (Universal Serial Bus)................................................................ 50 ●●System Requirement...................................... 50 ●●Procedure....................................................... 50 7-4. Showing Monitor Information.....................51 7-5. Specifications.............................................. 52 ●●Displaying signal information “Signal Info”.....51 ●●Displaying Monitor Information “Monitor Info”.51 Chapter 8 Glossary...........
Chapter 1 Introduction 1-1. Features • • • • • • 27.0″ wide format LCD Wide color gamut (Adobe RGB coverage: 97%) Applicable to the resolution of 2560 × 1440. IPS panel with 178˚ horizontal and vertical viewing angles Frame synchronization mode supported (23.75 - 30.5Hz, 47.5 - 61.0Hz) 3 signal input terminals (DVI-D × 1, HDMI × 1, DisplayPort × 1) -- DisplayPort (applicable to 8 bit and 10 bit)*1 -- HDMI (applicable to 8 bit, 10 bit, and 12 bit)*1 *1 Not applicable to audio signals.
Attention Be careful of the following points when using the built-in calibration sensor. Do not touch the built-in calibration sensor. It may reduce the measurement accuracy of the built-in calibration sensor, or result in injury or equipment damage. Attention • A high temperature or high humidity environment may affect the measurement accuracy of the built-in calibration sensor. We suggest storing and using the monitor under the following conditions.
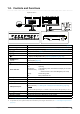
1-2. Controls and Functions Adjustment menu*1 1 15 16 17 2 3 4 5 6 7 8 9 10 11 12 13 14 1. Built-in calibration sensor Executes calibration for an independent monitor. SelfCalibration function (page 36) 2. Ambient Light Sensor Measures ambient light. button 3. 4. button button 5. 6. 7. 8. buttons button button Switches input signals for display (“To switch among input signals” (page 49)). Changes Color Mode (page 17). Cancels the setting/adjustment and exits the Adjustment menu.
1-3. EIZO LCD Utility Disk An “EIZO LCD Utility Disk” (CD-ROM) is supplied with this product. The following table shows the disk contents and the overview of the software programs. ●●Disk contents and software overview The disk includes application software programs for adjustment, and User’s Manual. Refer to “Readme.txt” or the “read me” file on the disk for software startup procedures or file access procedures. Contents Overview A “Readme.
1-4. Basic Operations and Functions ●●Basic Adjustment menu operations 1. Displaying Adjustment Menu 1. Press . The Adjustment menu appears. Menu title Current mode Item Setting Menu 2. Adjusting/Setting 1. Choose a menu to adjust/set with 2. Choose an item to adjust/set with 3. Adjust/set the selected item with , and then press . , and then press , and then press . . 3. Exiting the software 1. Press a few times. The Adjustment menu finishes.
●●Showing Button Guide When you press the front buttons (except the button), the button guide appears next to the button. Button Guide Control button Note • The button guide will continue to appear while the Adjustment menu or Mode menu is showing. • The button guide is displayed differently depending on the selected menu or status. • In CAL mode, the brightness cannot be adjusted even though the button guide is displayed above the 12 Chapter 1 Introduction and buttons.
●●Functions The following table shows the menus for adjustment and setting items of each menu. Main Menu Color*1 Item Reference “2-3. Adjusting Color” (page 17) Brightness Temperature Gamma Advanced Settings Hue Saturation Outline Enhancer Clipping Gain Black Level 6 Colors SelfCalibration Color Reset “3-10. Reset to default” (page 34) Execute “4-2. Executing SelfCalibration” (page 39) Result “4-3. Checking Adjustment Results” (page 40) Settings Mode Selection “4-1.
Power Manager Power Save “5-1. Setting Power Save” (page 41) Indicator “5-2. Sets the brightness of the indicator” (page 42) Menu Settings Language “3-2. Selecting the Language” (page 31) Orientation “3-3. Setting Orientation” (page 31) Menu Position “3-4. Changing Adjustment Menu Display Position” (page 32) Input Selection “To switch among input signals” (page 49) Mode Preset “3-1. Enabling/Disabling Mode Selection” (page 31) Tools USB Selection DVI DisplayPort “3-8.
Chapter 2 Adjusting Screens 2-1. Compatible Resolutions The monitor supports the following resolutions.
2-2. Setting Resolution When you connect the monitor to the PC and find that the resolution is improper, or when you want to change the resolution, follow the procedure below. ●●Windows 7 1. Right-click the mouse anywhere on the desktop except for icons. 2. From the displayed menu, click “Screen resolution”. 3. On the “Screen Resolution” dialog box, select the monitor. 4. Click “Resolution” to select the desired resolution. 5. Click the “OK” button. 6.
2-3. Adjusting Color ●●To select the display mode (color mode) This function allows easy selection of a desired mode according to monitor application. Display Modes Mode Purpose 1-Custom Available for the color settings according to your preference. 2-Adobe® RGB Suitable for color matching with Adobe ® RGB compatible peripherals. 3-sRGB Suitable for color matching with sRGB compatible peripherals.
●●To perform advanced adjustments “Color” of the Adjustment menu allows you to configure and save a separate set of color settings for each mode. Attention • It takes about 7 minutes (under our measurement conditions) for the performance of electrical parts to stabilize. Please wait 7 minutes or more after the monitor power has been turned on, and then adjust the monitor. • The same image may be seen in different colors on multiple monitors due to their monitor-specific characteristics.
●●Adjusting Brightness The screen brightness is adjusted by changing the brightness of the backlight (light source from the LCD back panel). Setting Range 75cd/m 2 to 350 cd/m 2 Procedure 1. Press or . The Brightness menu appears. 2. Use or for adjustment. to exit. 3. Press Attention • If the entered value cannot be set, the value will appear in magenta. In such a case, change the value. Note • Alternatively, you can use “Brightness” under “Color” in the Adjustment menu to adjust it.
●●Adjusting Gamma Gamma can be adjusted. The brightness of the monitor varies depending on the input signal, however, the variation rate is not proportional to the input signal. To keep the balance between the input signal and the brightness of the monitor is called as “Gamma correction”. Setting Range 1.6 - 2.7, Standard Procedure . 1. Choose “Color” from the Adjustment menu, and press 2. Choose “Gamma” from “Color”, and press 3. Use or . for adjustment. to exit. 4.
●●Adjusting Saturation This function allows you to adjust color saturation. Setting Range -100 to 100 Procedure . 1. Choose “Color” from the Adjustment menu, and press 2. Choose “Advanced Settings” from “Color”, and press 3. Choose “Saturation”, and press 4. Use or 5. Press . . for adjustment. to exit. Attention • Using this function may make some color gradations unavailable for display. Note • The minimum value (-100) changes the screen to monochrome.
●●To set clipping This function allows you to display the monitor with the colors based on the standard values of the defined color gamut (such as sRGB). The method of displaying the defined color gamut outside the normal gamut of the monitor can be set. Procedure . 1. Choose “Color” from the Adjustment menu, and press 2. Choose “Advanced Settings” from “Color”, and press 3. Choose “Clipping”, and press 4. Select “On” or “Off” with . . or . On Displays colors based on the standard values.
●●Adjusting Gain The brightness of each color component red, green, and blue is called Gain. You can change the hue of “white” by adjusting gain. Setting Range 0% to 100% Procedure . 1. Choose “Color” from the Adjustment menu, and press 2. Choose “Advanced Settings” from “Color”, and press 3. Choose “Gain”, and press . . 4. Choose the color for adjustment from “Red”, “Green”, and “Blue”, and press 5. Use or . for adjustment. to exit. 6.
●●Adjusting 6 Colors The hue and saturation can be adjusted for each of six colors: Magenta, Red, Yellow, Green, Cyan, and Blue. Adjustable Range -100 to 100 Procedure . 1. Choose “Color” from the Adjustment menu, and press 2. Choose “Advanced Settings” from “Color”, and press 3. Choose “6 Colors”, and press . . 4. Choose the color for adjustment from “Magenta”, “Red”, “Yellow”, “Green”, “Cyan”, and “Blue”, and press . 5. Select “Hue” or “Saturation”, and press 6. Use or 7. Press . for adjustment.
2-5. Selecting Screen Size The image with the resolution other than the recommended resolution is displayed in full screen automatically. You can change the screen size by using the “Screen Size” function from “Screen”. ●●DVI, DisplayPort (PC signal) input Settings Function Full Displays an image in full screen. Images are distorted in some cases because the vertical rate is not equal to the horizontal rate. Enlarged Displays an image in full screen.
●●HDMI (HD signal) input Settings Function Enlarged Displays an image in full screen. In some cases, a blank horizontal or vertical border appears to equalize the vertical rate and the horizontal rate. Dot by Dot Displays images with the specified resolution. Example: 720p Enlarged Dot by Dot Procedure . 1. Choose “Screen” from the Adjustment menu, and press . 2. Choose “Screen Size” from “Screen”, and press 3. Select “Enlarged”, or “Dot by Dot” with or . to exit. 4.
2-6. Configuring Moving Image Performance This function reduces visible afterimages that appear in fast moving images. If noise or afterimage is adversely noticeable, set the “Overdrive” setting to “Off”. Default setting: On Procedure . 1. Choose “Screen” from the Adjustment menu, and press 2. Choose “Overdrive” from “Screen”, and press 3. Select “On” or “Off” with 4. Press . or . to exit. 2-7. Specifying Color Space The color space of the input signal can be specified.
2-8. Setting HDMI ●●Reducing noise The small noises that occur in dark images are reduced. Use this function to reduce noise and roughness in images. Procedure . 1. Choose “Screen” from the Adjustment menu, and press 2. Choose “HDMI Settings” from “Screen”, and press . 3. Choose “Noise Reduction”, and press 4. Select “On” or “Off” with 5. Press . or . to exit. Attention • Using the Noise Reduction function may deteriorate fine images.
Enabling Pseudo Interlace The input interlace signal is displayed as it is without conversion, enabling images with a CRT-like texture to be displayed. Procedure . 1. Choose “Screen” from the Adjustment menu, and press 2. Choose “HDMI Settings” from “Screen”, and press 3. Choose “Pseudo Interlace”, and press 4. Select “On” or “Off” with 5. Press . . or . to exit. Attention • This function is enabled only during the 1080i signal input.
Setting safe area size The size of the safe area can be set. Adjustable Range 80% to 99% Procedure . 1. Choose “Screen” from the Adjustment menu, and press 2. Choose “HDMI Settings” from “Screen”, and press . 3. Choose “Safe Area Size”, and press 4. The size of the safe area is set with 5. Press . or . to exit. Setting safe area frame Procedure . 1. Choose “Screen” from the Adjustment menu, and press 2. Choose “HDMI Settings” from “Screen”, and press 3. Choose “Border Color”, and press . . 4.
Chapter 3 Setting Monitor 3-1. Enabling/Disabling Mode Selection This function selects / deselects modes that should be skipped. Please use this function if you would like to prevent a mode from being used. Procedure . 1. Choose “Tools” from the Adjustment menu, and press 2. Choose “Mode Preset” from “Tools”, and press 3. Use or to select the mode to change, and press 4. Select “On” or “Off” with 5. Press . . or . to exit. Attention • You cannot set all the modes disable.
3-4. Changing Adjustment Menu Display Position You can change the display position of the Adjustment menu. Procedure . 1. Choose “Menu Settings” from the Adjustment menu, and press . 2. Choose “Menu Position” from “Menu Settings”, and press 3. Choose the position with or . to exit. 4. Press 3-5. Showing and Hiding the EIZO Logo Procedure 1. Press to turn off the monitor. down, press 2. Holding for at least two seconds to turn on the monitor. The “Optional Settings” menu appears. 3.
3-7. Setting Signal Bandwidth The range of frequency and detection sensitivity of the change in signal can be switched. Attention • The graphics board supporting signal display is required. Refer to the User’s Manual of the graphics board. • This function cannot be used with HDMI input. Procedure 1. Press to turn off the monitor. down, press 2. Holding for at least two seconds to turn on the monitor. The “Optional Settings” menu appears. 3.
3-9. Changing DUE (Digital Uniformity Equalizer) Setting The DUE setting can be changed. Settings Function Brightness Makes the brightness and color of the whole screen uniform without changing the maximum brightness and contrast ratio. The brightness of a high gradation area is not corrected. Select this setting to prioritize the levels of the brightness and contrast over the uniformity in the high gradation area. Uniformity (Default setting) Makes the brightness and color of the whole screen uniform.
●●To reset all adjustments to the default settings This function resets all adjustments to the default settings (except the “Optional Settings” menu and “USB Selection”. Procedure 1. Choose “Tools” from the Adjustment menu, and press 2. Choose “All Reset” from “Tools”, and press 3. Select “Execute” with 4. Press . . or . .
Chapter 4 SelfCalibration This product is equipped with a built-in calibration sensor. The conditions that have been adjusted using ColorNavigator and the measurement device can be maintained. As the adjustment targets or interval times for SelfCalibration are set in advance using ColorNavigator, the built-in calibration sensor automatically executes regular calibration. Monitor operation and setting are not necessary when ColorNavigator is used.
●●Setting calibration schedule Set the calibration schedule for SelfCalibration. Attention • Clock adjustment is necessary for SelfCalibration to operate. Procedure 1. Choose “SelfCalibration” from the Adjustment menu, and press . 2. Choose “Settings” from “SelfCalibration”, and press 3. Choose “Schedule” from “Settings”, and press . . The schedule setting menu appears. 4.
●●Set the mode for which SelfCalibration is executed. Set the time at which SelfCalibration is executed. Procedure 1. Choose “SelfCalibration” from the Adjustment menu, and press . 2. Choose “Settings” from “SelfCalibration”, and press . 3. Choose “Mode Selection” from “Settings”, and press 4. Use or to select the mode to change, and press 5. Select “On” or “Off” with 6. Press . . or . to exit.
●●Setting Adjustment Target Set the calibration targets for SelfCalibration. Procedure 1. Choose “SelfCalibration” from the Adjustment menu, and press . 2. Choose “Settings” from “SelfCalibration”, and press . 3. Choose “Target” from “Settings”, and press 4. Use or . to select the mode to change, and press . The target setting menu appears. 5. Use or to select the items to change, and press Settings .
4-3. Checking Adjustment Results The previous SelfCalibration results can be checked. Procedure 1. Choose “SelfCalibration” from the Adjustment menu, and press 2. Choose “Result” from “SelfCalibration”, and press 3. Select the mode you want to check the results for with . . or . The Result menu appears. The date and time the last SelfCalibration was executed, and the total monitor usage time from the previous calibration are displayed. 4. Select “Calibration Result” or “Ambient Light” with or .
Chapter 5 Power Saving Functions 5-1. Setting Power Save This function allows you to set the monitor into the power saving mode according to the PC status. When the monitor has shifted to the power saving mode, the images on the screen are not displayed. Attention • Turning off the main power switch or unplugging the power cord completely shuts off power supply to the monitor.
5-2. Sets the brightness of the indicator The brightness of the power indicator (blue) and the function indicator below the operation keys when the screen is displayed can be set. (The both indicators are set to light up when the power is switched on, and are set to 4 by default.) Procedure . 1. Choose “PowerManager” from the Adjustment menu, and press 2. Choose “Indicator” from “PowerManager”, and press . or 3. Select the indicator brightness “Off” or in the range from 1 to 7 with as desired. to exit.
Chapter 6 Troubleshooting If a problem still remains after applying the suggested remedies, contact your local EIZO representative. 6-1. No picture Problem 1. No picture • Power indicator does not light. Possible cause and remedy • • • • Check whether the power cord is connected properly. Press . Turn the main power switch on. Turn off the main power, and then turn it on again a few minutes later. • Power indicator is lighting blue.
6-2. Imaging problems Problem 44 Possible cause and remedy 1. The screen is too bright or too dark. • Use “Brightness” in the Adjustment menu to adjust it. (The LCD monitor backlight has a limited life span.) When the screen becomes dark or begins to flicker, contact your local EIZO representative.) 2. Characters are blurred. • Check whether the PC is configured to meet the resolution and vertical scan frequency requirements of the monitor (see “2-1. Compatible Resolutions” (page 15)).
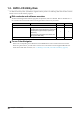
6-3. Other problems Problem Possible cause and remedy 1. The adjustment menu does not appear. • Check whether the operation lock function works (see “3-6. Locking Operation Button” (page 32)). 2. No mode menu is displayed. • Check whether the operation lock function works (see “3-6. Locking Operation Button” (page 32)). 3. The monitor connected with the USB cable is not detected. / USB devices connected to the monitor does not work. • Check whether the USB cable is connected correctly (see “7-3.
6-4. Built-in calibration sensor and SelfCalibration problems Problem Possible cause and remedy 1. The built-in calibration sensor does not come out/stays out. • Turn off the main power, and then turn it on again a few minutes later. 2. SelfCalibration cannot be executed. • Check whether the date and time are set correctly (see “Setting monitor date and time” (page 36)). • Check whether the mode is set (see “Set the mode for which SelfCalibration is executed.” (page 38)).
Chapter 7 Reference 7-1. Attaching the Optional Arm An optional arm (or an optional stand) can be attached by removing the stand section. Please refer to our web site for the corresponding optional arm (or optional stand). http://www.eizo.com Attention • When attaching an arm or stand, follow the instructions of their User’s Manual. • When using another manufacturer’s arm or stand, confirm the following in advance and select one conforming to the VESA standard.
7-2. Connecting Multiple External Devices The product has multiple connections to external devices and allows you to switch to one of the connections for display. Connection examples DVI-D connector Digital (DVI) Digital (HDMI) Signal cable (supplied DD200-DL) HDMI cable (Commercially available product) *1 DVI connector To external device 1 *1 Use a product able to handle High Speed .
●●To switch among input signals The input signal switches each time is pressed. When the signal is switched, the active input port name appears at the top right corner of the screen. ●●To set input signal selection “Input Selection” Settings Function Auto The monitor recognizes the connector through which signals are input. When an external device enters the power saving mode, the monitor automatically displays another signal.
7-3. Making Use of USB (Universal Serial Bus) This monitor has a USB hub. Connected to a PC compatible with USB, this monitor functions as a USB hub allowing connection to peripheral USB devices. ●●System Requirement • A PC equipped with a USB port. • Windows 2000/XP/Vista/7 or Mac OS 9.2.2 and Mac OS X 10.2 or later • USB cable Attention • This monitor may not work depending on PC, OS or peripheral devices. For USB compatibility of peripheral devices, contact their manufactures.
7-4. Showing Monitor Information ●●Displaying signal information “Signal Info” This function displays the information about the current input signals displayed. Procedure . 1. Choose “Tools” from the Adjustment menu, and press 2. Choose “Signal Info” from “Tools”, and press . The “Signal Info” appears. (Example) ●●Displaying Monitor Information “Monitor Info” This function displays the information about the monitor. Procedure . 1. Choose “Tools” from the Adjustment menu, and press 2.
7-5. Specifications LCD Panel Max. dot clock Size 27.0 inch (680 mm) Type Color TFT, IPS Surface treatment Hard Coating Surface hardness 3H Viewing angles Horizontal: 178˚, vertical: 178˚ (CR≥10) Dot pitch 0.233 mm Response time Black-white-black: Approx. 12 ms Gray-to-gray: Approx. 6 ms DVI / DisplayPort 242 MHz HDMI 149 MHz Horizontal scan DVI / DisplayPort frequency HDMI 26 kHz - 89 kHz Vertical scan frequency DVI / DisplayPort 23.
Environmental conditions Temperature Humidity Air pressure USB Operating: 0˚C to 35˚C (32˚F to 95˚F) Storage/Transportation: -20˚C to 60˚C (-4˚F to 140˚F) Operating: 20% to 80% R.H. (no condensation) Storage/Transportation: 10% to 90% R.H. (no condensation) Operating: 700 hPa to 1060 hPa Storage/Transportation: 200 hPa to 1060 hPa Standard USB Specification Revision 2.0 Port Upstream port × 2, Downstream port × 2 Communication Speed 480 Mbps (high), 12 Mbps (full), 1.
Outside Dimensions Unit: mm (inch) 7.5 (0.30) 344° SWIVEL 58.5 (2.30) 92 (3.62) 616 (24.3) 646 (25.4) 23.5 (0.93) 279 (11.0) TILT 30°~ 273 (10.7) 58 (2.28) 414 (16.3) 273 (10.7) 106 (4.2) 25 (0.98) 383.5 (15.1) 296 (11.7) 15.5 (0.61) 174.5 (6.9) 381 (15.0) 215 (8.5) 604 (23.8) 402 (15.8) 37.6 (1.48) °~ 704 (27.7) 90 576.5 (22.7) PIVOT 31 (1.22) 45.5 (1.79) 256.5 (10.1) 100 (3.9) 156.6 (6.2) 100 (3.9) 145.4 (5.7) 599 (23.6) 26.4 (1.04) 23.5 (0.93) 313 (12.3) 255 (10.
Chapter 8 Glossary Adobe RGB This is a definition of the practical RGB color space proposed by Adobe Systems in 1998. The color reproduction range (color gamut) is broader than sRGB, and is highly adaptable to such fields as printing etc. Clock The analog signal input monitor needs to reproduce a clock of the same frequency as the dot clock of the graphics system in use, when the analog signal is converted to a digital signal for image display. This is called clock adjustment.
Gain This is used to adjust each color parameter for red, green and blue. An LCD monitor displays the color by the light passing through the panel color filter. Red, green and blue are the three primary colors. All the colors on the screen are displayed by combining these three colors. The color tone can be changed by adjusting the light intensity (volume) passing through each color’s filter.
sRGB (Standard RGB) International standard for color reproduction and color space among peripheral devices (such as monitors, printers, digital cameras, scanners). As a form of simple color matching for the Internet, colors can be displayed using tones close to those of the transmission and reception devices. Temperature Color temperature is a method to measure the white color tone, generally indicated in degrees Kelvin.
Appendix Trademark The terms HDMI and HDMI High-Definition Multimedia Interface, and the HDMI Logo are trademarks or registered trademarks of HDMI Licensing, LLC in the United States and other countries. The DisplayPort Compliance Logo and VESA are registered trademarks of the Video Electronics Standards Association. Acrobat, Adobe, Adobe AIR, and Photoshop are registered trademarks of Adobe Systems Incorporated in the United States and other countries.
FCC Declaration of Conformity For U.S.A. , Canada, etc. (rated 100-120 Vac) Only FCC Declaration of Conformity We, the Responsible Party EIZONANAOTECHNOLOGIESINC. 5710WarlandDrive,Cypress,CA90630 Phone:(562)431-5011 declare that the product Tradename:EIZO Model:ColorEdgeCG276 is in conformity with Part 15 of the FCC Rules.
Hinweise zur Auswahl des richtigen Schwenkarms für Ihren Monitor Dieser Monitor ist für Bildschirmarbeitsplätze vorgesehen. Wenn nicht der zum Standardzubehör gehörige Schwenkarm verwendet wird, muss statt dessen ein geeigneter anderer Schwenkarm installiert werden.
LIMITED WARRANTY LIMITED WARRANTY EIZO NANAO CORPORATION (hereinafter referred to as “EIZO”) and distributors authorized by EIZO (hereinafter referredtoasthe“Distributors”)warrant,subjecttoandinaccordancewiththetermsofthislimitedwarranty(hereinafter referred to as the “Warranty”), to the original purchaser (hereinafter referred to as the “Original Purchaser”) who purchasedtheproductspecifiedinthisdocument(hereinafterreferredtoasthe“Product”)from
BEGRENZTE GARANTIE EIZONANAOCORPORATION(imWeiterenals„EIZO“bezeichnet)unddieVertragsimporteurevonEIZO(imWeiteren als „Vertrieb(e)“ bezeichnet) garantieren dem ursprünglichen Käufer (im Weiteren als „Erstkäufer“ bezeichnet), der dasindiesemDokumentvorgegebeneProdukt(imWeiterenals„Produkt“bezeichnet)vonEIZOodereinemVertrieb erworbenhat,gemäßdenBedingungendieserbeschränktenGarantie(imWeiterenals„Garantie“bezeichnet),dass EIZO und der Vertrieb nach
GARANTIE LIMITÉE EIZONANAOCORPORATION(ci-aprèsdénommé«EIZO »)etlesdistributeursautorisésparEIZO(ci-aprèsdénommés «Distributeurs »),sousréserveetconformémentauxtermesdecettegarantielimitée(ci-aprèsdénommée«Garantie »),garantissentàl’acheteurinitial(ci-aprèsdénommé«Acheteur initial »)duproduitspécifiédanslaprésente(ci-après dénommé«Produit »)achetéauprèsd’EIZOoudeDistributeursagréésEIZO,queEIZOetsesDistributeursauront pouroptionderépareroure
GARANTÍA LIMITADA EIZO NANAO CORPORATION (en lo sucesivo “EIZO”) y sus distribuidores autorizados (en lo sucesivo los “Distribuidores”),conarregloydeconformidadconlostérminosdeestagarantíalimitada(enlosucesivola“Garantía”), garantizanalcompradororiginal(enlosucesivoel“Comprador original”)quecompróelproductoespecificadoeneste documento(enlosucesivoel“Producto”)aEIZOoasusDistribuidores,queEIZOysusDistribuidores,asupropio criterio,repararán
GARANZIA LIMITATA EIZONANAOCORPORATION(acuisifaràriferimentodaquiinpoicon“EIZO”)ediDistributoriautorizzatidaEIZO(a cuisifaràriferimentodaquiinpoicon“Distributori”)garantiscono,secondoiterminidiquestagaranzialimitata(acuisi faràriferimentodaquiinpoicon“Garanzia”)all’acquirenteoriginale(acuisifaràriferimentodaquiinpoicon“Acquirente originale”) che ha acquistato il prodotto specificato in questo documento (a cui si farà riferimento da
BEGRÄNSAD GARANTI EIZO NANAO CORPORATION (nedan kallat “EIZO”) och EIZOs auktoriserade distributörer (nedan kallade “Distributörer”) garanterar i enlighet med villkoren i denna begränsade garanti (nedan kallad “Garantin”) den ursprungligeköparen(nedankalladden“Ursprunglige köparen”)somköptedenidokumentetspecificeradeprodukten (nedankallad“Produkten”)frånEIZOellerDistributörer,attEIZOellerDistributörerenligtegetgottfinnandekostnadsfritt antingenreparer
ΠΕΡΙΟΡΙΣΜΕΝΗ ΕΓΓΥΗΣΗ ΗEIZONANAOCORPORATION(στοεξής«EIZO»)καιοιδιανομείςπουεξουσιοδοτείηEIZO(στοεξής«Διανομείς») παρέχουν εγγύηση, υποκείμενη και σύμφωνα με τους όρους της παρούσας περιορισμένης εγγύησης (στο εξής «Εγγύηση»),στοναρχικόαγοραστή(στοεξής«Αρχικός Αγοραστής»)οοποίοςαγόρασετοπροϊόνπουκαθορίζεταιστο παρόνέγγραφο(στοεξής«Προϊόν»)απότηνEIZOήτουςΔιανομείς,ηοποίαεξασφαλίζειότιηEIZOκαιοιΔιανομείς, σύμφωναμετηδιακριτήευχέρειάτους,είτε
ОГРАНИЧЕННАЯ ГАРАНТИЯ EIZO NANAO CORPORATION (называемая в дальнейшем “EIZO”) и авторизированные EIZO дистрибуторы (называемые в дальнейшем “Дистрибуторы”) гарантируют, в соответствии с условиями и пунктами этой ограниченной гарантии (называемой в дальнейшем “Гарантия”), первичному покупателю (называемому в дальнейшем“Первоначальный покупатель”),которыйприобрелуEIZOилиДистрибуторовпродукт,указанный в этом документе (называемый в дальнейшем “Продукт”), что E
有限责任保证书 EIZONANAO 有限公司(以下简称 EIZO )和 EIZO 授权的经销商(以下简称 经销商 ),接受并依照本有限责任保证书 (以下简称 保证书 )之条款,向从 EIZO 和经销商购买本文中所规定产品(以下简称 产品 )的原买方(以下称 原买方 ) 提供保证 :在保证期内(规定如下),如果原买方发现按本产品所附使用说明书(以下简称 用户手册 )所述方式正常使 用本产品过程中,本产品出现故障或损坏,EIZO 和经销商根据其独自的判断免费修理或更换该产品。 本保证期限定为(i)自本产品购买之日起的五(5)年期间或限定为到达(ii)使用本产品 3 万小时的期限(以下简称 保证期限 ) 。 但是,仅按照用户手册所描述的推荐亮度使用本产品时方对产品的亮度提供保证。亮度的保证期限也限定为本产品的使用 时间在 10000 小时以下(含 10000 小时)的条件下自购买本产品之日起的五(5)年。EIZO 和经销商将不向原买方或任 何第三方承担本保证书所规定之外的与本产品有关的任何责任或义务。 本产品的任何部件停产七(7)年后,EIZO 和经销商将不再保留或保管任何这类部件。维修显示器时,EIZO
Recycling Information Recycling Information This product, when disposed of, is supposed to be collected and recycled according to your country’s legislationtoreduceenvironmentalburden.Whenyoudisposeofthisproduct,pleasecontactadistributoror anaffiliateinyourcountry. ThecontactaddresseesarelistedontheEIZOwebsitebelow. http://www.eizo.com ForrecyclinginformationforcustomersinSwitzerland,pleaserefertothefollowingwebsite. http://www.swico.
Πληροφορίες ανακύκλωσης Τοπροϊόναυτό,όταναπορρίπτεται,πρέπεινασυλλέγεταικαιναανακυκλώνεταισύμφωναμετηνομοθεσία τηςχώραςσαςέτσιώστεναμηνεπιβαρύνειτοπεριβάλλον.Γιανααπορρίψετετοπροϊόν,επικοινωνήστεμε έναναντιπρόσωποήμιαθυγατρικήεταιρείαστηχώρασας. ΟιδιευθύνσειςεπικοινωνίαςαναγράφονταιστηντοποθεσίαwebτηςEIZOπαρακάτω. http://www.eizo.
Informace o recyklaci Při likvidaci produktu musí být produkt vyzvednut a recyklován podle zákonů příslušné země, aby nedocházelo k zatěžování životního prostředí. Zbavujete-li se produktu, kontaktujte distributora nebo pobočkuvesvézemi.KontaktníadresyjsouuvedenynanásledujícíwebovéstráncespolečnostiEIZO. http://www.eizo.com Ringlussevõtu alane teave Keskkonnakoormusevähendamisekstulekskasutatudtootedkokkukogudajavõttaringlussevastavaltteie riigiseadustele.
Информация относно рециклиране Приизхвърлянетонатозипродуктсепредлагасъбиранетоирециклиранетомусъобразнозаконитена вашатастраназадасенамализамърсяванетонаоколнатасреда.Когатоискатедасеосвободитеот тозипродукт,молясвържетесестърговскиямупредставителилисъссъответнитеорганиотговарящи затовавъввашатастрана. ДаннитезавръзкаснассаописанинаследнияИнтернетсайтнаEIZO: http://www.eizo.
China Measures for RoHS Compliance in ChinaRoHS 关于电子信息产品污染控制标识 本标识根据「电子信息产品污染控制管理办法」,适用于在中华人民共和国销售的电子信息产品。标识中央的 数字为环保使用期限的年数。只要您遵守该产品相关的安全及使用注意事项,在自制造日起算的年限内,不会 产生对环境污染或人体及财产的影响。上述标识粘贴在机器背面。 • 有毒有害物质或元素的名称及含量 部件名称 有毒有害物质或元素 铅 汞 镉 六价铬 多溴联苯 多溴二苯醚 (Pb) (Hg) (Cd) (Cr(VI)) (PBB) (PBDE) 印刷电路板 × ○ ○ ○ ○ ○ 机箱 ○ ○ ○ ○ ○ ○ 液晶显示器 × × ○ ○ ○ ○ 其他 × ○ ○ ○ ○ ○ ○ :表示该有毒有害物质在该部件所有均质材料中的含量均在 SJ/T 11363-2006 规定的限量要求以下。 × :表示该有毒有害物质至少在该部件的某一均质材料中的含量超出 SJ/T 11363-2006 规定的限量要求。 ( 企业可在此处 , 根据实际情況对上表中打“×”的技术原因进行进一步说明 ) 74 Appen
1st Edition-October, 2012 Copyright © 2012 EIZO NANAO CORPORATION All rights reserved. 03V24155A1 (U.