
User Manual

BRACKETS & CORBELS
installation instructions:
construction adhesive
caulk
caulking gun
nail gun/hammer
nishing nails
extra ne sandpaper
paint
TOOL & MATERIAL
CHECKLIST
IMPORTANT INFO
• It is highly recommended that you paint/nish the brackets or corbels before installing.
• Recommended use of 100% acrylic latex paint for urethane products.
• Clean installation surface and back of bracket of all dirt and dust with a clean cloth or
sponge.
• Make sure that the surface and the back of the bracket are completely dry before
attempting installation.
• Urethane products are primarily used for decorative purposes.
SAFETY INSTRUCTIONS
Make sure to use the correct tools recommended.
Wear safety goggles.
Follow xture, power tools, and paint manufacturers’ instructions and users manuals.
Use common sense and follow good construction practices.
Brackets & Corbels are not load‐ bearing.
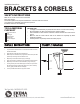
1. Lay the bracket or corbel face down on a soft surface that will not scratch/
dent the bracket detail.
2. Apply adhesive to back edge of the bracket/corbel.
3. Mark and press the bracket/corbel up against the surface hold in place with
painters tape or nishing nails while adhesive cures.
4. Wipe off any excess adhesive with a sponge or damp rag.
5. Apply silicone caulk as needed to ll in any gaps between bracket and wall.
6. Wipe off any excess adhesive and/or caulk with a sponge or damp rag.
7. Finishing nails may be used for added support. If used, ll in any nail holes
with caulk and smooth the surface with a nger. Let any excess caulk dry.
Once dry, lightly sand with extra ne sandpaper.
8. Touch-up bracket/corbel with touch-up paint as needed.
We Can Help. Call (866) 607-0453
www.ekenamillwork.com
Industry leading manufacturer of urethane, PVC, wood, rustic, and metal millwork