
Installation Instructions

IRON BRACKETS
installation instructions:
electric drill
screws
level
pencil
drill bit (for pilot hole)
TOOL & MATERIAL
CHECKLIST
IMPORTANT INFO
• Once installed, you can apply any necessary touch‐up paint/nish..
• Make sure that the surface and the back of the bracket are completely clean & dry before attempting
installation.
• Measure and mark the location where the bracket is going to be installed and be sure that the
bracket has a substructure that is able to support the bracket and any other additional weight that
may be added to it.
SAFETY INSTRUCTIONS
Make sure to use the correct tools recommended.
Wear safety goggles.
Follow xture, power tools, and paint manufacturers’ instructions and users manuals.
Use common sense and follow good construction practices.
Consult a professional when installing brackets for load bearing applications
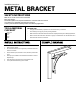
1. Place the bracket in place and with a pencil mark the placement of the screw
holes.
2. With a wood drill bit smaller than the size of the screw drill a pilot hole
through the marks on the wall.
3. Place the bracket back over the installation area and match the holes of the
bracket with the pilot holes.
4. Fasten the bracket in place with screws.