
Installation Guide


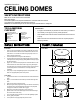


CEILING DOMES
installation instructions:
construction adhesive
elastomeric adhesive caulk
caulking gun
drywall screws
hammer
miter saw
construction hanging wire
tape measure
framing square
utility knife
power drill
2x4 and/or 2x6 framing
reciprocating saw
TOOL & MATERIAL
CHECKLIST
IMPORTANT INFO
• It is highly recommended that you paint/nish our domes before you install them.
• Once installed, you can apply any necessary touch‐up paint/nish.
• ‐Clean installation surface and back of dome of all dirt and dust with a clean cloth
or sponge.
• Make sure that the surface and the back of the dome are completely dry before
attempting installation.
SAFETY INSTRUCTIONS
Make sure to use the correct tools recommended.
Wear safety goggles.
Follow xture, power tools, and paint manufacturers’ instructions and users manuals.
Use common sense and follow good construction practices.
Medallions are not load‐ bearing. Do not use them to support electrical xtures or ceiling fans.
Recess Mount
1. Create a rough opening template. Lay the dome on a flattened piece of card-
board. Trace the outline of the dome on the cardboard. Next, draw an inside
outline about 1 1/2” inside the outer outline. Using heavy duty scissors or a
knife, cut along the inside outline.
2. Screw the template into the ceiling at the desired location.
3. Cut through the drywall along the edge of the template. Remove any drywall
in the way. Reinforce existing framing by adding additional framing to support
the edges of the Dome.
4. Apply an 1/2” continuous bead of polyurethane construction adhesive on the
inside of the dome rim. Lift the dome into the rough opening. Drive drywall
screws through the rim of the dome and into the framing. Countersink screws
(countersinking allows the screw heads to be covered by spackle after
installation).
5. Fill any chips or scrapes with lightweight spackle. Sand spackle after it has
dried. Use a high quality latex paint to touch up dome.
Surface Mount
1. Lay the dome face down on a soft surface that will not scratch/dent the dome
detail.
2. Apply a 1/2” bead of adhesive caulk all the way around the back edge of the
dome.
3. Gently press the dome up against the ceiling.
4. When pressing the dome up against the ceiling some adhesive caulk will seep
out. Smooth excess caulk around the dome with a nger or the putty knife
and apply extra caulk that is needed to ll in any gaps.
5. Wipe off any excess adhesive caulk with a sponge or damp rag.
6. Drywall screws can be used for added support. Countersink screws through
the rim of the dome into the ceiling.
7. Cover screw heads and any imperfections on dome with lightweight spackle.
8. Once dry, lightly sand spackle.
9. Touch up the dome using high quality latex paint as needed.
Recess Mount
Surface Mount