
Installation Guide

TRUE FIT PVC SHUTTERS
xed mount installation instructions
electric drill
ladder
caulk gun
exterior grade screws
putty knife
acrylic caulk
construction adhesive
TOOL & MATERIAL
CHECKLIST
IMPORTANT INFO
• It is recommended to use 6 screws per shutter
• Paint unnished shutters with 100% acrylic paint prior to installation.
• Must allow space above and below for shutters to expand and contract with temperature.
• Do not over-tighten fasteners to avoid bowing.
• Hardware not included, must purchase separately.
• If painted a dark color and in direct sunlight, additional installation measures should be taken.
• For additional strength, use construction adhesive if installing shutters on a flat surface.
• Store shutters flat until installation.
• Disclaimer: Ekena Millwork is not liable for paint used on unnished PVC shutters and/or the
results of its use.
SAFETY INSTRUCTIONS
Make sure to use the correct tools recommended.
Wear safety goggles.
Follow xture, power tools, and paint manufacturers’ instructions and users manuals.
Use common sense and follow good construction practices.
General Fixed Mount Installation
1. Determine the position for the shutter by matching up the top and bottom of the
shutter with the window and mark its position.
2. Mark the shutter where you will fasten it to your installation surface by drilling through
the shutter to mark the facade at the top, middle and bottom of the shutter.
3. Remove the shutter and pre-drill pilot holes through the facade. Caulk each pre-
drilled hole with a clear waterproof and paintable sealant.
4. Using a level, set the shutter in place and fasten using non-corrosive exterior grade
screws. Be sure not to over-tighten the screws.
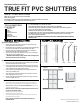
***IMPORTANT: When installing in lap siding, adhere the shutters to the highest point
of the siding or with shims/spacers to ll in the gap.
Fixed Mount Bracket Installation
1. Determine the position for the mounting brackets by matching up the top and bottom
of the shutter with the window and mark its position.
2. Using a level set the bottom bracket in place and fasten using the correct screws for
your installation surface. (Note: At this point it is recommended you place the shutter
in place and double check your marking for the top bracket.)
3. Using a level set the top and middle bracket in place and fasten using the correct
screws for your installation surface.
4. Set the shutter in place, mark the position of the holes on the shutter. Remove the
shutter and drill pilot holes using a 1/8” bit.
5. Place the shutters back in place and fasten the shutter in place using screws being
sure not to over-tighten the screws.
Tips for Painting Unnished or Primed Shutters
• Remove water and dirt on the shutter rst and make sure they are completely dry
before painting. Let paint completely dry before installing the shutter to your home.
• Unnished shutters need to be painted. Do not use oil based paint. Use a premium
100% acrylic exterior latex paint.
NOTE: Latex can take 2-4 days to dry. Avoid exposing shutters to moisture for a few
days after you have painted the shutters.
• Avoid painting in damp or high humidity areas.
• Seal with exterior grade clear acrylic top coat.
• When painting cellular PVC shutters a dark color, choose paint colors that have an
equivalent of 55 LRV units or greater.
NOTE: Consult paint representative for recommended heat reflective paint
compatible with PVC.
We Can Help. Call (866) 607-0453
www.ekenamillwork.com
***
A)
B)
B
correctcorrectwrong
A
high point
shim
low point
top bracket top bracket
side bracket side bracket
bottom bracket bottom bracket