
Installation Guide
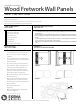
Table Of Contents

Wood Fretwork Wall Panels
installation instructions:
Standard power grab adhesive
Circular Saw or Table Saw
Paint or quality wood stain
Paint brush or roller
Power drill or hammer
Fine sandpaper
Small brad nails
Chalk line and measuring tape
STEP BY STEP
INSTRUCTIONS
TOOL & MATERIAL
CHECKLIST
SPECIAL INSTRUCTIONS
AND NOTES
EXAMPLE
INSTALLATION DIAGRAMS
• It is highly recommended that you paint or stain the panels before installation.
• It is recommended for nishing to use quality paint for MDF panels and stain for all other
wood species.
• Make sure the surface and the back of the panel are completely dry before installation.
• Before installing, acclimate the wood panels in the room where you will be installing
them.
• In most applications you will have to trim some panels. Cut them with a standard table
saw or power tool. Sand cut edge to remove debris.
• Depending on your installation method, use standard power grip adhesive and small brad
nails.
SAFETY INSTRUCTIONS
Make sure to use the correct tools recommended.
Wear proper protective gear.
Follow xture, power tools, paint manufacturers’ instructions, and users manuals.
Use common sense and follow good construction practices.
1. Prime and paint wood fretwork before installing
or use quality stain for wood species other than
MDF. Touch up paint or stain as needed after
installation.
2. Smooth installation surface with sandpaper by
removing excessive bumps or texture. Wipe wall
clean to clear debris.
3. We recommend laying out the desired layout
before installation. Mark the installation points
using a chalk line or straight edge and level.
A. For single panels, start at either the top or
bottom corner at the edge of the wall and work
towards the opposite corner (Diagram A).
B. For 2-piece panel sets start at the center and
work out (Diagram B).
4. Apply a small amount of adhesive to the back
of the panel and secure with small brad nails.
(Follow adhesive manufacturer’s instructions for
proper application.)
A. Install panels side by side.
(Diagram C).
B. OR for a different look leave a gap between
each panel. (Diagram D).
We Can Help. Call (866) 607-0453
Industry leading manufacturer of urethane, PVC, wood, rustic, and metal millwork
Diagram A
Diagram C
Diagram B
Diagram D
ADHESIVE
FINISHING
NAILS