Critical Things® EkkoHub Installation | Critical Things | EkkoHub Installation guide 1 PUBLIC
Critical Things® EkkoHub Installation Copyright Notice All rights reserved. No part of this publication may be reproduced without the expressed written permission of EkkoSense Ltd.
Critical Things® EkkoHub Installation Contents 1. About this installation guide................................................................................ 4 2. EkkoHub overview ............................................................................................... 4 EkkoHub mode (default setting) ..................................................................................... 4 EkkoSoft Direct mode ...........................................................................................
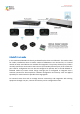
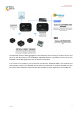
Critical Things® EkkoHub Installation 1. About this installation guide This guide is aimed at installers and explains how to install the EkkoSense Critical Things® EkkoHub. Further information about configuring the data sources for use in EkkoSoft® is provided as part of the EkkoSoft Sensor Editor documentation. 2. EkkoHub overview The EkkoHub is an embedded computing device with two Ethernet ports and integrated radio receiver for Critical Things® sensors.
Critical Things® EkkoHub Installation EkkoSoft Direct mode In this mode the EkkoHub links directly to EkkoSoft rather than to an EkkoLink. This mode is ideal for smaller installations where a smaller number of EkkoSensors are used and no, or a limited number of other wired devices are available for integration. The primary Ethernet port, ETH0 is normally used for the connection to the internet.
Critical Things® EkkoHub Installation The EkkoHub performs data aggregation from EkkoSense Critical Things® wireless sensors and other on-site data sources such as Modbus and SNMP devices. It provides a secure link to the EkkoSoft Critical Web Application over an internet connection. In the event of a temporary loss of external connectivity, EkkoHub buffers the site data and automatically transfers it to EkkoSoft Critical when the connection is restored.
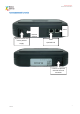
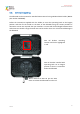
Critical Things® EkkoHub Installation Connections and controls ETH1 Reset to defaults Optional 5V DC 2.
Critical Things® EkkoHub Installation 3. Installing the EkkoHub CAUTION: Always wear appropriate Personal Protective Equipment (PPE) for the site. For details, please contact the site manager. 3.1. • • • • • • • Select a location for the EkkoHub Ensure there is sufficient space to route cables to it and to allow it to rotate onto the mounting plate (if used).
Critical Things® EkkoHub Installation 3.2. Surface mounting plate The EkkoHub has a separate mounting plate to simplify installation on walls, ceilings and other flat surfaces. The plate is fixed using two screws and then the EkkoHub attaches with a twist on action. 1. Fix plate to suitable surface 2. Fit EkkoHub on to plate 3. Rotate EkkoHub to lock in position The mounting plate has two screw holes on 35mm centres providing clearance for No. 6 or M4 screws.
Critical Things® EkkoHub Installation 3.3. DIN rail mounting The EkkoHub can be mounted on standard 35mm DIN rail using a BOPLA TSH35 holder (BOPLA part number 22035000). Follow the instructions supplied with the holder to move the operating latch to the longest position and then fix the holder to the back of the EkkoHub using the screws provided. If alternative screws are required then pan head No. 4 screws with thread length between 8mm and 12mm are suitable.
Critical Things® EkkoHub Installation 3.4. Power options The EkkoHub can be powered directly from a 5V 2.5A DC power supply with 2.1mm or 2.5mm centre positive plug (for example XP Power ACM18US05). Alternatively, it can be powered from Power over Ethernet (PoE) on the ETH0 Ethernet port using an IEEE 802.3af-2003 (15.4W) compliant PoE injector/midspan or switch. CAUTION: If a DC power supply is used then it must have a maximum output current rating of at least 2.5A at 5V and no more than 3A at 5V.
Critical Things® EkkoHub Installation 3.5. Antenna options The EkkoHub has an internal antenna which provides excellent performance in most situations. There may be installations where the internal antenna is not ideal, for example: • If the EkkoHub is DIN rail mounted in a metal cabinet an external antenna will be required to ensure the EkkoHub receives the signals from Critical Things sensors. • If it is impractical to install the EkkoHub centrally in the room or area to be monitored.
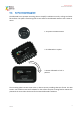
Critical Things® EkkoHub Installation Remove the rubber plug from the antenna connector hole Carefully remove internal antenna connector Fit the SMA connector from the inside, fit the washer and tighten the nut from the outside. Carefully fit the U.FL connector to the PCB. Ensure the connector is lined up correctly before pushing it into place. Gently rotate the connector to ensure it has fully mated.
Critical Things® EkkoHub Installation External antenna connector fitted. Refit the EkkoHub lid, ensuring the antenna cable is not trapped between the two halves and refit the four screws. The antenna may be mounted in a suitable location using a bracket or magnetic mount (for example Taoglas CAB.X05 (1m cable), CAB.X06 (2m cable), CAB-X07 (5m cable). Ensure that the chosen location places the antenna element in clear space.
Critical Things® EkkoHub Installation 4. Regulatory information The EkkoHub must be professionally installed. The EkkoHub is only approved for use with the internal antenna or an external PulseLarsen W1063M antenna. Use of other antennas is not permitted and invalidates the radio regulatory approval. Any changes or modifications not expressly approved by the party responsible for compliance could void the user’s authority to operate the equipment.
Critical Things® EkkoHub Installation 5. Reset to defaults button If the EkkoHub is configured in a way that prevents access to the configuration and status webpage then it can be reset to the standard default configuration. This could happen if ETH1 is configured to use DHCP to request an IP address and there is no way of finding out the address that has been assigned.