Automatic Blood Pressure Monitor for the upper arm - Vision 0301 User manual Tensiomètre automatique pour le bras - Vision 0301 Mode d’emploi Automatisches Blutdruckmessgerät für Oberarm - Vision 0301 Bedienungsanleitung Automatisk blodtrycksmätare för överarmen - Vision 0301 Användarmanual Sfigmomanometro da braccio completamente automatico - Vision Plus 0301 Manuale d’uso Monitor Automático de Presión Arterial para la parte superior del brazo - Vision 0301 Manual de Usuario Monitor de Pressão Arterial Tot
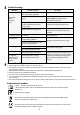
GB 1 Parts & display Cuff LCD ON/OFF Start Cuff tube socket Rubber tube Systolic pressure Diastolic pressure Starts to measure Pulse Symbol for pulse Low battery symbol Product description • Method based on oscillometric methodology and silicon integrated pressure sensor. • Blood pressure and pulse rate can be measured automatically and non-invasively. • Big LCD screen shows blood pressure and pulse rate. Precision fit guarantee 1. Use only the cuff supplied by the manufacturer.
Specifications 1. 2. 3. 4. Model: Vision 0301 Classification: Internally powered, type B Dimensions: 135mm x 97mm x 49mm Cuff circumference: M Medium: 22-30 cm and L Large: 30-42cm. (Optional S Small: 17 -22 cm and XL Extra large: 42-48cm) 5. Weight: Approv 223g (excluding batteries) 6. Measuring method: Oscillometric method, automatic air inflation and measurement 7. Power source: 6V , 1.5V AA × 4 batteries 8. Cuff pressure range: 0-300mmHg 9. Measuring accuracy: ±3mmHg 10.
3 4 Operating procedures BATTERY • Insert 4 x “AA 1,5V” size batteries in the battery compartment at the back of the unit. Make sure that the polarities are placed correctly. Fig. 1. • The LCD will not display anything at this point. • When the LCD shows the battery symbol, replace all batteries with new ones. • Rechargeable batteries are not suitable for this monitor. • Remove the batteries if the monitor is not to be used for a month or more to avoid damage from battery leakage. Fig.
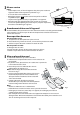
6 Taking a blood pressure reading a. Choose the cuff that best suits your arm size. Apply the cuff and sit or lie comfortably. b. Press the ON/OFF button, Fig. 4. A beep is heard and all display characters are shown. Fig. 5. Fig. 4 Fig. 5 c. The LCD goes directly to ”0” and the arrow up flashes. Fig 6 Fig. 6 d. Press the START button, Fig. 7, and the measurement will start. Fig. 7 e. The cuff inflates until sufficient pressure has built up for a measurement.
8 Troubleshooting PROBLEM LCD display shows abnormal result POSSIBLE CAUSE SOLUTION The cuff position is not correct or cuff is not properly tightened Apply the cuff correctly and try again Body posture was not correct during testing Review the “BODY POSTURE DURING MEASUREMENT” sections of the instructions and re-test. Talking, arm or body movement, irritation, excitement or tension during testing.
The blood pressure monitor corresponds to the following standards: EN1060-1:1995+A1:2002 (Non-invasive sphygmomanometers - Part 1: General requirements), EN 1060-3:1997+A1:2005(Non-invasive sphygmomanometers - Part 3: Supplementary requirements for electro-mechanical blood pressure measuring systems), ANSI/AAMI SP-10:2002+A1:2003+A2:2006. Note: Subject to modification without prior notice. EU REP: Lotus Global Co.,Ltd.
FR 1 Eléments et affichage LCD Brassard LCD ON/OFF Start / Démarrer Tuyau d’air Raccordement Pression systolique Pression diastolique Commencer à mesurer Pouls Symbole de pouls Symbole changement des piles Description du produit • Méthode basée sur la méthodologie oscillométrique et du silicium intégré dans le détecteur de pression. • La tension artérielle et le pouls peuvent être mesurés en même temps.
Caractéristiques techniques 1. 2. 3. 4. Modèle: Vision 0301 Classification de l’appareil: Puissance, type B Dimensions: 135mm x 97mm x 49mm Circonférence du brassard: (M) Moyen 22-30 cm, (L) Grand : 30-42 cm. (En option (S) Petit : 17-22 cm et (XL) Supplémentaire grand: 42-48 cm ) 5. Poids: 223 g (sans les piles) 6. Méthode de mesure: Oscillométrique, gonflage et mesure automatique 7. Alimentation électrique: 6V, 4 piles 1.5V AA 8. Plage de pression du brassard: 0-300 mmHg 9. Précision: ±3mmHg 10.
3 Mise en service PILES • Insérez 4 piles “AA 1,5V” dans le logement des piles qui est situé sous l’appareil. Veillez à bien respecter les polarités. Fig. 1. • A ce stade l’écran LCD n’affiche rien. • Remplacez les piles, par des piles neuves lorsque l’écran affiche le symbole de pile. • Les piles rechargeables ne sont pas appropriées à cet appareil. • Retirez les piles de l’appareil lorsque vous ne vous en servez pas. Durant une période prolongée (1 mois ou plus).
6 Prendre une mesure a. Appliquez le brassard, asseyez vous et/ou couchez vous confortablement. b. Appuyez sur le bouton ON/OFF, Fig. 4 vous entendrez un bip sonore et tous les caractères apparaissent à l’écran. Fig. 5 Fig. 4 Fig. 5 c. L’écran affiche directement “0” et la flèche vers le haut clignote. Fig. 6 d. Appuyez sur le bouton START, Fig. 7, et la mesure démarre automatiquement Fig. 6 Fig. 7 e.
8 Problèmes PROBLÈME L’appareil affiche des valeurs anormales CAUSE POSSIBLE Le brassard est mal mis ou peut-être pas assez serré. MESURE CORRECTIVE Enfilez correctement le brassard et renouvelez la prise de mesure Vous n’avez pas adopté la bonne position au moment de la mesure Reportez-vous à la section “bonne position de mesure” et reprenez la mesure Vous avez parlé, bougé durant la mesure, vous êtes nerveux ou excité.
Fabriqué conformément aux normes standards internationales Cet appareil répond aux exigences de la directive 93/42/EC relative aux dispositifs médicaux UE. Ce tensiomètre est conforme aux normes standard pour la mesure non invasive de la tension. EN1060-1:1995+A1:2002 - Part 1 exigences Générales EN 1060-3:1997+A1:2005 – Part 3 exigences supplémentaires pour les systèmes de mesure de tension électromécaniques ANSI/AAMI SP-10:2002+A1:2003+A2:2006.
DE 1 Bestandteile und Display Manschette LCD ON/OFF Start Steckvorrichtung für Luftschlauch Manschette Luftschlauch aus Gummi Systolischer Druck Diastolischer Druck Puls Messbeginn Niedriger Batteriestand Symbol für Puls Produktbeschreibung • Der Blutdruck und die Pulsfrquenz warden automatisch nicht invasiv gemessen • Dank grossem LCD Display sind Blutdruck und Puls leicht ablesbar • Die letzten 30 Messresultate warden mit Zeitangabe abgespeichert und sind abrufbar.
Spezifikation 1. 2. 3. 4. Modell: Vision 0301 Einstufung : mit Batterieversorgung , type B Dimensionen: 135mm x 97mm x 49mm Manschettendimensionen: M: 22cm-30cm, L: 42-48cm. (Optional S (17-22cm) oder XL (42-48cm) 5. Gewicht: 223g (exkl. Batterien) 6. Messmehtode: Oscillometrisch, automatisches Aufblasen der Manschette und Erfassen der Blutdruckwerte 7. Stromversorgung: 6V , 1.5V AA × 4 Batterien 8. Druckbereich : 0-300mmHg 9. Messgenauigkeit: ±3mmHg 10. Puls Messbereich : 40-180 Pulsschläge/Min 11.
3 Verwendung des Geräts Batterien • Die 4 x AA 1.5V Batterien mit Berücksichtigung der richtigen Polarität am hinteren Teil des Geräts einsetzen. Abb. 1. • Das Display ist in diesem Zustand ohne Anzeigewerte • Sollte das Sympbol , aufleuchten alle Batterien mit neuen ersetzen. • Wiederaufladbare Batterien sollten für dieses Gerät nicht verwendet werden Abb.1 4 Anschließen des Luftdruckschlauches am Gerät Schliessen Sie das Ende des Schlauches durch Einstecken in der vorgesehenen Öffnung an.
6 Blutdruck richtig messen: a. Die richtige Manschettengrösse für Ihren Arm auswählen, die Manschette auf den Oberarm ziehen, und sicherstellen dass sie fest und comfortabel aufliegt. b. Die ON/OFF Taste drücken, Abb. 4 , das Gerät macht einen Piepston und zeigt alle Werte gemäss, Abb. 5, im display. Abb. 4 Abb. 5 c. Das Gerät zeigt “0” und blinkt . Abb. 6. Abb. 6 d. Jetzt die START Taste drücken der Messvorgang beginnt. Abb. 7 Abb. 7 e.
8 Problembehebung PROBLEM URSACHE LÖSUNG Die Manschette sitzt nicht richtig (zu fest oder zu leicht) am Oberarm. Nochmals die Manschette korrekt anlegen. Die Körperhaltung war falsch. Die Bedienungsanleitung Kapitel Körperhaltung nochmals durchlesen. Sprechen, Bewegung Nochmals in Ruhe ohne zu sprechen oder bewegen messen.
Das Blutdruckmessgerät entspricht folgenden Standards: EN1060-1:1995+A1:2002 (Non-invasive sphygmomanometers - Part 1: General requirements), EN 1060-3:1997+A1:2005(Non-invasive sphygmomanometers - Part 3: Supplementary requirements for electro-mechanical blood pressure measuring systems), ANSI/AAMI SP-10:2002+A1:2003+A2:2006. Note: Technische Änderungen vorbehalten. EU REP: Lotus Global Co.,Ltd.
SE 1 Beståndsdelar & display Manschett LCD ON/OFF Starta Manschettfattning Gummislang Systoliskt blodtryck Diastoliskt blodtryck Börja göra mätning Puls Symbol för puls Batterinivån låg Produktbeskrivning • Metoden bygger på oscillometrisk metologi och silikonintegrerad trycksensor. • Blodtryck och puls kan mätas automatiskt och är ”non-invasive”. • Stor LCD-skärm visar blodtryck och puls. Passform garanti 1. Använd endast manschetten som skickats med av tillverkaren.
Specifikationer 1. 2. 3. 4. Modell: Vision 0301 Klassificering: Inbyggd kraft, typ B Dimensioner: 135mm x 97mm x 49mm Manschettomkrets: M: Medium 22-30 cm och L: Large 30-42cm. (Alternativt S: Small (Liten) 17 -22 cm och XL: Extra large (Extra stor) 42-48cm. 5. Vikt: 223g (exklusive batteri) 6. Mätmetod: oscillometrisk, automatisk luftpåfyllning och mätning 7. Kraftförsörjning: 6V , 1.5V AA × 4 batterier 8. Manschettens tryckområde: 0-300mmHg 9. Mätprecision: ±3mmHg 10.
3 Användande BATTERI Fig.1 • Sätt i 4 x “AA 1,5V” batterier i batteriluckan på baksidan av mätaren. Försäkra dig om att batterierna sätts i på rätt håll. (+/-) Fig. 1. • Det syns ännu ingenting i LCD-displayen • När displayen visar batterisymbolen , ersätt samtliga batteri med nya. • Uppladdningsbara batterier är inte lämpliga för denna mätare. • Ta ur batterierna om mätaren inte ska användas på en månad eller längre för att undvika skada orsakad av batteriläckage.
6 Gör en blodtrycksmätning a. Välj en manschett som har rätt storlek för armen. Sätt på manschetten och sitt eller ligg bekvämt. b. Tryck på ON/OFF-knappen. Fig. 4. Ett pip hörs och alla displaysymboler visas. Fig. 5 Fig. 4 Fig. 5 c. LCD:n går till ”0” och en uppåtpekande pil blinkar. Fig 6 Fig. 6 d. Tryck på START-knappen, Fig. 7, och mätningen börjar. Fig. 7 e. Mätaren blåser upp manschetten tills tillräckligt tryck byggts upp för en mätning.
8 FELSÖKNINGSGUIDE PROBLEM Displayen visar onormala resultat Symbol för låg batteri LCD visar EE ORSAK ÅTGÄRD Manschettens position är inte korrekt eller manschetten är inte rätt fastsatt. Sätt fast manschetten rätt och försök igen. Kroppsställningen var inte korrekt under testet. Läs igenom “Kroppsställning under mätning” i instruktionen och testa igen.
Blodtrycksmätaren motsvarar följande standarder: EN1060-1:1995+A1:2002 (Non-invasive sphygmomanometers - Part 1: General requirements), EN 1060-3:1997+A1:2005(Non-invasive sphygmomanometers - Part 3: Supplementary requirements for electro-mechanical blood pressure measuring systems), ANSI/AAMI SP-10:2002+A1:2003+A2:2006. Observera: Med förbehåll för ändringar utan föregående meddelande. EU REP: Lotus Global Co.,Ltd.
IT 1 Parti e display Bracciale LCD SU/VIA Inizio Attacco per tubo bracciale Tubo di gomma Pressione sistolica Pressione diastolica L’inizio di misurare Pulsazioni Simbolo batteria scarica Simbolo pulsazioni Descrizione del prodotto • Metodo oscillometrico e sensore di pressione in silicone integrato. • La misurazione della pressione sanguigna e della frequenza del polso avviene automaticamente e non in modo invasivo. • Il grande schermo LCD mostra la pressione sanguigna e la frequenza del polso.
Caratteristiche tecniche 1. 2. 3. 4. Modello: Vision 0301 Classificazione: alimentazione interna, tipo B Dimensioni: 135 mm x 97 mm x 49 mm Circonferenza bracciale: M: 22 cm-30 cm e L: 42-48 cm (opzionale S: 17-22 cm, XL: 42-48 cm) 5. Peso 223 g (batterie escluse) 6. Metodo di misurazione: metodo oscillometrico, gonfiatura e misurazione automatiche 7. Alimentazione: 6 V , 4 batterie tipo AA da 1,5 V 8. Intervallo di pressione bracciale: 0-300 mmHg 9. Precisione di misurazione: ±3 mmHg 10.
3 Per il funzionamento dell’apparecchio BATTERIA • Inserite 4 batterie tipo AA da 1,5 V nel vano batterie sul retro dell’apparecchio. Assicuratevi di inserire le batterie secondo le corrette polarità. Fig 1 • A questo punto, nulla apparirà sul display • Quando sul display LCD appare il simbolo batteria, sostituite tutte le batterie con batterie nuove. • Le batterie ricaricabili non sono adatte a questo monitor.
6 Per misurare la pressione del sangue a. Applicare la fascia e sedersi o sdraiarsi comodamente b. Premere il pulsante ON/OFF (Fig. 4). Si sentirà un bip e sul display appariranno tutti i numeri ( Fig. 5.) Fig. 4 Fig. 5 c. Apparirà lo “0” e la freccia lampeggerà (Fig. 6) d. Premere il pulsante START (Fig. 7) e la misurazione avrà inizio. Fig. 6 Fig. 7 d. La fascia si gonfierà fino a quando la pressione sarà sufficiente alla misurazione.
8 Ricerca guasti e soluzioni PROBLEMA Il display LCD mostra risultati anomali. Simbolo batteria scarica Se LCD mostra EE POSSIBILE CAUSA SOLUZIONE La posizione del bracciale non è corretta o il bracciale non è stretto come dovrebbe. Infilate il bracciale correttamente e riprovate. La postura durante il test non era corretta. Rivedete la sezione “POSTURA DURANTE LA MISURAZIONE” del manuale e riprovate.
Spiegazione dei simboli Attenzione - Consultate la documentazione esplicativa di accompagnamento Accessori tipo BF Fabbricato in conformità agli standard internazionali. L’apparecchio è in linea con la Direttiva Europea sui Dispositivi Medici 93/42/CEE. L’apparecchio deve essere smaltito ai sensi della direttiva 2002/96/CE-RAEE (rifiuti di apparecchiature elettriche ed elettroniche).
ES 1 Piezas y Pantalla Brazalete LCD Encendido/Apagado Comenzar Conector tubo del brazalete Tubo de goma Sistólica Diastólica El comienzo para medir Pulso Batería baja Símbolo de pulso Descripción del Producto • Método basado en la metodología de silicio oscilométrico sensor de presión integrado. • La presión arterial y el pulso pueden medirse de forma automática y no invasiva. • Pantalla LCD grande muestra la presión arterial y el pulso. Garantía de ajuste de precisión 1.
Especificaciones 1. 2. 3. 4. Modelo: Vision 0301 Clasificación: Alimentación Interna Tipo B Dimensiones: 135mm x 97mm x 49mm Circunferencia del manguito: M 22-30 cm y L 30-42 cm (Optional (S) Pequeño: 17-22 cm, (XL) Extra grande: 42-48 cm) 5. Peso: 233g (sin baterías) 6. Método de medición: método oscilométrico, inflación y medición de aire automáticos. 7. Fuente de energía: 6V , 1.5V AA × 4 baterías. 8. Rango de presión del manguito: 0-300mmHg 9. Precisión de la medición: ±3mmHg 10.
3 Procedimientos de operación BATERÍA • Insertar baterías tamaño 4 x “AA 1,5V” en el compartimento de batería en la parte trasera de la unidad. Asegúrese de que las polaridades estén colocadas correctamente. • La pantalla LCD no muestra nada en este momento. • Cuando la pantalla LCD muestre el símbolo de batería , reemplace todas las baterías por otras nuevas. • Las Baterías recargables no son adecuadas para este monitor.
6 Tomar lectura de la presión arterial a. Coloquese el manguito y siéntese o acuéstese cómodamente. b. Presione el botón ON/OFF , Fig. 4. Escuchará un pitido y en la pantalla se mostrarán todos los caracteres. Fig. 5 Fig. 4 Fig. 5 c. La pantalla se colocará directamente en ”0” y la fecha parpadeará. Fig. 6 Fig. 6 d. Presione el botón START, Fig. 7, y se iniciará la medición. Fig. 7 e. El brazalete se inflará hasta que haya acumulado suficiente presión para la medición.
8 Solucion de problemas PROBLEMA Pantalla LCD muestra resultados anormales Símbolo de batería baja LCD muestra EE LCD parpadea EE POSIBLE CAUSA SOLUCIÓN La posición del manguito no es la correcta o el brazalete no está bien apretado. Coloque el manguito apropiadamente y trate de nuevo. La postura corporal no es correcta durante la prueba. Consulte la sección “Postura corporal durante la medición” y pruebe nuevamente.
El monitor de presión sanguínea corresponde a los siguientes estándares: EN1060-1:1995+A1:2002 (Esfigmomanómetros no invasivos - Parte 1: Requisitos generales), EN 1060-3:1997+A1:2005 ( Esfigmomanómetros no invasivos- Part 3: Requisitos suplementarios para los sistemas de medición electro- mecánicos de la presión arterial), ANSI/AAMI SP-10:2002+A1:2003+A2:2006. Note: Sujeto a modifición sin previo aviso. REP UE: Lotus Global Co.,Ltd.
PT 1 Peças & visor Punho LCD ON/OFF Início Tomada do tubo do punho Tubo de borracha Pressão sistólica Pressão diastólica Os inícios medir Pulsação Bateria com carga baixa Símbolo de Pulsação Descrição do produto • Método baseado na metodologia oscilométrica e sensor de pressão de silicone integrado. • A pressão arterial e pulsação podem ser medidas automaticamente e de forma não invasiva. • Grande visor LCD mostra a pressão arterial e pulsação. Garantia de encaixe de precisão 1.
Especificações 1. 2. 3. 4. Modelo: Vision 0301 Classificação: Alimentado internamente, tipo B Dimensões: 135mm x 97mm x 49mm Circunferência do punho: M: 22-30 cm e L: Large: 30-42cm (Opcional S:17 -22cm e XL: Extra large: 42-48cm) 5. Peso: 223 g (excluíndo baterias) 6. Método de medição: método oscilométrico, inflação de ar e medição automáticas 7. Fonte de energia: 4 x baterias de 6V, 1.5V AA 8. Taxa de pressão no punho: 0-300mmHg 9. Precisão da medição: ±3mmHg 10.
3 Procedimentos operacionais BATERIA • Inserir 4 baterias de tamanho “AA 1,5V” no compartimento da bateria, na traseira da unidade. Certificar-se que as polaridades estão posicionadas correctamente. • O LCD não exibira nada neste momento. • Substituir todas as baterias por novas quando aparecer o símbolo da bateria no LCD. • Baterias recarregáveis não são adequadas para este monitor.
6 Ler uma medição de pressão do sangue. a. Colocar a braçadeira e sente ou deite confortavelmente b. Pressione o ON/OFF botão, ilustração 4. Um sinal sonoro será ouvido e aparecerão no mostrador todos os detalhes da medida. Ilustração 5. Fig. 4 Fig. 5 c. O Mostrador vai diretamente para o “0” e pisca, ilustração 6. Fig. 6 d. Pressione o botão START, ilustração 7, e a medição começara. Fig. 7 e. A braçadeira se inflará até chegar a uma pressão suficiente para medir.
8 Solucionar falhas simples PROBLEMA CAUSA POSSÍVEL Visor LCD mostra resultado anormal SOLUÇÃO A posição do punho não está correcta ou o punho não está adequadamente apertado Aplicar o punho correctamente e tentar novamente A postura do corpo durante o teste não é a correcta Rever as secções “POSTURA DO CORPO DURANTE A MEDIÇÃO” das instruções e voltar a testar.
Fabricado em conformidade com as normas internacionais. Este instrumento está em linha com a Directiva de Produtos Médicos da UE MDD 93/42/EC. REP UE:: Lotus Global Co.,Ltd.
RU Компоненты тонометра и экран 1 Манжета LCD ВКЛ/ВЫКЛ ПУСК Гнездо для трубки манжеты Резиновая трубка Систолическое давление Диастолическое давление Пульс Начало измерения Описание изделия Символ пульс Низкий заряд батарейки • Для определения давления используются осциллометрический метод и встроенный силиконовый датчик давления. • Кровяное давление и частота пульса автоматически измеряются неинвазивным способом.
Технические характеристики 1. 2. 3. 4. Модель: Vision 0301 Классификация: внутреннее питание, тип B Размеры: 135 x 97 x 49 Окружность манжеты: M (средний): 22-30 см и L (большой): 30-42 см. (Дополнительно S (маленький): 17-22 см и XL (очень большой): 42-48 см) 5. Вес: 223 г (без батареек) 6. Способ измерения: осциллометрический метод, автоматическое накачивание воздухом и измерение 7. Источник питания: 6 В , 4 батарейки типа AA по 1,5 В 8. Диапазон давления в манжете: 0-300 мм рт. ст. 9.
10. Не используйте другие манжеты, помимо поставляемых изготовителем, так как это может создать опасность, совместимую с живыми тканями, и привести к ошибочным измерениям. 11. Проследите за тем, чтобы тонометр хранился и эксплуатировался в пределах указанных диапазонов температуры и влажности. Тонометр может не соответствовать своим характеристикам производительности при хранении или использовании с нарушением казанных в спецификации диапазонов температуры и влажности. 12.
6 Снятие показаний кровяного давления a. Наложите манжету и удобно сядьте или лягте. b. Нажмите кнопку ON/OFF (ВКЛ/ВЫКЛ), рис. 4. Прозвучит звуковой сигнал, и на экране отобразятся все символы. Рис. 5. Рис. 4 Рис. 5 c. На ЖК-дисплее отображается «0», мигает стрелка вверх. Рис. 6. d. Нажмите кнопку START (Пуск), рис. 7, после чего начнется измерение. Рис. 6 Рис. 7 Манжета накачивается до тех пор, пока не будет достигнуто давление, необходимое для измерения.
8 Поиск и устранение неисправностей ПРОБЛЕМА ВОЗМОЖНАЯ ПРИЧИНА УСТРАНЕНИЕ НЕИСПРАВНОСТИ На экране отображается неправильный результат Символ низкого заряда батарейки На ЖК-дисплее отображается EE На ЖК-дисплее мигает EE На ЖК-дисплее отображается EE EP Отсутствие реакции на нажатие кнопки или установку батарейки. Манжета расположена неправильно или недостаточно сильно затянута Наложите манжету правильно и повторите измерение.
Значение символов Внимание! – Прочтите сопроводительную документацию Активный узел типа BF Изготовлено в соответствии с международными стандартами. Данный прибор соответствует требованиям европейской Директивы на медицинские изделия MDD 93/42/EC. Утилизируйте прибор согласно требованиям Директивы по утилизации электрического и электронного оборудования 2002/96/EC-WEEE.
2cm 2cm 53
www.eks-int.