
Operation Manual


10
Function
ELAC In-Ceiling loudspeakers are ideal for lightweight ceilings but also lightweight walls. The installation cover and the front
grille can be painted according to your requirements. This has to be done before the loudspeaker is installed.
ELAC In-Ceiling loudspeakers offer unobtrusive design and perfect sound for all applications from hi-fi to stereo, home
cinema to surround sound.
What is included with the product
As standard, this product includes:
1 fully assembled ELAC In-Ceiling loudspeaker
1 ELAC In-Ceiling installation template
1 small bag with accessory, including grille removal tool
1 safety instructions
1 manual
Requirements
The installation of In-Ceiling loudspeakers requires certain craft skills. Please refer to an expert if you require any help.
The following shall be used for the installation of this loudspeaker:
1 yardstick, 1 pencil, 1 sharp knife or (electrical) jig saw,
1 Phillips hand screw driver (size: 2), 1 strip-insulation pliers, 1 power drill with suitable drill
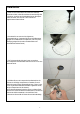
Connecting
ELAC In-Ceiling loudspeakers can be used with any conventional amplifier.
The connecting cable should run inside the wall. Cable ends with a length of approx. 35-40 cm will come out of the
installation hole.
Use flexible twin cables with a cross section of 2.5 mm² for a line length of approx. 5 m and cables with a cross section of 4
mm² for larger line lengths.
Please do not use NYM cables for the installation because they may become mixed up with buried wires .
Note: Mixing up the wires is extremely dangerous and can cause an electric shock!
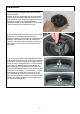
Appropriate polarity must be ensured. The positive poles of the amplifier outputs (red terminals) have to be connected to the
positive poles of the loudspeaker inputs (red terminals). The same applies for all negative poles, that must be connected to
the black terminals. Correct polarity is extremely important for connecting the buried loudspeaker units to the amplifier.