
Owners Manual


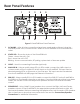

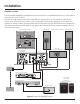


7. Digital IN - Using a quality digital optical audio cable, connect the Optical OUT on
a source component to the Optical IN on the IS-AMP340. This input can be selected
pressing Opt on IR remote or from the app. This input can also be selected from the IS-
AMP340 unit WEB page via Ethernet connection.
8. IR IN - Plug in the provided 3.5mm IR receiver cable.
9. ETHERNET - Using an Ethernet cable, connect the Ethernet port on the IS-AMP340 to local
network(LAN).TheEthernetportisusedforsettinguptheAmplierthroughit’swebGUI
and for 3rd party control.
10. 12V TRIGGER - Use this connection to ON/OFF control the IS-AMP340 unit (>5 ... 24V DC).
Rear Panel Features (cont.)
ELAC IS-AMP340 | www.elac.com | Page 7