4-LIGHT VANITY MODEL #83077 Français p. 9 ATTACH YOUR RECEIPT HERE Serial Number Purchase Date Questions, problems, missing parts? Before returning to your retailer, call our customer service department at 1-855-226-7169, 8 a.m. - 4 p.m., EST, Monday - Friday.
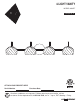
PACKAGE CONTENTS B C A G D F E PART A B C D E F G DESCRIPTION Canopy Arm Threaded Socket Threaded Socket Ring Bulb Cover 40-Watt G9 Bulb Glass Shade 2 QUANTITY 1 4 4 4 4 4 4
HARDWARE CONTENTS BB AA DD CC Ground Screw Qty: 1 GN D Wire Connector Qty: 3 Short Machine Screw Qty: 2 EE Threaded Knob Qty: 2 Mounting Bracket Qty: 1 SAFETY INFORMATION Please read and understand this entire manual before attempting to assemble, operate or install the product. • • • • • WARNING IMPORTANT: NEVER attempt any work without shutting off the electricity. Go to the main fuse box, or circuit breaker, in your home.
ASSEMBLY INSTRUCTIONS 1. Connect the mounting bracket (DD) to the outlet box with short machine screws (BB). 1 DD Outlet Box (Not Included) Hardware Used BB BB Short Machine Screw Mounting DD Bracket x2 GN D x1 2. Wire connection guide: 2 Ground wire: • For installation in the United States: Wrap ground wire from outlet box around ground screw (EE) on mounting bracket (DD) no less than 2 in. from wire end. Tighten ground screw (EE).
ASSEMBLY INSTRUCTIONS 3. Supply wire connection guide: Make wire connections, securing with wire connectors (AA), following the reference chart listed below.
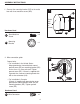
ASSEMBLY INSTRUCTIONS 5. Raise glass shade (G) to threaded socket (C) and secure with threaded socket ring (D). 5 C G D 6. Insert 40-watt max. G9-base bulb (F) into threaded socket (C). Screw bulb cover (E) onto threaded socket (C). 6 Note: Never touch a halogen light bulb with your bare skin, even when removing the bulb from the package before installing. The oils on your skin will drastically shorten the lifespan of the bulb.
CARE AND MAINTENANCE • Always be certain that electric current is turned off before cleaning this item. • Use a soft, moist cloth with mild non-abrasive soap to clean fixture. Never use glass cleaner on fixture, as it will damage the metal finish. • All glass shades may be washed in a towel-lined sink with warm water and mild soap. Do not wash shades in an automatic dishwasher. TROUBLESHOOTING PROBLEM Fixture does not light. POSSIBLE CAUSE CORRECTIVE ACTION 1. Fixture may be wired incorrectly. 1.
REPLACEMENT PARTS LIST For replacement parts, call our customer service department at 1-855-226-7169, 8 a.m. - 4 p.m., EST, Monday - Friday. PART D E G AA BB CC DD DESCRIPTION Threaded Socket Ring Bulb Cover Glass Shade Wire Connector Short Machine Screw Threaded Knob Mounting Bracket PART # TSR83072 BC83072 G83072 WC001 SCR832X050 KLRK-CH XBAR83077 D AA E BB G DD CC GN D Rev.
LUMINAIRE DE MEUBLE-LAVABO À 4 LUMIÈRES MODÈLE #83077 JOIGNEZ VOTRE REÇU ICI Numéro de série Date d’achat Des questions, des problèmes, des pièces manquantes? Avant de retourner l’article au détaillant, appelez notre service à la clientèle au 1 855 226-7169, entre 8 h et 16 h (HNE), du lundi au vendredi.
CONTENU DE L’EMBALLAGE B C A G D F E PIÈCE A B C D E F G DESCRIPTION Pavillon Bras Douille filetée Bague de douille filetée Cache-ampoule Ampoule G9 40 watts Abat-jour en verre 10 QUANTITÉ 1 4 4 4 4 4 4
QUINCAILLERIE INCLUSE AA BB DD CC GN D Capuchon de connexion Vis à métaux Qté : 3 courtes Qté : 2 Boutons filetés Qté : 2 EE Vis de mise à la terre Qté : 1 Support de fixation Qté : 1 CONSIGNES DE SÉCURITÉ Veuillez vous assurer de lire et de comprendre l’intégralité du présent guide avant d’assembler, d’utiliser ou d’installer ce produit. • • • • • AVERTISSEMENT IMPORTANT : NE tentez JAMAIS de travailler sans couper l'électricité.
INSTRUCTIONS POUR L'ASSEMBLAGE 1. Fixez le support de fixation (DD) à la boîte de sortie à l’aide des vis à métaux courtes (BB). 1 DD Quincaillerie utilisée BB Vis à métaux courtes Support de DD fixation x2 Boîte de sortie (non incluse) GN D x1 BB 2.
INSTRUCTIONS POUR L'ASSEMBLAGE 3. Guide pour la connexion des fils du cordon d’alimentation : Effectuez le raccordement des fils à l’aide des capuchons de connexion (AA), en respectant le tableau de référence ci-dessous.
INSTRUCTIONS POUR L'ASSEMBLAGE 5. 5 Placez l'abat-jour en verre (G) sur la douille filetée (C) et fixez-le à l'aide de la bague de douille filetée (D). C G D 6. Insérez une ampoule G9 de 40 watts max. (F) dans la douille filetée (C). Vissez le cache-ampoule (E) sur la douille filetée (C). 6 Remarque - Ne touchez jamais une ampoule halogène avec votre peau nue, même lorsque vous retirez l’ampoule de son emballage avant de l’installer.
ENTRETIEN • Vérifiez toujours que le courant est coupé avant de nettoyer le luminaire. • Utilisez un linge doux et humide ainsi qu’un savon non abrasif. N’utilisez jamais de nettoyants pour vitres; vous risqueriez d’endommager le fini métallique du luminaire. • Les abat-jour en verre peuvent être nettoyés dans un évier couvert de serviettes, à l’aide d’eau tiède et de savon doux. Ne nettoyez pas les abat-jour dans un lave-vaisselle. DÉPANNAGE PROBLÈME Le luminaire ne s’allume pas.
LISTE DES PIÈCES DE RECHANGE Pour obtenir des pièces de rechange, appelez notre service à la clientèle au 1 855 226-7169, entre 8 h et 16 h (HNE), du lundi au vendredi. PIÈCE D E G AA BB CC DD Nº DE PIÈCE DESCRIPTION Bague de douille filetée Cache-ampoule Abat-jour en verre Capuchon de connexion Vis à métaux courtes Boutons filetés Support de fixation TSR83072 BC83072 G83072 WC001 SCR832X050 KLRK-CH XBAR83077 D AA E BB G DD CC GN D Rev.