LED 3-RING SEMI-FLUSH MODEL #83441 Français p. 9 ATTACH YOUR RECEIPT HERE Serial Number Purchase Date Questions, problems, missing parts? Before returning to your retailer, call our customer service department at 1-855-226-7169, 8 a.m. - 4 p.m., EST, Monday - Friday.
PACKAGE CONTENTS A C B D PART A B C D DESCRIPTION Canopy Threaded Tube Set Screw LED Rings 2 QUANTITY 1 1 4 1
HARDWARE CONTENTS AA BB CC Wire Canopy Connector Short Screw Qty: 3 Machine Qty: 2 Screw Qty: 2 EE DD FF GG HH Anchor Screw Qty: 2 Allen Tool Qty: 1 Ground Screw Qty: 1 Mounting Bracket Qty: 1 Anchor Qty: 2 SAFETY INFORMATION Please read and understand this entire manual before attempting to assemble, operate or install the product. • • • • • • WARNING IMPORTANT: NEVER attempt any work without shutting off the electricity. Go to the main fuse box, or circuit breaker, in your home.
PREPARATION Before beginning assembly of product, make sure all parts are present. Compare parts with package contents list. If any part is missing or damaged, do not attempt to assemble the product. Estimated assembly time: 30 minutes to 1 hour Tools Required for Assembly (not included): Phillips screwdriver, flathead screwdriver, wire strippers, electrical tape, ladder, safety glasses.
ASSEMBLY INSTRUCTIONS 1. Temporarily raise mounting bracket (DD) to ceiling. Mark location for anchor (FF). Use 9/32 size drill to drill holes for anchor (FF). Insert anchor (FF) into hole. 1 Ceiling FF Hardware Used FF Anchor x2 DD 2. Connect the mounting bracket (DD) to the outlet box with short machine screws (BB). 2 Outlet Box (Not Included) Hardware Used Short Machine BB Screw x2 BB DD Mounting Bracket DD x1 3. Screw anchor screws (GG) through mounting bracket (DD) and into anchors (FF).
ASSEMBLY INSTRUCTIONS 4. Wire connection guide: 4 Ground wire: • For installation in the United States: Wrap ground wire from outlet box around ground screw (EE) on mounting bracket (DD) no less than 2 in. from wire end. Tighten ground screw (EE). If fixture is supplied with a ground wire, connect to outlet ground wire with a wire connector (AA). • For installation in Canada: If fixture is supplied with ground wire, wrap ground wire around ground screw (EE) on mounting bracket (DD).
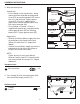
ASSEMBLY INSTRUCTIONS 6. Screw LED rings (D) onto the threaded tube (C). 6 C D 7. Pass threaded tube (B) over the stand-off on the canopy (A). Tighten set screws (C) using the allen tool (HH) to secure. 7 Hardware Used A Allen HH Tool x1 C HH B CARE AND MAINTENANCE • Always be certain that electric current is turned off before cleaning this item. • Use a soft, moist cloth with mild non-abrasive soap to clean fixture. Never use glass cleaner on fixture, as it will damage the metal finish.
WARRANTY Distributor warrants products manufactured by it will be free from defects in material and workmanship for three (3) years following the date of shipment. This warranty does not cover bulbs or finish on outdoor product. If any of the warranted products are found by Distributor to be defective, such products will, at Distributor’s option, be replaced or repaired at Distributor’s cost.
LUMINAIRE SEMI-ENCASTRÉ À 3 ANNEAUX À DEL MODÈLE #83441 JOIGNEZ VOTRE REÇU ICI Numéro de série Date d’achat Des questions, des problèmes, des pièces manquantes? Avant de retourner l’article au détaillant, appelez notre service à la clientèle au 1 855 226-7169, entre 8 h et 16 h (HNE), du lundi au vendredi.
CONTENU DE L’EMBALLAGE A C B D PIÈCE A B C D DESCRIPTION Pavillon Tube fileté Vis de réglage Anneaux à DEL 10 QUANTITÉ 1 1 4 1
QUINCAILLERIE INCLUSE AA BB CC Capuchon de connexion Vis à Vis du Qté : 3 métaux pavillon Qté : 2 courtes Qté : 2 EE DD FF GG Vis de mise à la terre Qté : 1 Support de fixation Qté : 1 HH Clé Allen Qté : 1 Pièce d’ancrage Vis à pièce d’ancrage Qté : 2 Qté : 2 CONSIGNES DE SÉCURITÉ Veuillez vous assurer de lire et de comprendre l’intégralité du présent guide avant d’assembler, d’utiliser ou d’installer ce produit.
MISE EN GARDE • • • Utilisez SEULEMENT le pilote de DEL fourni pour alimenter le luminaire. Le câble du pilote ne doit pas être utilisé à travers ni caché derrière les murs, les planchers ou les plafonds. N'utilisez PAS le plafonnier si des lumières ne fonctionnent pas ou ne fonctionnent pas correctement ou si le plafonnier pourrait être encore plus endommagé. PREPARATION Avant de commencer l’assemblage du produit, assurez-vous d’avoir toutes les pièces.
INSTRUCTIONS POUR L'ASSEMBLAGE 1. Placez temporairement le support de fixation (DD) au plafond. Marquez l'emplacement des ancrages (FF). Utilisez une perceuse équipée d'un foret de 9/32 po afin de percer les trous pour les ancrages (FF). Insérez les ancrages (FF) dans les trous. 1 Plafond FF Quincaillerie utilisée FF Pièce d’ancrage x2 DD 2. Fixez le support de fixation (DD) à la boîte de sortie à l'aide des vis à métaux courtes (BB).
INSTRUCTIONS POUR L'ASSEMBLAGE 4. Guide de raccordement électrique 4 Fil de mise à la terre : • Pour une installation aux États-Unis : enroulez le fil de mise à la terre provenant de la boîte de sortie autour de la vis de mise à la terre (EE) située sur le support de fixation (DD), à au moins 5 cm (2 po) de l’extrémité du fil. Serrez la vis de mise à la terre (EE).
INSTRUCTIONS POUR L'ASSEMBLAGE 6. Vissez les anneaux à DEL (D) sur le tube fileté (C). 6 C D 7. Enfilez le tube fileté (B) sur le support situé sur le pavillon (A). Fixez en serrant les vis de réglage (C) à l'aide de la clé Allen (HH). 7 Quincaillerie utilisée A Clé HH Allen x1 C HH B ENTRETIEN • Vérifiez toujours que le courant est coupé avant de nettoyer le luminaire. • Utilisez un linge doux et humide ainsi qu’un savon non abrasif.
GARANTIE Le distributeur garantit les produits qu’il a fabriqués contre tout défaut de matériaux ou de fabrication pour une période de trois (3) an à compter de la date d’expédition. Cette garantie ne couvre pas les ampoules ni le fini des produits extérieurs. Si l’un des produits garantis est déclaré défectueux par le distributeur, celui-ci choisira de remplacer ou de réparer le produit à ses frais.