ELAN HOME SYST E M S INSTALLATION MANUAL THP800C Contents Introduction ....................................................................... 2-4 Specifications ........................................................................ 2 Features .................................................................................. 4 Installation ....................................................................... 4-21 Wiring .................................................................................
THP800C INSTALLATION MANUAL ELAN HOME SYST E M S Introduction Congratulations and thank you for purchasing ELAN TheaterPoint speakers. The TheaterPoint speaker line has been designed specifically to match the needs of dedicated Home Theater and critical listening areas within the home.
ELAN HOME SYST E M S INSTALLATION MANUAL THP800C Features • 8 Inch Woven Kevlar Woofer • 2 1/2” Woven Kevlar Cone Mid-Range w/ Neodymium Magnet • Kevlar Fiber Dome Pivoting Tweeters w/ Neo Magnet & Fluid Cooling • 360 Degree Rotation • 30 Degree Off-Axis Woofer • Cast Aluminum Basket • Custom Q High Order Crossovers • Inverted Butyl Rubber Surrounds • EQ Switch • Bass Limiting Switch • Glass-Filled ABS Frame w/ Dog-Ear Mounting • Single Screw Locking Mechanism • ‘TheaterPoint’ Pointing Laser Included • P
THP800C INSTALLATION MANUAL ELAN HOME SYST E M S Installation The Installation process is divided into two distinct processes, wiring and mounting. After carefully considering the intended application (defining a Listening Area, Home Theater/Stereo, etc.) specific mounting locations can be decided upon. Once the specific locations are determined, installation can commence.
ELAN HOME SYST E M S INSTALLATION MANUAL THP800C Wiring (cont’d) The audio/speaker cable runs should be routed from the head-end location to in-wall keypad, IR receiver, or volume control locations (if applicable), then to the speaker rough-in brackets (if used). At the speaker locations, securely fasten the speaker wire to the speaker rough-in bracket.
THP800C INSTALLATION MANUAL ELAN HOME SYST E M S Wiring (cont’d) If not using speaker rough-in brackets, staple speaker wire runs in a loose zigzag between the studs where the speaker is to be mounted to make it easier to find the cable after the drywall is installed. Zigzagging the cable also allows flexibility in the placement of the speaker.
ELAN HOME SYST E M S INSTALLATION MANUAL THP800C In-Ceiling Stereo Speaker Pairs There are three common scenarios for connecting stereo speaker pairs to a distributed audio system: • One 4-conductor speaker wire runs from the amplifier to one speaker with two conductors connected. The second two conductors are spliced and connected to a 2-conductor speaker wire that runs to the second speaker. Amplifier Splice • Two separate two-conductor speaker wires run from the amplifier to each stereo speaker.
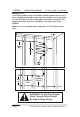
THP800C INSTALLATION MANUAL ELAN HOME SYST E M S In-Ceiling Surround Speakers Typically, Home Theater surround speakers are connected directly from the amplifier to the speakers without the use of a volume control. A/V Receiver WARNING: Turn Off Power to Amplifier Before Connecting Speakers! Page 8 © ELAN Home Systems 2005 • All rights reserved.
ELAN HOME SYST E M S INSTALLATION MANUAL THP800C Mounting Two situations that can exist when mounting in-ceiling speakers: Pre-Construction - Installations that occur in new homes being built and in remodel situations where walls and/or ceilings will be exposed. Retro-Fit - Installation that involve existing homes with walls and ceilings finished. While the end result of either type of installation is similar, the process is quite different.
THP800C INSTALLATION MANUAL ELAN HOME SYST E M S Mounting Rough-In Brackets 1. Decide on the installation location for the speakers. WARNING: Be sure mounting locations are clear of high-voltage wiring, pipes, or other obstructions. 2. Attach the Bracket Flanges to the Bracket Frame as shown. Note: Make sure the dimpled side of the flange faces OUT and interlocks with the frame from the rear. 3. Secure the bracket assembly to the ceiling joists with flat-head screws or heavy-duty staples.
ELAN HOME SYST E M S INSTALLATION MANUAL THP800C Mounting Rough-In Brackets (cont’d.) 4. Once the drywall is installed, carefully and accurately cut out the speaker holes using a routing tool or similar device. A drywall professional may perform this step. After the drywall is up and the the holes are cut, the Speaker Frame and Speaker Grille may be removed for painting (see Painting for more details). It is also possible to install only the speaker frame and speaker grille.
THP800C INSTALLATION MANUAL ELAN HOME SYST E M S Mounting Speakers in Rough-In Brackets 1. Remove speaker grille and place speaker face down. 2. Locate the speaker wire and pull through the ceiling opening. 3. Connect the speaker wire. Be sure to observe correct polarity! 4. Insert the speaker into the opening in the ceiling and carefully tighten each of the four clamping screws, alternating diagonally between each screw position to ensure proper fit. 5.
ELAN HOME SYST E M S INSTALLATION MANUAL THP800C Retro-Fit Retro-fit installations are more difficult to complete than preconstruction because walls and ceilings are intact. Typically wires must be fished into position through walls, floors and ceilings. Holes must be cut and speakers mounted directly in the ceiling with no rough-in brackets.
THP800C INSTALLATION MANUAL ELAN HOME SYST E M S Mounting Speakers in Ceiling 1. Remove speaker grille and place speaker face down. 2. Locate the speaker wire and pull through the ceiling opening. 3. Connect the speaker wire. BE SURE TO OBSERVE CORRECT POLARITY! 4. Insert the speaker into the opening in the ceiling and carefully tighten each of the four clamping screws, alternating diagonally between each screw position to ensure proper fit. 5.
ELAN HOME SYST E M S INSTALLATION MANUAL THP800C Speaker Enclosures In certain applications, it may be desirable to build enclosures for TheaterPoint in-ceiling speakers. In these situations, use the guidelines presented below. Note: The THP800C is 7" deep. Provisions must be made for this depth when mounting the speaker in ceilings with 6" joists or less.
THP800C INSTALLATION MANUAL ELAN HOME SYST E M S Speaker Enclosures (cont’d) The completed enclosure should look similar to the drawing below. When designing an enclosure to dimensions other than what is listed in the chart on the previous page, ELAN recommends using a height to width ratio of 1:1.5 in order to reduce resonance. The dimensions shown in the chart take this into consideration.
ELAN HOME SYST E M S INSTALLATION MANUAL THP800C Sound Dampening Material The use of sound dampening material such as Dynamat® can dampen bleed-through into adjoining rooms and improve the sound quality of in-wall or in-ceiling speakers by reducing vibrations. The diagram below shows a typical in-ceiling speaker installation using sound dampening material on the back wall and the baffle surface (the ceiling surface in which the speaker actually mounts).
THP800C INSTALLATION MANUAL ELAN HOME SYST E M S Pointing Speakers TheaterPoint speakers are specifically designed to produce outstanding audio quality when properly placed in relationship to the listening area. Human hearing relies on mid-range and high frequencies to determine spatial direction (where a sound is coming from).
ELAN HOME SYST E M S INSTALLATION MANUAL THP800C Pointing Tweeter TheaterPointer Laser Pointer All TheaterPoint speakers include ELAN’s exclusive TheaterPointer Laser Pointing Device for precise tweeter adjustment. Because the human ear relies heavily on high frequencies to locate sound, and because high frequency drivers create a narrow soundfield, it is important to align tweeters precisely.
THP800C INSTALLATION MANUAL ELAN HOME SYST E M S Setting Switches Once the speakers are wired, mounted, and positioned correctly, use the EQ switches to fine-tune the speakers based on local environmental variables such as hardwood floors, thick draperies, etc. The two EQ switches are labelled “EQ” (Equalizer) and “BASS”. The EQ switch compensates for the “liveness” or “deadness” of the room while the BASS switch cuts bass by aproximately - 20dB.
ELAN HOME SYST E M S INSTALLATION MANUAL THP800C Applications All TheaterPoint speakers have similar “voices” designed to work together to create a seamless, high-quality Home Theater or critical listening experience. ELAN strongly recommends installing TheaterPoint speakers in matched groups (Left, Center, Right, Rear, Sub) in order to preserve the acoustic integrity of the source material.
THP800C INSTALLATION MANUAL Stereo Applications (cont’d.) ELAN HOME SYST E M S THP800C Critcal listening areas require a well-defined listening position. Make sure to point the speakers toward the listening area as shown. THP800C THP800C X THP800C/THP1200SW Add a THP1200SW subwoofer to increase bass response. This adds richness to the music and makes a huge improvement in sound quality. THP800C THP800C THP1200SW Subwoofer X Page 22 © ELAN Home Systems 2005 • All rights reserved.
ELAN HOME SYST E M S INSTALLATION MANUAL THP800C Home Theater It is essential to use voice-matched speakers in any Home Theater application. Sound emanates from each speaker in turn, and all should sound the same. TheaterPoint speakers satisfy this requirement perfectly, and should be used in combinations shown in the following section. Center Channel Positioning A center channel speaker should be placed as close as possible to the video display utilized in a Home Theater.
THP800C INSTALLATION MANUAL ELAN HOME SYST E M S Subwoofer Positioning Subwoofers are considered to be omnidirectional. They produce low bass frequencies that are not especially localized. The human ear does not rely on these frequencies to place sounds in space therefore, placement is not as important as with other types of speakers. Place subwoofers along the front wall of the room approximately 2-3 feet from the corners.
ELAN HOME SYST E M S THP800C INSTALLATION MANUAL 5.1 Surround Sound Applications THP525LS/THP650LS - Free-Standing L/C/R THP650SS - On-Wall Dipole Rear Side THP1200SW - Subwoofer TV THP1200SW Subwoofer THP650LS or THP525LS THP650LS or THP525LS THP650LS or THP525LS THP650SS THP650SS THP800C - In-Ceiling L/C/R & Rear THP1200SW - Subwoofer THP1200SW Subwoofer TV THP800C THP800C THP800C © ELAN Home Systems 2005 • All rights reserved.
THP800C INSTALLATION MANUAL 5.1 Applications (cont’d.) ELAN HOME SYST E M S THP525W - In-Wall L/C/R THP650D - In-Wall Dipole Rear Side THP1200SW - Subwoofer TV THP1200SW Subwoofer THP525W THP525W THP650D THP525W THP650D THP650W - In-Wall L/C/R & Rear THP1200SW - Subwoofer TV THP1200SW Subwoofer THP650W THP650W THP650W THP650W Page 26 THP650W © ELAN Home Systems 2005 • All rights reserved.
ELAN HOME SYST E M S INSTALLATION MANUAL THP800C 5.1 Applications (cont’d.) THP650W - In-Wall Left/Right THP525W - In-Wall Center THP650D - In-Wall Dipole Rear Side THP1200SW - Subwoofer TV THP1200SW Subwoofer THP525W THP650W THP650W THP650D THP650D THP525LS/THP650LS - Free-Standing L/C/R THP650D - In-Wall Dipole Rear Side THP1200SW - Subwoofer TV THP1200SW Subwoofer THP650LS or THP525LS THP650LS or THP525LS THP650D © ELAN Home Systems 2005 • All rights reserved.
THP800C INSTALLATION MANUAL 5.1 Applications (cont’d.) ELAN HOME SYST E M S THP525LS/THP650LS - Free-Standing L/C/R THP800C - In-Ceiling Rear THP1200SW - Subwoofer TV THP1200SW Subwoofer THP650LS or THP525LS THP650LS or THP525LS THP800C THP650LS or THP525LS THP800C THP650W - In-Wall L/C/R THP800C - In-Ceiling Rear THP1200SW - Subwoofer TV THP1200SW Subwoofer THP650W THP650W THP650W THP800C Page 28 THP800C © ELAN Home Systems 2005 • All rights reserved.
ELAN HOME SYST E M S THP800C INSTALLATION MANUAL 5.1 Applications (cont’d.) THP525W - In-Wall L/C/R THP800C - In-Ceiling Rear THP1200SW - Subwoofer TV THP1200SW Subwoofer THP525W THP525W THP525W THP800C THP800C THP525W - In-Wall Center THP650W - In-Wall L/R THP800C - In-Ceiling Rear THP1200SW - Subwoofer TV THP1200SW Subwoofer THP525W THP650W THP650W THP800C THP800C © ELAN Home Systems 2005 • All rights reserved.
THP800C INSTALLATION MANUAL ELAN HOME SYST E M S 6.1/7.1 Surround Sound 6.1 and 7.1 surround sound systems utilize additional rear and/or rear side speakers to enhance the audio effects contained in a soundtrack. Any of the previous examples can easily become a 6.1 or 7.1 system by changing the configuration of the rear channels. The diagrams in this section show rear and side rear speakers only! 6.1 Systems Typical 6.1 systems use two rear side speakers with a center rear speaker.
ELAN HOME SYST E M S THP800C INSTALLATION MANUAL 6.1 Applications (cont’d.) THP650W - In-Wall Rear THP650W THP650W THP650W THP525W - In-Wall Rear THP525W THP525W THP525W THP525W - In-Wall Rear Center THP650D - In-Wall Rear Side THP650D THP650D THP525W © ELAN Home Systems 2005 • All rights reserved.
THP800C INSTALLATION MANUAL ELAN HOME SYST E M S 7.1 Systems Use a total of four speakers for rear Surround effects when configuring 7.1 systems. Several logical combinations can be created using TheaterPoint speakers as shown in the following examples.
ELAN HOME SYST E M S THP800C INSTALLATION MANUAL 7.1 Applications (cont’d.) THP650W - In-Wall Rear and Side THP650W THP650W THP650W THP650W THP525W - In-Wall Rear and Rear Side THP525W THP525W THP525W THP525W THP650D - In-Wall Rear Side THP525W - In-Wall Rear THP650D THP650D THP525W THP525W © ELAN Home Systems 2005 • All rights reserved.
THP800C INSTALLATION MANUAL ELAN HOME SYST E M S High Performance 7.1 Surround System THP650LS - Free-Standing L/C/R THP650SS - On-Wall Rear Side THP525LS - On-Wall Rear THP1200SW - Subwoofers TV THP1200SW Subwoofer THP1200SW Subwoofer THP650LS THP650LS THP650LS THP650SS THP650SS THP525LS Page 34 THP525LS © ELAN Home Systems 2005 • All rights reserved.
ELAN HOME SYST E M S INSTALLATION MANUAL THP800C Notes: © ELAN Home Systems 2005 • All rights reserved.
THP800C INSTALLATION MANUAL ELAN HOME SYST E M S Notes: Page 36 © ELAN Home Systems 2005 • All rights reserved.
Limited Lifetime Warranty ELAN HOME SYSTEMS L.L.C. (“ELAN”) warrants to the original purchaser only that THP800C speakers are free from defects in materials and workmanship provided that the product was purchased from an authorized ELAN Home Systems Dealer. If the purchaser discovers that such item was not as warranted above and promptly notifies ELAN in writing, ELAN shall repair or replace the item at the company’s option.