
User guide


Using the Database Module 5-9
Software Release 3.00 StormTracker-Site Manager and Administration User Guide 08-01148-01-200
Procedure 5-2 (continued)
Exporting and importing EtherLoop modem databases
Action
Step Action
Exporting the modem database
1 Browse to the IP address of the BitStorm Server containing the desired
EtherLoop CO/CPE modem database.
2 Select the StormTracker-Site Manager software group and Database from
the StormTracker-Site Manager module menu.
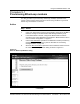
3 Select the Export to file
function, and click on the "Retrieve the exported
database" link.
Note: To view the exported data, left-click on the link. (If a dialog box appears
with the options 'Open...' and 'Save...', select 'Open' to view, or 'Save’ to
download).
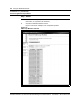
4 To download the exported file, right-click on the "Retrieve the exported
database" and select the 'Save to target...' menu item. Save the file to a
desired location on your workstation or network.
Importing the modem database
5 Browse to the IP address of the BitStorm Server controlling the system.
6 Select the StormTracker-Site Manager software group and Database from
the StormTracker-Site Manager module menu.
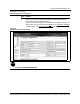
7 Select the Import from File
function, and enter or browse to the file containing
the exported database.
8 Select the "Import and Provision"
or "Import Only" button, depending on your
requirements.
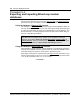
If the function is executed, the system displays "File has been imported
successfully."
STOP
You have completed this task.
Import from File / Import and Provision vs. Import Only
Click 'Import and Provision' to automatically provision modems with the
imported IP address, shelf and slot. Click 'Import Only' to import CO/CPE
modem database without provisioning the modems on the Site Manager.
The ’Import Only’ option is useful if you need to make changes to the
database (such as changing/adding IP addresses) before provisioning the
modems into the system Site Manager database.