
User`s guide


12-8 Providing visitor printing services
Software Release 2.30 YesWare Applications User’s Guide 08-01016-01
Procedure 12-1 (continued)
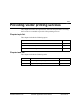
Provisioning visitor printing services
Step Action
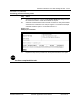
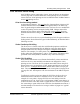
6 Click the "Add" button to add the printer configuration to the database. After
a few moments, the system should display the printer configuration in the
"database table" above the "Add" fields as shown in Figure 12-5.
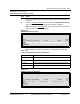
Note: To save re-entering the same information for additional printers, the
text-entry fields in the table used to add new printers do not clear when a
printer is added. To clear the text-entry fields, click the "Clear Fields" button.
Figure 12-5
Example / First printer added to database
—continued—
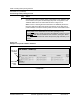
Caution - "Delete Record" checkbox usage
Clicking once on the "Delete Record" checkbox (see Figure 12-5)
immediately
removes a printer record from the database, whthout a prompt.
If you accidentally
click the "Delete Record" checkbox, clicking the "Back"
button of your web-browser will restore the previous page and allow you to
continue.
First row in
database
table
Add new
printers
table