user manual E L A TI ON | PROTRON 3K™ | user manual PROTRON 3K™
www.elationlighting.com ©2015 ELATION PROFESSIONAL all rights reserved. Information, specifications, diagrams, images, and instructions herein are subject to change without notice. ELATION PROFESSIONAL logo and identifying product names and numbers herein are trademarks of ELATION PROFESSIONAL. Copyright protection claimed includes all forms and matters of copyrightable materials and information now allowed by statutory or judicial law or hereinafter granted.
www.elationlighting.
www.elationlighting.com GENERAL INFORMATION INTRODUCTION Congratulations, you have just purchased one of the most innovative and revolutionary new hybrid lighting fixtures on the market today! The PROTRON 3K™ has been designed to perform reliably for years when the guidelines in this booklet are followed. Please read and understand the instructions in this manual carefully and thoroughly before attempting to operate this unit.
www.elationlighting.com CUSTOMER SUPPORT Elation Professional® provides a customer support line, to provide set up help and to answer any question should you encounter problems during your set up or initial operation. You may also visit us on the web at www.elationlighting.com for any comments or suggestions. For service related issue please contact Elation Professional®. ELATION SERVICE USA - Monday - Friday 8:00am to 5:00pm PST Voice: 323-582-3322 Fax: 323-832-9142 E-mail: support@elationlighting.
www.elationlighting.com LIMITED WARRANTY A. Elation Professional® hereby warrants, to the original purchaser, Elation Professional® products to be free of manufacturing defects in material and workmanship for a period of two years (730 days), and Elation Professional® product rechargeable batteries to be free of manufacturing defects in material and workmanship for a period of six months (180 days), from the original date of purchase. This warranty excludes discharge lamps and all product accessories.
www.elationlighting.com SAFETY INSTRUCTIONS The PROTRON 3K™ is an extremely sophisticated piece of electronic equipment. To guarantee a smooth operation, it is important to follow the guidelines in this manual. The manufacturer of this device will not accept responsibility for damages resulting from the misuse of this fixture due to the disregard of the information printed in this manual. This device falls under PROTECTION CLASS 1. It’s essential this device be grounded properly.
www.elationlighting.com GENERAL GUIDELINES • N E V E R O P E N T H I S F I X T U R E W H I L E I N U S E ! • During the initial operation of this fixture, a light smoke or smell may emit from the interior of the fixture. This is a normal process and is caused by excess paint in the interior of the casing burning off from the heat associated with the lamp and will decrease gradually over time.
www.elationlighting.com FIXTURE OVERVIEW 1. powerCON OUT 2. powerCON IN 3. FUSE 4. LED Indicators - DMX Signal, Flash 5. MENU, UP, DOWN, ENTER Buttons 6. LCD Menu Function Display 7.
www.elationlighting.com FIXTURE INSTALLATION FLAMMABLE MATERIAL WARNING Keep fixture at least 5.0 ft. (1.5m) away from any flammable materials, decorations, pyrotechnics, etc. E L E C T R I C A L C O N N E C T I O N S A qualified electrician should be used for all electrical connections and/or installations. W A R N I N G MINIMUM distance of inflammable materials from surface 1.6 feet (0.5m). Keep fixture at least 5.0 feet (1.5m) away from any flammable materials, decorations, pyrotechnics, etc.
www.elationlighting.com MOUNTING POINTS • Overhead mounting requires extensive experience, including amongst others calculating working load limits, installation material being used, and periodic safety inspection of all installation material and the device. If you lack these qualifications, do not attempt the installation yourself. Improper installation can result in bodily injury. • Fixture is fully operational in any of the mounting positions as illustrated below.
www.elationlighting.com CLAMP MOUNTING AND SECURING The PROTRON 3K™ includes an adjustable mounting yoke that attaches to both sides of the fixture. When mounting this fixture to truss be sure to secure an appropriately rated clamp to the mounting yoke using a M10 screw fitted through the center hole of the mounting yoke. Be sure to attach a Safety Cable to the fixture using the safety cable rigging point on the back of the fixture as illustrated below.
www.elationlighting.com UNDERSTANDING DMX DMX-512 DMX is short for Digital Multiplex. This is a universal protocol used by most lighting and controller manufactures as a form of communication between intelligent fixtures and controllers. DMX allows all makes and models of different manufactures to be linked together and operate from a single controller. This is possible as long as all the fixtures and the controller are DMX compliant.
www.elationlighting.com Be sure to follow the above figure when making your own cables. Do not use the ground lug on the XLR connector. Do not connect the cable’s shield conductor to the ground lug or allow the shield conductor to come in contact with the XLR outer casing. Grounding the shield could cause a short circuit and erratic behavior. DMX-512 CONTROLLER CONNECTION Connect the provided XLR cable to the female XLR output of your controller and the other side to the male XLR input of the PROTRON 3K™.
www.elationlighting.com 5pin XLR DMX CONNECTORS Some manufactures use 5pin XLR connectors for DATA transmission in place of 3pin. 5pin XLR fixtures may be implemented in a 3pin XLR DMX line. When inserting standard 5pin XLR connectors in to a 3pin line a cable adaptor must be used, these adaptors are readily available at most electric stores. The following chart details a proper cable conversion.
www.elationlighting.com DMX ADDRESSING All fixtures should be given a DMX starting address when using a DMX controller, so the correct fixture responds to the correct control signal. This digital starting address is the channel number from which the fixture starts to “listen” to the digital control information sent out from the DMX controller. The allocation of this starting DMX address is achieved by setting the correct DMX address on the digital display located on the back of the fixture.
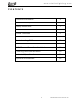
www.elationlighting.com FIXTURE MENU ON-BOARD SYSTEM MENU The PROTRON 3K™ comes with an easy to navigate system menu. The next section will detail the functions of each command in the system menu. LCD MENU CONTROL PANEL The control panel (see image below) located on back of the fixture allows you to access the main menu and make all necessary adjustments to the PROTRON 3K™. During normal operation, pressing MENU button once will access the fixture’s main menu.
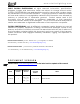
www.elationlighting.com ELATION© PROTRON 3K™ MAIN MENU Specifications are subject to change without any prior written notice. MENU DMX Address Channel Mode Power Save OPTIONS / VALUES DESCRIPTION 1 - 512 Set DMX Address 1Chan, 2Chan, 3Chan, 4Chan Set DMX Channel Mode Low, High Set Power Mode Intnsity 000- 255 Manual Mode On, Off Durate - Null 0.1s / 0.2s / 0.5s / 1s 1.5s / 2s / 2.
www.elationlighting.com DMX CHANNEL FUNCTIONS AND VALUES ELATION© PROTRON 3K™ DMX Channel Values / Functions (4 DMX Channels) Specifications subject to change without any prior written notice.
www.elationlighting.com CLEANING AND MAINTENANCE C A U T I O N Disconnect power before cleaning or maintenance. CLEANING Frequent cleaning is recommended to insure proper function, optimized light output, and an extended life. The frequency of cleaning depends on the environment in which the fixture operates: damp, smoky or particularly dirty environments can cause greater accumulation of dirt on the fixture’s optics.
www.elationlighting.com TECHNICAL SPECIFICATIONS FEATURES 120° Beam Angle (2) Power Modes (HIGH and LOW) (2) Silent Cooling Fans SOURCE (202) CREE™ 3W Cool White LEDs 80,000 Total Lumens 50,000 Average LED Life EFFECTS Electronic Dimming Burst, Pulse, Lighting, Full ON* *Thermally regulated output at full max 10 seconds.
www.elationlighting.com PHOTOMETRIC DATA DIMENSIONAL DRAWINGS Please Note: Specifications and improvements in the design of this unit and this manual are subject to change without any prior written notice.
www.elationlighting.com OPTIONAL ACCESSORIES ORDER CODE TRIGGER CLAMP EWDMXSYSTEM EWDMXT EWDMXR PLC3 PLC6 AC3PDMX5PRO AC5PDMX5PRO ITEM Heavy Duty Wrap Around Hook Style Clamp Wireless DMX System (1 Transmitter, 1 Receiver) Wireless DMX Transmitter Wireless DMX Receiver 3' (1m) powerCON PRO Link Cable 6' (1.8m) powerCON PRO Link Cable 5 ft. (1.5m) 3pin PRO DMX Cable 5 ft. (1.