
Installation & Assembly

Page 2 Elcoma Metal Folding Shower Seats
Preparation
Check local codes for proper placement of fold down shower seating to meet ADA and/or ANSI 117.1
Consumer Safety Requirements or other regulations you may be required to meet.
Before installing the Folding Shower Seat, you will need to prepare the area.
ROUGH-IN INSTALLATION:
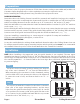
Determine where the Folding Shower Seat will be mounted and install the bracing to the rough-in
framing to support the seat through the shower wall. Provide no smaller than a 2” X 6” blocking in the
wall for mounting. Measure from the sub-floor up 13 ”. Center the 2” X 6” at the 13 ” mark.
Notch the wall studs to accommodate the header and attach with no less than Six (6) ” X 3” stainless
steel screws. (Fig. 1a).
Before finishing the wall and using the dimensions of your seat, ensure that the two upper mounting
brackets and the top two screws of the guide bracket align with the 2” X 6” blocking, while the third
bottom screw of the guide bracket will line up with the middle and wall stud (Fig. 1b).
If you are installing a seat with legs, no center support is required for setup and installation.
Finish the stud wall with tile, fiberglass, or other decor.
EXISTING WALL INSTALLATION:
Locate the stud behind the existing shower wall and determine where the Folding Shower Seat can
be safely mounted. Both the upper mounting bracket and the guide bracket must be in contact with
the studwall. Clean the portion of the shower wall where the seat will be installed.
Installation
NOTE: When installing a leg-supported seat, the guide bracket is not required. The two upper
mounting brackets are centered on the 2” X 6” blocking with the four legs siting firmly on the floor.
All four legs are adjustable with locking feet. It is recommended to adjust the two front feet so that
the seat tilts upwards 2° - 3° from the wall to the front edge. Once positioned, tighten the lock nut
to prevent slipping.
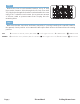
Step 1:
Locate the desired seating position making sure that the
top of the seat is between 17” - 19” from the finished floor.
When measuring, the seat must be in the downward, seating
position. With a 24” level, measure the side-to-side alignment
to ensure the seat is level, and front-to-back is at a 2° - 3°
incline.
Step 2:
Use a pencil to mark the locations for the three screw holes
from each of the upper mounting brackets, and the three
holes from the guide bracket (legless seats only). Be careful
of its position: the bottom screw of the guide bracket needs
to be centered on the middle wall stud with the top screws
fastened to the 2” X 6” block (Fig. 2).