READ THIS MANUAL BEFORE OPERATING YOUR GAS CHOPPER SCOOTER™ ELECTRA ACCESSORIES, INC. STRONGLY SUGGESTS THE OPERATOR OF THIS PRODUCT BE 16 YEARS OF AGE OR OLDER. Assembly and User's Manual Model #: 88905 / 88969 For the most recent version of this user's manual and for all updated product information please visit www.electraUSA.
YOUR INSURANCE POLICIES MAY NOT PROVIDE COVERAGE FOR ACCIDENTS INVOLVING THE USE OF THE GAS CHOPPER SCOOTER™. TO DETERMINE IF COVERAGE IS PROVIDED YOU SHOULD CONTACT YOUR INSURANCE COMPANY OR AGENT.
TABLE OF CONTENTS Features and Specifications_________________________________________3 Contents of the Box________________________________________________4 General Safety Guidelines & Restrictions_________________________5,6,7,8 Assembly Instructions Handlebars _________________________________________________9 Lights__________________________________________________9 Backrest___________________________________________10 Mirrors___________________________________________10 Pre-Ride Adjustments Brakes______
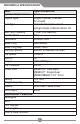
FEATURES & SPECIFICATIONS Item Specifications Cylinder Displacement Engine Type 43 cc Single Cylinder, 2-Stroke Air-cooled Unleaded Gasoline mixed w/High-Grade 2-Stroke Motor Oil Fuel Type Gas Tank Capacity Gas:Oil Ratio Carburetor Spark Plug Spark Plug Gap Starting Options Top Speed Max HP Torque Tire Pressure Wheel Size 1 Liter (.26 Gallons) 32:1 Double Films NGK-BM6A .6mm-.7mm Electric & Manual Pull Start 14 MPH .47 .9Nm/3800rpm 50PSI (88905)10” Dual Rear (88969)11” Single Rear (88905/88969) 12.
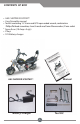
CONTENTS OF BOX l l l l l l GAS CHOPPER SCOOTER™ User/Assembly manual Tool kit containing 13/16 mm and 8/10 open ended wrench, combination Phillips/flat head screwdriver, 4 mm/5 mm/6 mm/8 mm Allen wrenches, 22 mm socket Spare fuses (10 Amp x 3 qty) 2 Keys 12V Battery charger GAS CHOPPER SCOOTER™ Manual Battery Charger Tool Kit 4
GENERAL SAFETY GUIDELINES & RESTRICTIONS This Manual contains many notes concerning the consequences of failure to maintain or inspect your GAS CHOPPER SCOOTER™. Your safety and the safety of others is very important. We have provided important safety messages in this manual and on the GAS CHOPPER SCOOTER™. Please read these messages carefully. A safety message alerts you to potential hazards that could hurt you or others. Each safety message is preceded by a safety alert symbol and one of two words.
GENERAL SAFETY GUIDELINES & RESTRICTIONS HELMET USE WHILE RIDING THE MINI SPORT GAS RACER™ Your state DMV, or the city or county where it will be used, may require that you use a helmet that meets the federal Department of Transportation "DOT" requirements (like those used by motorcycle riders) while riding the GAS CHOPPER SCOOTER™.
GENERAL SAFETY GUIDELINES & RESTRICTIONS • GAS CHOPPER SCOOTER ™ should not be ridden by any person that is physically or mentally challenged • GAS CHOPPER SCOOTER ™ should not be ridden by any person with vision, balance, hearing or coordination impairments • GAS CHOPPER SCOOTER ™ should not be ridden by any person using headphones or a cellular phone (They mask traffic sounds and emergency vehicle sirens, distract you from concentrating on what's going on around you, and their wires can tangle in the movi
GENERAL SAFETY GUIDELINES & RESTRICTIONS BEFORE EACH RIDE: • Make sure you properly (per the instructions in the helmet) wear a helmet that meets DOT or CPSC regulations • Wear protective clothing and gloves •Wear eye protection that does not interfere with your peripheral vision • Check local and state laws before operating the GAS CHOPPER SCOOTER™ in any area • Make sure Battery is fully charged • Make sure the horn and headlight are operational • Make sure Brakes are in proper working order • Make sure y
ASSEMBLY INSTRUCTIONS BEFORE ASSEMBLING YOUR GAS CHOPPER SCOOTERTM, PLEASE BE SURE YOU HAVE ALL NECESSARY PARTS. REFER TO CONTENT OF BOX. PLEASE FOLLOW PROPER ASSEMBLY INSTRUCTIONS. IF YOU DO NOT HAVE THE PROPER PARTS NECESSARY TO ASSEMBLE YOUR GAS CHOPPER SCOOTERTM, PLEASE DO NOT RETURN THE UNIT TO THE ORIGINAL PLACE OF PURCHASE. CALL ELECTRA CUSTOMER SERVICE AT: 1-888-467-1234 M-F 10am - 9pm EST.
ASSEMBLY INSTRUCTIONS BACKREST INSTALLATION 1. Remove the backrest mounting hardware from the GAS CHOPPER SCOOTER™. Attach the backrest by aligning the backrest frame against the fixed mounting brackets, inserting the bolts through the rubber mounting cushion, through the backrest frame, and finally through the fixed mounting bracket on the GAS CHOPPER SCOOTER™. Secure all 4 bolts with self locking nuts.
PRE-RIDE ADJUSTMENTS ADJUST FRONT & REAR BRAKES The front and rear brakes your GAS CHOPPER SCOOTER™ have been pre-assembled and preadjusted by the manufacture. However, the cables and brakes may need adjustment if they are not slowing or stopping the GAS CHOPPER SCOOTER™ properly.The brakes can be adjusted at the handlebar mounted brake levers. BRAKE ADJUSTMENTS: 1.
PRE-RIDE ADJUSTMENTS DRIVE CHAIN MAINTENANCE Periodic adjustments of the drive chain will be necessary to maintain proper tension. If the drive chain is loose, it may make a "popping" noise, which indicates a need for immediate adjustment. To manually check the drive chain tension, make sure the drive chain is properly seated on both the front and rear sprockets. Place your finger underneath the center of the drive chain and push upwards to the top of the chopper.
PRE-RIDE ADJUSTMENTS TIRE ADJUSTMENTS: IMPORTANT INFORMATION!!! Proper Tire Pressure 50 PSI 30 40 45 20 50 60 10 70 0 PSI 80 Make sure that the air pressure for all tires is 50 PSI . If the tires have less than the recommended amount of pressure, poor handling, and damage to the tires and rims may occur. Use an air pressure gauge to check for the air pressure of the tire. DO NOT USE GAS STATION AIR FILLING STATIONS AS THE PRESSURE IS USUALLY TOO HIGH AND THE GAUGES ARE INACCURATE.
PRE-RIDE ADJUSTMENTS MIXING GAS & OIL FOR GAS CHOPPER SCOOTER™ : Your GAS CHOPPER SCOOTER™ is equipped with a two-stroke engine. It is REQUIRED that you ALWAYS premix gasoline and oil prior to filling the gasoline tank. Failure to use a premixed gasoline mixture will cause serious engine problems resulting in total engine failure. If engine fails or seizes while rider is operating GAS CHOPPER SCOOTER™, it could lead to an accident, injuries, damage to the bike, or even death.
BATTERY CHARGING THE GAS CHOPPER SCOOTER™ BATTERY To avoid damage to the battery when charging, use only the charger provided with your GAS CHOPPER SCOOTER™. 1. DO NOT CHARGE OR STORE THE GAS CHOPPER SCOOTER™ CLOSER THAN 20 FEET FROM ANY FLAME (E.G. FURNACE, FIREPLACE, WATER HEATER, SPACE HEATER) 2. Be sure to only use 110V AC with the GAS CHOPPER SCOOTER™ charger. Also make sure the plug is inserted into a three prong grounded AC outlet. 3.
STARTING INSTRUCTIONS First, be sure there is pre-mixed gasoline the gas tank. If unsure about the gasoline mixture, refer to the Gasoline/Oil Mixing Instructions section. Make sure both fuel lines are properly attached to the carburetor. There is one main fuel line (black) and one primer bulb line (clear). If these lines are not properly attached, the engine will not run. 1.
SERVICE & MAINTENANCE MAINTENANCE Technological breakthroughs have made components more complex than ever before, and the pace of innovation is increasing. This on-going revolution makes it impossible for this manual to provide all the information required to properly repair and/or maintain your GAS CHOPPER SCOOTER™. In order to help minimize the chances of an accident and possible injury, it is critical that you have all repair and maintenance work performed regularly.
SERVICE & MAINTENANCE TIRE MAINTENANCE Make sure that the air pressure for all tires is correct. If the tires have less than the recommended amount of pressure, this may cause the unit the handle poorly or cause damage to the tires. Use an air pressure gauge to check for the air pressure of the tire. DO NOT USE GAS STATION AIR FILLING STATIONS AS THE PRESSURE IS USUALLY TOO HIGH AND THE GAUGES ARE INACCURATE. OVER INFLATION OF THE TIRE COULD CAUSE A BLOW OUT AND CRASH.
SERVICE & MAINTENANCE GAS:OIL MAINTENANCE *Refer to Pre-Ride Adjustments in this manual (pg. 14) BATTERY MAINTENANCE *Refer to battery charging instructions (pg. 15) BATTERY RECYCLING When maintained and used properly, (by following charging and storage guidelines), the Lead Acid Battery used in this product has a normal life span of many miles.
SERVICE & MAINTENANCE GAS TANK REMOVAL/GAS DISPOSAL TOOLS NEEDED: 1 Phillips Screwdriver 1 10mm wrench 1 Draining container or pan REMOVE SEAT & GAS TANK COVER: 1. Locate seat screws under the back side of the seat(Fig. 1) 2. Remove screws from seat and pull up(Fig. 1) 3. Remove gas cap and screws from gas tank cover (Fig. 2) and lift up slightly to expose the ignition wires(Fig. 3) 4. Unplug Ignition wire and pull off gas tank cover Ignition Wires Fig. 2 Fig. 1 Fig. 3 REMOVING GAS TANK 1.
TROUBLE SHOOTING Problem Solution Engine is difficult to start or does not start at all: 1. Check the main fuse. Replace if necessary. 2. Check the fuel lines. Be sure it is full of fuel and that there are no bends or kinks in the line. If large air bubbles are present in the fuel line, push the primer ball a few more times or until the large air bubbles are no longer present. 3. Check the fuel filter. Inside the bike's gas tank is a fuel filter. Remove the filter and examine it for signs of clogging.
STORAGE STORING YOUR GAS CHOPPER SCOOTERTM Proper storage preparation is essential for keeping your GAS CHOPPER SCOOTERTM trouble free and in good working order. The following steps will help you keep rust and corrosion from impairing your racer's function and appearance and will make the engine easier to start when used again. STORAGE PRECAUTIONS If your chopper will be stored with a gasoline mixture in the fuel tank and carburetor, it is important to reduce the hazard of gasoline vapor ignition.
WARRANTY INFO 30 Day Limited Warranty Electra Accessories, Inc. ("Electra" the distributor) warrants to the original retail purchaser ("you") that the Electra product for which this warranty has been issued is free from defects in material and workmanship for 30 days from the date of original retail purchase. This warranty is not transferable to a subsequent purchaser. Electra's sole obligation under this warranty is to repair or replace the product, at Electra's option.
WARRANTY INFO Warranty Service Options To obtain service under this warranty you must Call our Toll-Free Number at 1-888-467-1234 M-F 10am - 9pm EST for Customer Service/Technical Support on your Electra Product BEFORE returning your Electra Product back to the place of purchase. If you return your Electra Product for warranty service you must obtain a return authorization number by calling Electra at 1-888-467-1234 M-F 10am - 9pm EST.
RETURN POLICY 10 DAY RETURN/EXCHANGE POLICY THIS WRITTEN POLICY SUPERCEDES ANY OTHER PREVIOUS POLICY, WRITTEN OR IMPLIED. THIS WARRANTY IS TO BE POSTED AT THE STORE LEVEL IN PLAIN SIGHT OF THE CONSUMER.
NOTES 26