MODEL EL 235 INSTALLATION AND USERS' INSTRUCTIONS 25
PREFACE Welcome to your new Electra cooker. Its stylish and practical design will enhance your kitchen and make "cooking electric" a pleasure. Features include a radiant hob for responsive, economical cooking with two large and two small radiant rings, full width grill and a side element heated oven and two removable shelves. There is also a clock / timer featuring a minute minder and automatic oven switching.
TECHNICAL DETAILS MODEL NO. EL 235 Voltage: 230/240 Volts AC 50Hz Wattage: 9.6 / 10.7kW Height: 1240mm Width: 460mm Depth: 585mm Weight: 51.4kg This appliance complies with: European Council Directive 73/23/EEC. EMC Directive 89/336/EEC. CE Marking Directive 93/68/EEC.
CONTENTS Preface . . . . . . . . . . . . . . . . . . . . . . . . . . . . . . . . . . . . . . . . . . . . . . . . . . . . . . . . . . . . . . . . . . . . . . . . . . . . . . . . . . . . . . . . . . . 1 Technical Details . . . . . . . . . . . . . . . . . . . . . . . . . . . . . . . . . . . . . . . . . . . . . . . . . . . . . . . . . . . . . . . . . . . . . . . . . . . . . . . . . 2 Contents . . . . . . . . . . . . . . . . . . . . . . . . . . . . . . . . . . . . . . . . . . . . . . . . . . . . . . . . . . . .
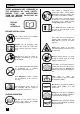
SAFETY THESE WARNINGS ARE PROVIDED IN THE INTERESTS OF YOUR SAFETY. ENSURE THAT YOU UNDERSTAND THEM ALL BEFORE INSTALLING OR USING THE COOKER. PLEASE READ CAREFULLY BEFORE INSTALLATION This cooker is heavy and care must be taken when moving it. Accessible parts especially around the grill area, may become hot when the cooker is in use. Children should be kept away until it has cooled. Take great care when heating fats and oils as they will ignite if they become too hot.
Ensure that all vents are left unobstructed to ensure ventilation of the oven cavity. Ensure that the anti-tilt shelves are put in place correctly. Refer to instructions on pages 16. GENERAL Under no circumstances should repairs be carried out by an inexperienced person as this may cause injury or serious malfunction. This cooker should be serviced by an authorised Service Engineer and only genuine-approved spare parts should be used.
INTRODUCTION WARNING: THIS COOKER MUST BE EARTHED RATING PLATE The cable should be routed away from potentially hot areas marked by an ' X' in the diagram below. Record the model, product and serial numbers inside the back cover of this instruction book from the rating plate. This is situated on the lower front frame of the cooker and can be seen upon opening the oven door. The cooker must be protected by a suitably rated fuse or circuit breaker. The rating of the cooker is given on the rating plate.
REVERSIBLE OVEN DOOR GRILL AND OVEN FURNITURE If you require the oven door to be hinged on the opposite side, you will need to contact your local Electricity Company's Service Department. PLEASE NOTE that a charge may be made. The following items of grill/oven furniture have been supplied with the cooker. 1 grill pan GENERAL NOTES ON USING YOUR COOKER We suggest that you run the oven elements for 10 15 minutes at 220°C to burn off any residue from their surfaces.
GETTING TO KNOW YOUR COOKER THE CONTROL PANEL A FEATURES A B C D E 8 - Hotplate Controls Grill Control Oven Indicator Neon Oven Temperature Control Automatic Timer B C D E
\ THE AUTOMATIC TIMER A START TIME SETTING KNOB B SECOND HAND C J A CLOCK SYMBOL H B D CLOCK/MINUTE MINDER/LENGTH OF COOKING TIME SETTING KNOB G E START TIME INDICATOR F HOUR HAND G DISPLAY WINDOW H MANUAL SYMBOL J MINUTE HAND C D F E 1. TO SET THE TIME OF DAY The clock will operate when the cooker is switched ON at the wall. To set, pull out and turn setting knob (D) clockwise until the right time of day is displayed, e.g. 9 a.m. as Fig.1. Fig. 1 D 2.
4. TO CANCEL MINUTE MINDER/BUZZER Turn setting knob (D) clockwise, without pulling it out until "O" or the manual symbol appears in the window (G) as Fig.4. 5. HOW TO SET THE OVEN TIMER G When using the oven timer for the very first time, it is advisable to let it operate while you are at home. The timer can be checked to show that it is operating correctly and then you will then feel confident to leave a meal to cook automatically in the future.
B) TO START COOKING NOW, THEN SWITCH OFF AUTOMATICALLY Follow the first 3 points under section 5. (A) above, and then; iv) To set the length of time you want the food to cook; turn setting knob (D) clockwise, without pulling it out, until the required cooking period can be seen in window (G), e.g. 120 minutes (2 hours) and Fig. 9. v) Turn the oven temperature control to the required setting. The oven indicator neon should glow. 110 120 G 130 Fig.
THE RADIANT HOB USING THE HOB l l To operate the hotplates, turn the control knobs clockwise from the OFF position to the required setting. l Avoid placing fish kettles or large preserving pans across two hotplates as this may cause damage. The highest number represents the hottest setting and the lowest number the coolest setting. Choose a setting appropriate to the quantity and type of food to be cooked.
PRESERVING 1. Preparing the food. Seal the food by coating with flour, egg and breadcrumbs or batter. Do not use a basket with batter coated foods as they will stick. 2. Amount of oil. For safety purposes fill the pan only one-third full of oil. 3. Testing the temperature of the oil. 1. DO NOT use a pan that overlaps the perimeter of the hob trim. 2. To allow for a full rolling boil, the pan should be no more than one third full when all the ingredients have been added.
THE GRILL CAUTION - ACCESSIBLE PARTS MAY BECOME HOT WHEN THE GRILL IS IN USE. CHILDREN SHOULD BE KEPT AWAY. l l To operate the grill, turn the grill control clockwise from the 'OFF' position to the required setting. To correctly locate the grill pan ensure the pan locates into the runners in the grill compartment side panels. There are two grilling positions. The highest number represents the hottest setting and the lowest the coolest setting. NOTE THE GRILL DOOR MUST BE LEFT OPEN DURING GRILLING.
l l l l When toasting bread use the top runner position. Adjust the grill pan grid to suit. Accompaniments such as tomatoes and mushrooms may be placed underneath the grid when grilling meats. Preheat the grill on a full setting for a few minutes before cooking. Adjust the heat setting and runner position as necessary during cooking. The food should be turned over during cooking as required.
THE OVEN SELECTING THE OVEN l l To operate the oven turn the oven temperature control to the required setting. HINTS AND TIPS l The oven indicator neon will glow until the oven has reached the required temperature and then go out. It will turn ON and OFF periodically during cooking showing that the temperature is being maintained. Arrange the shelves in the required positions before switching the oven ON. Shelves are numbered from the bottom upwards.
l l l l Do not place dishes or baking trays directly on the oven floor as it interferes with the oven air circulation and can lead to base burning; use the lower shelf position. However non critical dishes can be placed on the oven base when more space is required. The use of excessively high temperatures can cause uneven browning. It may be necessary to reduce temperatures slightly. Refer to the recommendations given in the oven cooking chart on page 18.
OVEN COOKING CHART The oven temperatures are intended as a guide only. It may be necessary to increase or decrease the temperature by 10°C to suit individual preferences and requirements. Shelf positions are counted from the bottom of the oven.
ROASTING CHART The oven temperatures are intended as a guide only. It may be necessary to increase or decrease the temperatures by 10° C to suit individual preferences and requirements. The roasting temperatures and times given in the chart should be adequate for most joints, but slight adjustments may be required to allow for personal requirements and the shape and texture of the meat. However, lower temperatures and longer cooking times are recommended for less tender cuts or larger joints.
CARE AND CLEANING ALWAYS SWITCH OFF THE ELECTRICITY SUPPLY AT THE MAIN WALL SWITCH AND ALLOW THE COOKER TO COOL BEFORE CLEANING CLEANING MATERIALS Before using any cleaning materials on your cooker, check that they are suitable and that their use is recommended by the manufacturer. CLEANING THE BRASS PLATED HANDLES - WHERE FITTED It is strongly recommended that only hot soapy water is used for cleaning the door handles. Any other cleaning materials will dull the brass plated finish.
THINGS TO NOTE When operating the cooker at higher temperatures than used in normal cooking the surfaces of the cooker may get hotter than usual. Children should be kept away. HINTS AND TIPS l l l l l l l l Manual cleaning of the Stayclean coating is not recommended. Damage will occur if abrasives or aerosol sprays of any kind are used. Slight discolouration and polishing of the Stayclean surfaces may occur in time. This does not affect the Stayclean properties in any way.
SOMETHING NOT WORKING We strongly recommend that you carry out the following checks on your cooker before calling a Service Engineer. It may be that the problem is a simple one which you can solve yourself without the expense of a Service call. If our Service Engineer finds that the problem is listed below you will be charged for the call whether or not the cooker is under guarantee.
GUARANTEE Your Electra cooker is covered by the terms of your Electricity Company's guarantee for the period of one year. In the event of a defect please contact the Service Department of your local Electricity Company. It is suggested that you record the model number, product number, serial number and date of purchase on the following page. The model, product and serial numbers of the cooker are detailed on the rating plate.
SERVICE CALL RECORD How to obtain After Sales Service quickly Remember that you may be charged for a service call (even during the guarantee period) if nothing is found to be wrong with the cooker. So always check the instructions to make sure you have not missed anything. Make a note of your nearest Electricity Company Service Depot and their telephone number here: .....................................................................................................................................
4 MODEL NO. PART NO.