
Instruction Manual


6
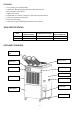
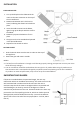
INSTALLATION
COLD AIR OUTLETS
1. Line up the dimple on the Elbow with the
notch on the Hose connector on the top of
the air conditioner.
2. Rotate anticlockwise until a click can be
heard, indicating the elbow has locked into
place.
3. Insert the Cold Air Hose into the Elbow,
again lining up the dimple with the notch in
the Elbow.
4. Rotate the pipe anticlockwise to fix it in
place.
5. The pipe can then be extended and pointed
in the desired direction.
6. Repeat for the second air outlet.
HOT AIR OUTLET
1. Push the Hot Air Hose onto the Hot air outlet on the top of
the appliance.
2. Extend the pipe and route it outside.
NOTES:
• The best form of installation is through a wall duct. By properly venting you expel hot air from your room
while efficiently cooling it.
• Your air conditioner should be used without the vent pipe in dry mode. When using dry mode ensure
that the water tank is monitored and regularly emptied. Permanent plumbing can be also installed for
dry mode or an external uplift water pump can be set up for unattended use.
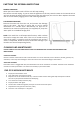
IMPORTANT SAFEGUARDS
If hoses are extended above the permitted length, the unit may
malfunction which can invalidate the warranty. The outlet vent must be
well ventilated and not obstructed as this will cause the unit to
overheat. Keep the all the hoses as straight and short as possible and
avoid bending the air hose by more than 45 degrees in order to
maintain the performance of the unit. Excessive bends in the hose may
prevent the unit from expelling the hot air, which can lead to internal
damage which would invalidate the warranty. Ensure that sufficient
space is left in from the end of the vent pipes (30cm – Cold air, 90cm
Hot air)