USER MANUAL 27” LED MONITOR eiQ-27MF144FSHDRB Thank you for choosing electriQ Please read the user manual before using this monitor and keep it safe for future reference Visit www.electriQ.co.
CONTENTS Safety Information 2 What’s Included 4 Monitor Dimensions 4 Connections Available on the Monitor 5 Wall Mounting 6 Getting Started 6 Monitor Controls 6 Initial Setup 7 Menu Options 7 Picture Settings 8 Image Settings 9 Colour Temperature Settings 10 OSD Settings 11 Reset 12 Miscellaneous Settings 13 Specification 14 Troubleshooting 15 electriQ UK Support 15 1
SAFETY INFORMATION • • • • • • • • • • • • • • • • • • • • • Read these instructions - All the safety and operating instructions should be read before this product is operated. Keep these instructions - The safety and operating instructions should be retained for future reference. Heed all warnings - All warnings on the appliance and in the operating instructions should be adhered to. Follow all instructions - All operating and usage instructions should be followed.
• • • • • Do not remove the safety covers. There are no user serviceable parts inside. Trying to service the unit yourself is dangerous and may invalidate the product's warranty. Only qualified personnel should service this apparatus. Do not block ventilation slots on the back cover. The monitor can be placed in a cabinet but ensure at least 5cm (2") clearance all around. Do not tap or shake the screen, this may damage internal components.
WHAT’S INCLUDED 4
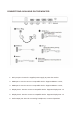
CONNECTIONS AVAILABLE ON THE MONITOR 12V 1. DC input port: Connect the supplied power supply to power the monitor 2. HDMI port 1: Used to connect a compatible device. Supports HDMI 1.4 & 2.0 ; 3. HDMI port 2: Used to connect a compatible device. Supports HDMI 1.4 & 2.0 ; 4. Display Port 1: Used to connect a compatible device. Supports Display Port 1.2 5. Display Port 2: Used to connect a compatible device. Supports Display Port 1.2 6.
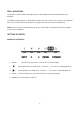
WALL MOUNTING The monitor is provided with mounting holes for a VESA approved wall mounting bracket (not supplied) The VESA mounting pattern is: 100x100mm and the size of the screws is 4 x M6 x 10 (not supplied) Do not use screws longer than specified or damage will occur to the internal components. NOTE: As the monitor is considered heavy, please consult with a professional wall mount installer to perform the installation. GETTING STARTED MONITOR CONTROLS 1.
INITIAL SETUP Connect the monitor to a power outlet. 1. Press the POWER button on the monitor or to turn it on (The indicator will be blue) 2. Connect the relevant cable to the corresponding input on the monitor. The source will be automatically detected. 3. To change between inputs, press the “Source” button to enter the source menu. Use the "◀" and "▶" buttons to choose the input source between DP1, DP2, HDMI1 and HDMI 2.
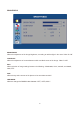
BRIGHTNESS BRIGHTNESS Allows the adjustment of the image brightness, according to ambient light in the room. Value “0-100” CONTRAST Allows the adjustment of contrast between white and black areas of the image. Value “0-100” ECO Allows selection of image settings between the following: STANDARD, TEXT, MOVIE, and GAME, FPS, RTS”. DCR Allows the dynamic contrast of the picture to be turned ON and OFF HDR MODE Allows to change the GAMMA value between “OFF, AUTO, MAX “.
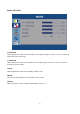
IMAGE SETTINGS H. POSITION Allows adjustment of the horizontal position of the display image. Use the "◀" and "▶" buttons to horizontally move the image. V. POSITION Allows adjustment of the vertical position of the display image. Use the "◀" and "▶" buttons to vertically move the image. CLOCK Allows adjustment of the CLOCK setting. Value“0-100” PHASE Can reduce video distortion and instability. Value"0-100" ASPECT Allows selection of video format of the between “16:9, 4:3..... “.
COLOUR TEMPERATURE SETTINGS COLOR TEMP. Allows adjustment of the colour settings between the following options: ”Normal – Warm - Cool User”. In the “ User” setting, you have full control to alter the individual settings “ Red : 0-100, Green: 0-100, and Blue : 0-100 “.
OSD SETTING LANGUAGE Allows selection of desired language: “ENGLISH, FRENCH, TURKISH, ITALIAN, SPANISH, PORTUGUESE, CHINESE, DUTCH, JAPANESE, GERMAN, POLISH, KOREAN”. OSD H. POS Allows adjustment of the horizontal position of the OSD OSD V. POS Allows adjustment of the vertical position of the OSD OSD TIMER Allows adjustment of the duration of the OSD, value “0-60” TRANSPARENCY Allows adjustment of the transparency of the OSD, value “0-100”.
RESET RESET Returns the monitor to its factory default settings. SHARPNESS Allows adjustment of sharpness between "0-4". BLACK LEVEL Allows adjustment of black level between "0-100".
MISCELLANEOUS SIGNAL SOURCE Allows user to choose the signal source of the display “ HDMI1, HDMI2, DP1, DP2, AUTO”. VOLUME Allows adjustment of the volume of the monitor from “0-100”. LOW BLUE RAY Allows adjustment of the low blue effect of the display, value: 0-100. FREE SYNC Allows FreeSync to be turned ON and OFF". OVERDRIVE Allows adjustment of Overdrive function.
SPECIFICATION eiQ-27MF144FSHDRB Panel Type 27'' (16:9) LED Backlit Monitor Case Type Plastic Best Resolution 1920(H) x 1080(V) @ 144Hz Active Display Area 597.6 (H) X 336.15 (V) Pixel Pitch 0.311 (H) x 0.311 (V) Contrast Ratio 1000:1 Typical Brightness 350 cd/m² Response Time 5ms(G2G) Viewing Angle U/D: 85° / 85°, L /R: 80° / 80° Display Colours 16.
TROUBLESHOOTING Problem No power Solution Insert the plug securely into the power outlet Ensure that the equipment is connected properly Ensure the correct input is selected Disconnect the plug and then reconnect it. (The unit may not be operating properly due to lightning, static, or other factors.) Electronic equipment near the unit may be causing interference. Relocate the unit or move the equipment.