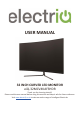
USER MANUAL 32 INCH CURVED LED MONITOR eiQ-32MCV4KAFSHDR Thank you for choosing electriQ Please read the user manual before using this monitor and keep it safe for future reference Visit www.electriQ.co.
CONTENTS SAFETY 3 PARTS LIST 5 STAND INSTALLATION 6 WALL MOUNT INSTALLATION 7 CONNECTIONS AVAILABLE 8 GETTING STARTED 8 MONITOR CONTROLS 8 INITIAL SET UP 9 SHORTCUT BUTTONS 9 MENU OPTIONS 9 INPUT SOURCE 10 BRIGHTNESS / CONTRAST 10 COLOUR SETTINGS 11 PICTURE QUALITY SETTINGS 12 DISPLAY 13 AUDIO 13 MULTI WINDOW 14 OSD 15 OTHER 16 TECHNICAL SPECIFICATION 17 TROUBLESHOOTING 18 SUPPORT 18 2
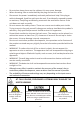
SAFETY INFORMATION • • • • • • • • • • • • • • • • • • Read these instructions - All the safety and operating instructions should be read before this product is operated. Keep these instructions - The safety and operating instructions should be retained for future reference. Heed all warnings - All warnings on the appliance and in the operating instructions should be adhered to. Follow all instructions - All operating and usage instructions should be followed.
• • • • • • • • • • • Do not place heavy items on the cable as this may cause damage. When removing from a socket hold by the plug and not the wires. Disconnect the power immediately and seek professional help if the plug or cable is damaged, liquid has spilt onto the unit, if accidentally exposed to water or moisture, if anything accidentally penetrates the ventilation slots or if the unit does not work normally. Do not remove the safety covers. There are no user serviceable parts inside.
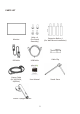
PARTS LIST Monitor Bolts x 4 (For Stand Assembly) DP Cable USB Cable Power Cable (AC 100-240V, 50/60Hz) User Manual Extension Bolts x 4 (For Wall Mount Installation) Cable Clip Stand – Upright Section 5 Stand - Base
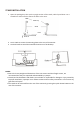
STAND INSTALLATION 1. Open the packing box, take out the upright section of the stand, cable clip and base. Use a screwdriver and one bolt to fasten the base to the stem. Cable clip Stand Base Bolts x1 2. Use 2 x Bolts to secure the mounting plate to the rear of the monitor. 3. Use both hands to stand the assembled monitor on a flat desktop. NOTES: • Due to the heavy weight and dimensions of the LCD screens and their fragile nature, we recommend that they are unpacked and assembled by 2 people.
WALL MOUNT INSTALLATION • The monitor is provided with mounting holes for a VESA approved wall mounting bracket (not supplied). • Unscrew the 2 bolts on the mounting plate and press the button to remove the monitor from the bracket if mounting. • M4 x12 bolts (not supplied) should be used to attach the bracket to the extension bolts. • Do not use bolts longer than specified or damage will occur to the internal components. If the monitor is already attached to the stand, remove the stand.
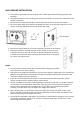
CONNECTIONS AVAILABLE ON THE MONITOR 1. Power 2. AUDIO OUTPUT 3. DP 1 4.
INITIAL SETUP CONNECT THE MONITOR TO A POWER OUTLET 1. Press the POWER button on the monitor or to turn it on (The indicator will be blue) 2. Connect the relevant cable to the corresponding input on the monitor. The source will be automatically detected. SHORTCUT BUTTONS The monitor includes one touch options to access common settings. MENU OPTIONS The menu for the monitor can be accessed by pressing the menu button on the control panel.
OSD MENU INPUT SOURCE Signal Switch the signal input or select the source. DP, HDMI1, HDMI2, HDMI3 BRIGHTNESS/CONTRAST Brightness Adjust the brightness of the display between 0 and 100. Contrast Adjust the contrast of the display between 0 and 100. DCR Turn the Dynamic Contrast Ratio Feature On or Off. Black level Adjust the black level of the display between 0 and 100.
COLOUR SETTINGS Gamma Change the Gamma value for the display between 2.0, 2.2 and 2.4. Picture Mode Change the picture mode between Standard, Photo, Movie, Game, FPS and RTS. Change the Colour Temperature of the display to Normal, Warm, Colour Cool or User. When the User Mode is selected, the Red, Green, and Temperature Blue values can be adjusted independently between 0 and 100. Low Blue Light Change the blue light emitted by the display between0 and 100. Hue Change the Hue value between 0 and 100.
PICTURE QUALITY SETTINGS Sharpness Change the display Sharpness between 0 and 100. Response Time Turn the Response Over Drive feature between Off, High, Middle of low Noise Reduction Adjust the level of Noise Reduction between Low, Medium, High, or Off. Super Resolution Change the Super Resolution value from 0 to 5. Dynamic Luminance Control Turn the Dynamic Luminance Control Feature On or Off.
DISPLAY Aspect Ratio LED Mode Change the image aspect ratio to Wide Screen Enter the monitors LED mode AUDIO Mute Turn On and off to mute and unmute the audio output. Volume Adjust the output volume between 0 and 100. Audio Source Chose which source the audio is output from.
MULTI-WINDOW Multi-Window Choose the different formats of multi window display between Off, Picture in Picture (PIP) and Picture By Picture (PBP 2Win) Sub Win2 Input Choose the source of the second window between HDMI 1, HDMI 2, HDMI 3 and DP. PIP Size Adjust the size of the secondary source in PIP and PBP modes between Small, Medium and Large PIP Position Set the position of the secondary source in PIP and PBP modes between Top Right, Top Left, Bottom Right and Bottom Left.
OSD Language Change the OSD Menu display language between English, Chinese, Korean, Russian, Spanish, Japanese and French. OSD H Position Change the horizontal position of the OSD Menu. OSD V Position Change the vertical position of the OSD Menu. OSD Transparency Change the transparency value of the OSD Menu between 0 and 100. OSD Time Out Change how long the OSD Menu is on before it automatically exits. OSD Rotation Rotate the OSD Menu for ease of use on rotated screens.
OTHER Free Sync Mode Turn Free Sync On or Off. HDR: Turn HDR On (requires HDMI 2.0 input). DP Version Change the DP version Reset Restore factory default setting. HDR Turn the HDR on or off.
TECHNICAL SPECIFICATION Product Model eiQ-32MCV4KVAFSHDR 32” Diagonal Panel Type VA Panel Aspect Ratio 16:9 Power Supply AC 100-240V, 50/60Hz, 1.5A Power Consumption 46W(Typical) Dimensions 712*505.6 *226.5 mm Net / Gross Weight 7.07kg / 9.09 kg Terminals Picture Screen Size Maximum Resolution 3840*2160 Brightness 350cd/m 2 Static Contrast 3000:1 Response Time 8ms Viewing Angle (H/V) 178° / 178° USB Input USB-B x 1, USB-A x 3 USB 3.0 Compliant with USB 3.0 standards.
TROUBLESHOOTING PROBLEM No power SOLUTION Insert the plug securely into the power outlet. Ensure that the equipment is connected properly. No picture Ensure the correct input is selected. Buttons on the monitor don’t do anything Disconnect the power plug and then reconnect it. (The unit may not be operating properly due to lightning, static, or other factors.) Noise or other interference Electronic equipment near the unit may be causing interference. Relocate the unit or move the equipment.