USER MANUAL eiQ-9WMINV-V3 eiQ-12WMINV-V3 9,000 BTU 12,000 BTU ENVIRONMENTALLY FRIENDLY SMART WIFI CONTROLLED WALL MOUNTED INVERTER SPLIT AIR CONDITIONER WITH HEAT PUMP Thank you for choosing an electriQ Air Conditioner Please read this manual before installing this innovative Air Conditioner and keep it safe for future reference.
CONTENTS SAFETY INFORMATION 3 GENERAL INSTRUCTIONS ENERGY SAVING AND UNIT PROTECTION TIPS PRODUCT OVERVIEW 3 4 5 SYSTEM DIAGRAM HOW IT WORKS PARTS DIAGRAM 5 6 7 OPERATING THE AIR CONDITIONER 8 FUNCTIONS DISPLAY IMPORTANT INFORMATION 8 10 11 CUSTOMISING YOUR AIR CONDITIONER OPTIONAL PANELS FOR THE INDOOR UNIT HOW TO CHANGE THE PANEL SETTING UP THE WIFI APP 12 12 12 13 BEFORE YOU START CONNECTION METHODS AVAILABLE REGISTERING THE APP SETTING UP YOUR HOME WITHIN THE APP CONNECTING USING QUICK
SAFETY INFORMATION • Before commencing work on the appliance the safety instructions from the user and installation manuals must be read and understood. During the work these instruction must be fully adhered to. If in doubt, please contact the manufacturer for assistance. • The installer must ensure they are suitably competent and insured for the work they are carrying out. The manufacturer accepts no liability for damage or injury caused due to failure to follow the instructions.
SAFETY INFORMATION • The air conditioner contains about 320g (eiQ-9WMINV) or 400g (eiQ-12WMINV) of R290 refrigerant gas. • R290 is classed as flammable and as such naked flames and sources of ignition should be kept a safe distance from the unit. • Do not install or store in an unventilated space with an area smaller than 18m2 (eiQ-9WMINV) or 28m2 (eiQ-12WMINV) per unit.
PRODUCT OVERVIEW SYSTEM DIAGRAM Please note: The diagram is for illustrative purposes only, the actual product will differ 5
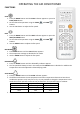
PRODUCT OVERVIEW HOW IT WORKS COOLING MODE 2 1 1 3 4 5 7 8 6 The compressor (6) in the external unit compresses the refrigerant into a high-temperature, high-pressure gas. When this gas flows along the cooling fins of the condenser (7), heat is exuded and the gas condenses into a liquid, which is then led to the evaporator (1) in the indoor unit. The liquid expands into a gas at a low temperature and low pressure.
PRODUCT OVERVIEW PARTS DIAGRAMS INDOOR UNIT No. 1 2 3 4 5 6 7 8 9 10 11 Description Front panel Air filter Optional filter LED Display Signal receiver Terminal block cover Ionizer generator (not applicable on all models) Deflectors Emergency button Indoor unit rating label Airflow direction louver OUTDOOR UNIT No.
OPERATING THE AIR CONDITIONER FUNCTIONS COOL 1. Press the MODE button until the COOL indicator appears or press the COOL/COLD button. 2. Set the desired temperature using the TEMP and TEMP buttons. 3. Use the FAN button to adjust the fan speed. HEAT 1. Press the MODE button until the HEAT indicator appears or press the HEAT/HEATING button 2. Set the desired temperature using the TEMP and TEMP buttons. 3. Use the SPEED button to adjust the fan speed. FAN MODE 1.
OPERATING THE AIR CONDITIONER SHUTDOWN TIMER (WHILE THE AIR CONDITIONER IS ON) 1. 2. 3. 4. Press the MODE button until the symbol appears for the operation you want. Set the desired temperature. Use the SPEED button to set the fan speed. Press the TIMER button to set the running time required. Use the up and down buttons to set the running time in 30 minute intervals (max 24 hours). Once the running time has elapsed, the appliance will switch itself off.
OPERATING THE AIR CONDITIONER CHILD LOCK Press the LOCK button to turn the child lock on and off. When activated, the other buttons on the remote cannot be used until the lock has been turned back off. QUIET OPERATION Press the QUIET/MUTE button and the unit will operate at its quietest settings at low fan speed. This mode is only available in Cooling mode. DISPLAY The air conditioner contains a temperature display on the front panel Much more information is provided on the remote control.
OPERATING THE AIR CONDITIONER IMPORTANT INFORMATION HEATING MODE When the air conditioner is placed in heating mode, the indoor unit will appear to be inactive while it follows it’s preheat procedure to heat the evaporator coils. Once the coils have heated, the indoor fan will start to run. This process usually takes 1 – 3 minutes, and is designed to ensure that cold air is not circulated. AUTO RESTART The air conditioner will automatically restart when electricity is restored after a power cut.
CUSTOMISING YOUR AIR CONDITIONER OPTIONAL PANELS FOR THE INDOOR UNIT Your air conditioner is supplied with a white front panel but can be customised with the addition of optional front panels, allowing you to choose the look that best suits your room and preferences.
SETTING UP THE WIFI APP BEFORE YOU START • • • • Ensure your router provides a standard 2.4ghz connection. If your router is dual band ensure that both networks have different network names (SSID). The provider of your router / Internet service provider will be able to provide advice specific to your router. Ensure the router is as close as possible to the indoor unit during setup.
SETTING UP THE WIFI APP CONNECTION METHODS AVAILABLE FOR SETUP The air conditioner has two different setup modes, Quick Connection and AP (Access Point). The quick connection is a quick and simple way to set the unit up. The AP connection uses a direct local wifi connection between your phone and the air conditioner to upload the network details. Before starting the setup, with the air conditioner plugged in, but turned off, quickly press the DISPLAY button on the remote 8 times.
SETTING UP THE WIFI APP REGISTER THE APP 1. Press on the register button at the bottom of the screen. 4. A verification code will be sent by the method selected in step 3. Enter the code into the app. 2. Read the Privacy policy and press the Agree Button. 5. Type in the password you would like to create. This needs to be 6-20 characters, with letters and numbers. 15 3. Enter your email address or phone number and press continue to register. 6. The app is now registered.
SETTING UP THE WIFI APP SETTING UP YOUR HOME WITHIN THE APP TUYA is designed so it can work with a large number of compatible smart devices within your home. It can also be set up to work with multiple devices within different houses. As such during the setup process, the app requires that different areas are created and named to allow easy management of all your devices. When new devices are added, they are assigned to one of the rooms you have created. CREATING ROOMS 1. Press on the ADD HOME button. 2.
SETTING UP THE WIFI APP CONNECTING USING QUICK CONNECTION Before initiating the connection, make sure the unit is in standby mode, with the WIFI light flashing twice per second. If not follow the instructions for changing the connection mode. Also ensure your phone is connected to the WIFI network. (We advise turning mobile data off during setup) 1. Open the app and press “+” to add device 4. Enter your WIFI password and press confirm. 2. Select the type of device 3.
SETTING UP THE WIFI APP CONNECTING USING AP MODE (ALTERNATIVE METHOD) Before initiating the connection, make sure the unit is in standby mode, with the WIFI light flashing once per second. If not follow the instructions for changing the WIFI connection mode. Also ensure your phone is connected to the WIFI network. (We advise turning mobile data off during setup) 2. Open the app and press “+” to add device 4.
USING THE WIFI APP Add Device: Add a device to the app, and go through the setup process. THE HOME SCREEN Voice Control: Use to give verbal instructions to the app. Your Device: Press to enter the device screen. Home: Return to this screen when within the Smart or profile tabs. Profile: Provides the option for changing settings, and adding devices using a QR code provided by a friend.
USING THE WIFI APP DEVICE SCREEN The device screen is the main control screen for the air conditioner, providing access to the controls to amend the functions and settings Edit Name: Use to change the name of the air conditioner.
USING THE WIFI APP SMART SCENES Smart Scenes is a powerful tool providing the option to customise the operation of the air conditioner based both on conditions within the room and outside influences. This gives the user the option of specifying much more intelligent actions. These are split into two categories Scene and Automation. SCENE Scene allows for a one touch button to be added to the Home screen.
USING THE WIFI APP AUTOMATION Automation allows an automatic action to be set up for the device. This can be triggered by the Time, indoor temperature, humidity of the room, weather conditions, and a range of other influences. 1. Press on the Smart Scene tab at the bottom of the Home screen 2. Press on the Plus in the top right corner to add a smart scene. 4. Setup is very similar to the scene setup on the previous page, and includes an extra section for specifying a trigger for the scene to start.
USING THE WIFI APP PROFILE TAB The profile tab gives you the option to edit both your detail, and use the added features of the unit. CHANGING THE NAME OF YOUR DEVICE When in any of the device screens further settings for the device can be accessed, by pressing on the three dots in the top right hand corner. The top option within this allows you to change the name of the device to something relevant to the use of the product, such as “Living Room Air Conditioner”.
TECHNICAL SPECIFICATION TROUBLESHOOTING MALFUNCTION The appliance does not operate Strange odour Noise of running water A fine mist comes from the air outlet A strange noise can be heard Insufficient airflow, either hot or cold The appliance does not respond to commands The display is off POSSIBLE CAUSE Power failure Damaged indoor/outdoor unit fan motor Faulty compressor thermomagnetic circuit breaker Faulty protective device or fuses Loose connections Self protection in adverse conditions Voltage hig
TECHNICAL SPECIFICATION FAULT CODES ON THE INDOOR UNIT The air conditioner is equipped with intelligent self diagnostic and protection features. If abnormal operating conditions are detected the appliance will stop working, and a fault code will display on the indoor unit. For further assistance and advice, speak to our technical support team.
TECHNICAL SPECIFICATION Outdoor Indoor Model Rated voltage and frequency (Ph-V-Hz) Fuse Required Mode Rated capacity (W) Power input (W) Current input (A) SEER/SCOP(W/W) Nominal load (kW) Balance point temperature heating (oC) Min. outdoor operating temperature (oC) Thermostat-off mode (W) Standby mode (W) Off mode (W) Annual consumption (kW) Copper Pipe Type length(m) Liquid side / Gas side (mm/inch) Max. refrigerant pipe length Max.
WARRANTY AND SUPPORT WARRANTY INFORMATION electriQ guarantee provides cover against material or manufacturing faults. This means that if your air conditioner develops a fault during the guarantee period, we will arrange for it to be repaired or replaced. Faults arising from a faulty installation are specifically excluded. The system must be serviced annually by qualified personnel. This unit must be operated under conditions as recommended in this user manual, at voltages indicated on the unit.