
User Manual


8
INSTALLATION
1. Before installation, ensure you have not connected the appliance to the mains supply.
2. The base of the cooker hood should be placed at a distance of 65~75cm above the
cooking plane for best effect.
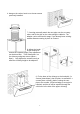
3. Install the hanging screws on a suitable wall once the
installation height is decided, ensuring they are level. The
fixed position of the inside chimney bracket is the place of
chimney. Also install the safety hole in the wall. In total 8 holes
should be drilled and wall plugs inserted.
4. Put 2 x Screws (4mm x30mm) into position to hang the
hood ensuring the heads are protruding by 3-4mm, screw
and tighten Plate II onto the wall with the screws (4mm
x 40mm) and wall plugs provided.
5. The 2 x airflaps should be installed at
this stage, as access is easier before the
unit is wall mounted. On the top of the
Hood Unit, where the air outlet vent is
located, the 2 x flaps should be carefully
installed, bending very slightly so the lugs
at each end locate into the holes, enabling
flaps to pivot upwards when the unit is in
operation, opening up the outlet fully for
the air to pass through. Please note: the
small spindles/lugs at each end of each
flap locate into the holes on the housing,
not the grooves above them.