USER MANUAL 1 KW SLIM WALL MOUNTABLE PANEL HEATER EPMH1000LED Thank you for choosing electriQ Please read the manual before using this heater and keep it safe for future reference. Visit our page www.electriQ.co.
SAFETY INSTRUCTIONS • • • • • • • • • • • • • • • • • • • • • IMPORTANT Carefully read the instructions before operating the unit This appliance is for indoor use only. Rating: This unit must be only connected to a 220-240 V / 50 Hz earthed outlet. Installation must be in accordance with the regulations of the country where the unit is used. If you are in any doubt about the suitability of your electrical supply have it checked and, if necessary, modified by a qualified electrician.
• Always ensure the unit is secure before operation. Do not use on unstable or uneven surfaces and if wall-mounted, it must be securely attached to a suitable wall. • Do not move or tilt the unit. • Avoid keeping the unit in direct sunlight for a long period of time. • The heater is designed to be used at temperatures above -20°C. If it is exposed to temperatures below this, it must be allowed to warm above this level before operation. • Do not attempt to repair, disassemble or modify the appliance.
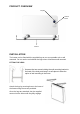
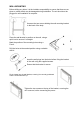
PRODUCT OVERVIEW Display Control Panel Castors INSTALLATION The heater can be fitted with the supplied legs to use as a portable unit or wall mounted. Do not use the unit without the legs unless it has been wall mounted. FITTING THE LEGS Unscrew the two screws holding the wall mounting bracket to the back of the body, and keep in a safe place to allow the option of wall mounting in the future. Attach the legs by securing them to the base of the heater using the screws provided.
WALL MOUNTING Before drilling any holes, it is the installers responsibility to ensure that there are no pipes or cables which may be damaged during installation. The unit should not be plugged in until installation is complete. Unscrew the two screws holding the wall mounting bracket to the back of the body. Place the wall bracket in position on the wall, using a spirit level to ensure it is straight. Mark the position of the mounting holes using a Pencil.
CONTROL PANEL Display Minute Button Heat Level Selection Mode Selection and Hour Button Function Selection and Weekly Button Temperature Up/ Timer Open Temperature Down/ Timer Close REMOTE CONTROL Function Selection and Weekly Button Mode Selection and Hour Button Temperature Up/ Timer Open Child Lock Heat Level Selection Temperature Down/ Timer Close
OPERATION The unit should be turned on using the power switch on the side. The unit has 3 modes. Press the SET button to change the heater into the desired mode. The current mode will be indicated on the display TURNING ON Standby Mode On Weekly Timer Mode With the heater in Standby Mode: SETTING THE DAY AND TIME Press and hold the MODE Press and hold the MIN Press and hold the SET button to set the hour VALUE. button to set minute VALUE. button to set the day.
Change the heater into Weekly timer mode. Press the button to choose between the following preprogrammed heating periods: WEEKLY TIMER 1. 2. 3. 4. 5. 6. 7. 8. 9. Mon. to Fri. Mon. to Sat. Every day Mon., Wed., Fri. Tues., Thur., Sat. Weekend Mon. to Wed. Thur. to Sat. Permanently on Once the preset has been chosen, start and stop times should be set for the full 24 hours which will be operational for each of the days in the above heating period.
CLEANING AND STORAGE ATTENTION: Please shut off the unit and unplug from the mains before cleaning or performing any maintenance. CLEANING THE SURFACE • Clean the heater with a duster or a soft wet cloth. Do not use chemical solvents (such as benzene, alcohol or gasoline) as they may cause irreversible damage. Make sure no water enters the control panel or gaps in the casing. • Do not run the unit until completely dry. • Place the heater in its original box or cover to protect it from dust when not in use.
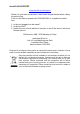
electriQ UK SUPPORT www.electriQ.co.uk/support Please, for your own convenience, make these simple checks before calling the service line. If the unit still fails to operate call: 0330 390 3061 or complete the online form 1. Is the unit plugged into the mains? 2. Is the fuse OK? 3. Switch the unit off and wait three minutes to see if the issue is resolved. Restart the unit. Office hours: 9AM - 5PM Monday to Friday www.electriQ.co.
Model Identifier: EPMH1000LED Item Symbol Value Unit Heat Output Item Unit Type of heat input, for electric storage local space heaters only (select one) Nominal heat output Pnom 1.0 kW manual heat charge control, with integrated thermostat No Minimal heat output Pmin 0 kW manual heat charge control with room and/or outdoor temperature feedback No Maximum continuous heat output Pmax 1.