USER MANUAL Robot Vacuum Cleaner with Camera, VSLAM and SLAM Navigation iQLEAN-CR01 Thank you for choosing your electriQ robot vacuum cleaner. This instruction manual is designed to provide you with all required instructions related to the installation, use and maintenance of the appliance. In order to operate the unit correctly and safely, please read this instruction manual carefully before installation and usage.
CONTENTS SAFETY 3 PARTS LIST 5 PRODUCT OVERVIEW 6 INITIAL SETUP 8 OPERATION 10 APP CONTROL 12 CLEANING AND MAINTENANCE 17 TROUBLESHOOTING 20 TECHNICAL SPECIFICATIONS 21 SUPPORT 21 2
SAFETY PRECAUTIONS IMPORTANT • • • • • • • • • • • • • • • • • • • • • Carefully read the instructions before operating the unit. Please retain the manual for future reference. This appliance is for indoor use only. Rating: This unit must be only connected to a 220-230 V earthed outlet. Always check the rating label against your electrical supply. If you are in any doubt about the suitability of your electrical supply have it checked and, if necessary, retested by a qualified electrician.
• • • • • • Do not use in an environment where there is a risk of fire or explosion. Do not use to clean printer toner spilled on the floor as this could cause fire. Before using the robot cleaner, remove any fragile objects from the floor e.g. glasses, bottles, candles, lamps. Also removes any sharp metals, needles, nails, sharp glass pieces or any other objects that could block or damage the robot. Do not place any object on the top of the robotic cleaner.
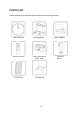
PARTS LIST Please familiarise yourself with this list before commencing operation.
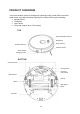
PRODUCT OVERVIEW Your robot vacuum cleaner is designed for cleaning homes, small offices and other small rooms. It provides excellent cleaning for a variety of floor types including: • Wooden floors • Tiled floors • Stone floors • Short-pile carpets (up to 1.
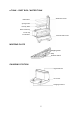
e-TANK – DUST BOX / WATER TANK HEPA Filter Cover HEPA Filter Sponge Filter Primary Filter Water Tank Cap e-Tank Top e-Tank Base Dust Box Side Cover MOPPING PLATE Mopping Plate Mop Release Catch CHARGING STATION Signal Indicator DC socket Charging Contacts 7
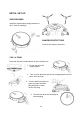
INITIAL SET UP SIDE BRUSHES Install the side brushes paying attention to the ‘L’ and ‘R’ markings BUMPER PROTECTORS Remove the bumper protectors 2 IN 1 e-TANK Press the dust box release button to eject the dust box. 1. Fit the mop onto the mopping plate 2. Turn over the dust box and clip the mopping plate onto the base of the dust box 3. Turn the dust box back over, open the water tank filler plug and pour in water. Secure the plug. 4. Re-insert the dust box assembly to start mopping.
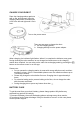
CHARGE YOUR ROBOT Place the charging station against a wall on flat, level ground. Keep the charging station free of obstructions 0.5m to the left and right and 1.5m in front. Turn on the power switch There are two ways to charge the robot: a. On the charging station b. Charging directly from the power adapter When charging, the indicator light flashes. When it is complete the indicator turns green. During cleaning the robot monitors its own charge level and returns to the charging station when required.
OPERATION The product has different cleaning modes to cater for different cleaning needs. The cleaning mode can be chosen on the robot, on the remote control or on the app. AUTOMATIC CLEANING SPOT CLEANING The robot will scan the immediate environment and generate a map in its internal memory. It will then clean the room in S-shape cleaning patterns and finally clean around the perimeter of the room. To activate: with the robot in standby mode, switch on the power.
REMOTE CONTROL On/Off Home Forward Start/Pause Turn Left Turn Right Back Decrease Suction Increase Suction Spot Cleaning Border Cleaning Please insert 2 x AAA batteries, not included Before using your robot vacuum cleaner: o Arrange your furniture so that your robot move around freely. o Block off hazards such as stairways and bannisters to prevent your robot from danger.
APP CONTROL Before you start: • Ensure your router provides a standard 2.4GHZ connection. • If your router is dual band ensure that both networks have different network names (SSID). The provider of your router / Internet service provider will be able to provide advice specific to your router. • Place the cleaning robot as close as possible to the router during setup. • Once the app has been installed on your phone, turn off the data connection, and ensure your phone is connected to your router via Wi-Fi.
ADD DEVICE 1. At the Device screen select the + symbol to add a device. 4. Reset the device by pressing the power switch. After restarting, press and hold the device button3-5 seconds. The device will make a confirmation tone. Click next on your phone. Note: do not attempt to connect from the charging base.Make sure that after the long press a network prompt tone is received. 2. You will now be prompted to scan the QR code which is located on the underside of your robot. 3.
7. Confirm WeBack’s connection of the robot to the Wi-Fi network. 8. Success – all devices connected. 14 9. The WeBack home screen now lists your robot.
CONTROLLING YOUR DEVICE THROUGH THE APP THE DEVICE SCREEN The device screen is the main control screen for the cleaning robot, providing access to the controls to amend the functions and settings. Status: the robot’s current activity. Back: Returns to the WeBack home screen. Virtual Line: create a boundary that the robot should not cross. Direction: control the robot manually with the arrow keys. Instruction: choose one spot and the robot will focus cleaning on that spot.
THE SETTINGS SCREEN This screen gives you the option to turn off the robot’s voice and update some of the device’s basic settings. Voice switch – switch voice on and off Crossing Obstacles – whether to allow robot to cross 1cm doorways and other obstacles. Breakpoint Cleaning – permit robot to break off from a cleaning job to recharge then continue the remaining clean.
CLEANING AND MAINTENANCE DUST BOX AND FILTER CLEANING 1. Press the dust box release button to remove the dust box. 2. Open the dust box side cover. 3. Empty the contents into your waste bin. 4. Open the HEPA filter cover 5. Remove the HEPA filter, sponge filter and primary filter. Clean with a cloth or brush. Don’t wash the HEPA filter or sponge filter with water. 6. Remove the dust from the primary filter. Wash and dry it before next use. 7. Clean the dust box with a soft cloth or cleaning brush. 8.
WATER TANK MAINTENANCE 1. Release the e-Tank. 2. Turn over and detach the mopping plate. 3. Remove the mop. 4. Empty out any remaining water. 5. Clean the mopping plate under the tap. 6. Leave the mopping plate to air dry for 24 hours. 7. Rinse the mop under the tap. 8. Leave the mop to air dry for 24 hours.
CLEANING THE BRUSHES 1. Open the roller brush cover assembly. 2. Take out the roller brush 3. Use the cleaning brush provided to cut off any hair tangled on the roller brush. 4. Take off the side brush. Clean with a soft cloth. MAINTENANCE OF CHARGE TERMINALS AND WHEELS Note: the charging terminals on the charging station and the underside of the robot contain sensitive electronic components. Do not use water to clean them, use only a dry cloth.
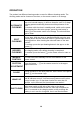
TROUBLESHOOTING FAULT POSSIBLE CAUSE SOLUTION Robot does not charge. Poor connection between the electrodes on the base of the robot and the charging base. The charging base is switched off. Ensure contacts are clean and free from obstruction. Robot gets stuck. Robot returns to charging station without completing the cleaning. Robot does not perform cleaning work automatically as scheduled. The robot may get entangled by wires and cables on the floor, by hanging curtains and by rugs and carpets.
TECHNICAL SPECIFICATIONS Model name: iQlean-CR01 CHARGING STATION Description Parameter Size Input Output Rated Power Rated Frequency 155 x 150 x 80 mm 19V 19V 0.6A 11.4W 50/60Hz ROBOT Description Parameter Size Battery Running Time Weight Rated Voltage Rated Power Suction 320 x 76mm Lithium Ion, 3200mAh 130 mins max. 2.3kg 14.8V 24W 3500Pa max. electriQ UK SUPPORT www.electriQ.co.uk/support www.electriQ.co.