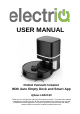
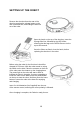
USER MANUAL Robot Vacuum Cleaner With Auto Empty Dock and Smart App iQlean-LR02C30 Thank you for choosing this electriQ robot vacuum cleaner. The instruction manual is designed to provide you with all the required instructions related to the use and maintenance of this appliance. In order to operate the unit correctly and safely, please read this instruction manual carefully before use.
CONTENTS SAFETY PRECAUTIONS 4 PRODUCT OVERVIEW 6 PARTS LIST 6 PRODUCT DIAGRAMS 7 SETTING UP THE CHARGING BASE 9 SETTING UP THE ROBOT 10 BEFORE OPERATION 11 QUICK START GUIDE 12 REMOTE CONTROL 13 USING THE WATER TANK AND MOP 15 CLEANING AND MAINTENANCE 16 SIDE BRUSH CLEANING AND REPLACEMENT 16 CLEANING OF SENSORS AND CHARGING CONTACTS 16 DUST BOX AND FILTER CLEANING 17 CLEANING THE WATER TANK 19 REPLACING THE DUST BAG 19 CLEANING THE MAIN BRUSH 20 BATTERY REPLACEMENT / REMOV
SAFETY PRECAUTIONS Important • Carefully read the instructions before operating the unit. Please retain the manual for future reference. • This appliance is for indoor use only. • Rating: This unit must be only connected to a 220-240 V, 50/60 Hz outlet. Always check the rating label against your electrical supply. • If you are in any doubt about the suitability of your electrical supply have it checked and, if necessary, tested by a qualified electrician.
• Before using the robot cleaner, remove any fragile objects from the floor e.g. glasses, bottles, candles, lamps. Also remove any sharp metals, nails, sharp glass pieces or any other objects that could block or damage the robot. • Do not place any object on the top of the robotic cleaner. • Do not leave any fragile objects on the side of the tables, cabinets etc where the robot could bump into and cause them to fall.
PRODUCT OVERVIEW Your robot vacuum cleaner is designed for cleaning homes, hotel rooms and small offices. It provides excellent cleaning for a variety of floor types including: • • • • Wooden floors Tiled floors Stone floors Short-pile carpets (less than 2cm deep) FEATURES OF YOUR ROBOT VACUUM CLEANER • • • • • Smart cleaning modes designed to suit your different cleaning needs. Great cleaning efficiency and power saving.
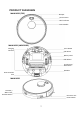
PRODUCT DIAGRAMS MAIN BODY (TOP) Bumper Control Panel Wi-Fi Indicator Laser Module MAIN BODY (UNDERSIDE) Charging Contacts Front Wheel Side Brush Battery Cover Side Wheel Suction Port / Main Brush Dust Box Dust Collection Port MAIN BODY Dust Box / Water Tank Release Button DC Power Jack Power Switch 7
DUST BOX Pre-Filter Cleaning Tool Dust Box Contacts HEPA Filter Sponge Filter Note: HEPA and Sponge filters are inserted using the flap on the top of the Dust Box.
SETTING UP THE CHARGING BASE / DUST BOX Place the charging base within 5 cm of the back wall with no objects 1 m to either side and 2 m in front. Keep away from strongly reflective surfaces such as mirrors. Once the base is positioned, it can be plugged in to a suitable socket. Fit the dust bag into the charging base, by opening the lid, and slide the cardboard handle on the bag into the slot on the left-hand side within the dust box.
SETTING UP THE ROBOT Remove the dust box from the rear of the robot by pressing the release button on the rear of the dust box, and sliding the dust box out of the robot. Open the hatch on the top of the dust box. Insert the Sponge filter first, followed by the HEPA filter, ensuring that the tags on the HEPA filter are on the top to aid removal. Once the filters are fitted, close the hatch, before replacing the dust box in the robot.
BEFORE OPERATION Before using your robot vacuum cleaner: o Arrange your furniture so that your robot can move around freely. o Block off hazards such as stairways and bannisters to prevent the risk of falling. o Avoid blocking corridors and narrow walkways, the robot will avoid those areas. Also ensure any objects that are under 2cm tall are removed to prevent the risk of the robot climbing and jamming.
QUICK START GUIDE • Ensure the charging base and robot have been set up following the instructions on the previous page. POWER BUTTON HOME BUTTON WI-FI INDICATOR Press the POWER button to start cleaning. The robot will map out the room and start off at the edges of the room. Press the HOME button to return the robot to the charging base to empty and charge. The robot will also return to the base when it has finished cleaning or when the battery is low.
REMOTE CONTROL Power On/Off Display Plan Cleaning (Smart Cleaning) Return for Auto Charging Direction Confirm Suction Cleaning Clock Setting Spot Cleaning POWER PLAN CLEANING SPOT CLEANING Schedule Setting Press the power button to change the unit between Sleep mode (Ready to work) and Standby (Power saving). The robot will also automatically enter standby if left inactive for 10 minutes. With the unit in Sleep mode, press the PLAN CLEANING button to enter plan cleaning mode.
MANUAL CLEANING The arrow buttons can be used to take control of the robot vacuum, Press the UP and DOWN buttons to move forwards and backwards, and the LEFT and RIGHT buttons to rotate. Press the PLAY/PAUSE button on the centre to turn the suction on and off. If no input is received for 10 seconds the robot will enter standby. Press the RETURN TO HOME button to stop the current operation and the robot cleaner will return to the base unit.
USING THE WATER TANK AND MOP Instead of using the dust box, the robot can also be set up to mop hard surfaces using the supplied water tank. WARNING: Remove the water tank when charging to remove risk of electric shock. To fill tank, open tank sealing cap and slowly pour in water. After replacing the tank sealing cap, fix the microfibre mop to the Velcro on the base of the water tank.
CLEANING AND MAINTENANCE SIDE BRUSH CLEANING AND REPLACEMENT Regularly check the condition of the side brushes for damage or entanglement with foreign objects. Clean the brushes with a cloth. If the brushes become damaged over time, please replace them. Note that the left and right brushes are different, and should be changed accordingly.
DUST BOX AND FILTER CLEANING Press the dust box release button to remove the dust box. Open the dust box cover and empty any contents into a bin. Remove the primary filter. Open the top filter cover and remove the HEPA filter and sponge filter. Remove any debris from the HEPA filter, and clean with a vacuum.
Rinse the dust box, pre-filter and sponge filter with water. Dry the dust box and filter components. The pre-filter should be washed after the first 15-30 days. The maximum service life of the high efficiency filter is three months. Do not expose the filters to direct sunlight. Ensure that the pre-filter and sponge filter are completely dry. Reinstall the filters in the dust box following the reverse of removal. Replace the cover on the dust box and fit it back into the main body.
CLEANING THE WATER TANK Press the release button to remove the water tank. Remove the mop. Wash and dry the mop. Pour out any remaining water from the tank. Clean and dry the tank. REPLACING THE DUST BAG IN THE BASE Open the lid. While gripping the cardboard handle, slide the full dust bag up and out of the charging base, before placing in a bin. Guide plate Handle Insert a new bag by sliding the cardboard handle down the guide plate until it is in position.
CLEANING THE MAIN BRUSH 1. Open the roller brush cover assembly. 2. Take out the roller brush 3. Use the cleaning tool provided to cut off any hair tangled on the roller brush. BATTERY REPLACEMENT / REMOVAL Using a small screwdriver, Remove the two screws from the battery cover on the underside of the robot. Remove the battery cover. Take out the battery and disconnect the connector.
APP CONTROL As well as being operated by the remote control, the iQlean-LR02C30 can be operated by the Tuya Smart home automation app which allows control from your phone by Wi-Fi. DOWNLOAD THE APP TO YOUR PHONE Download the TUYA SMART app, from your chosen app store, using the QR codes below, or by searching for the app in your chosen store. Android IOS CONNECTION METHODS AVAILABLE FOR SETUP The robot has AP (Access Point) to connect to Wi-Fi.
REGISTER AND LOG IN Press on the ‘register’ button at the bottom of the screen. A verification code will be sent by the method selected in step 3. Enter the code into the app. Read the Privacy policy and press the Agree Button. Enter your email address or phone number and press continue to register. Type in the password you would like to create. This needs to be 620 characters, with letters and numbers. The app is now registered. It will automatically log you in following registration.
PERSONALISE THE APP WITH YOUR HOME DETAILS TUYA can control a large number of devices within your home or across multiple homes. In this stage we define those houses, rooms and devices so that Tuya can control them. CREATING ROOMS Select ADD HOME. • Type in a name for your home, • Press on the location button to select the location of your home. (See SETTING YOUR LOCATION below.) • New rooms can be added by pressing the ADD ANOTHER ROOM option at the bottom. (See ADD ANOTHER ROOM below.
CONNECTING USING AP MODE Before initiating the connection make sure that the WI-FI light on the robot is flashing slowly. If not follow the instructions for changing the connection mode. Also ensure your phone is connected to the WI-FI network. (We advise turning mobile data off during setup) 1. Open app and press “+” to add 2. device, or use the add device button. 4. From the menu at the top right choose ‘AP Mode’. 5. Select the category “Small 3.
7. The Tuya app is now connected to your Wi-Fi. 8. This screen confirms your connection to the hot spot. Select ‘Confirm hot spot connection, next’. 9. Now the robot is being added to the Wi-Fi. 10. The device is now added. You will now be taken to the device control screen.
CONTROLLING YOUR ROBOT THROUGH THE APP THE HOME SCREEN Add Device: Add a device to the app, and go through the setup process. Change Home: If you have a number of units at different houses, you can change between them Room Management: Allows rooms to be added, removed or renamed.
DEVICE SCREEN The device screen is the main control screen for the vacuum cleaner robot, providing access to the controls to amend the functions and settings. NOTE: Due to continuous development of the app, the layout and availability of features are subject to change.
SMART SCENES AND AUTOMATION Smart Scenes is a powerful tool providing the option to customise the operation of the robot based both on conditions within the room and outside influences. This gives the user the option of specifying much more intelligent actions. These are split into two categories Scene and Automation. SCENE Scene allows for a one touch button to be added to the Home screen. The button can be used to change a number of settings in one go, and can change all the settings within the unit.
AUTOMATION Automation allows an automatic action to be set up for the device. This can be triggered by the Time, temperature of the room, weather conditions, and a range of other influences. 1. Press on the Smart Scene 3. Select Automation to 2. Press on the ‘Plus’ in the tab at the bottom of the create a new Automation top right corner to add a Home screen. Scene. smart scene. 4.
PROFILE TAB The profile tab gives you the option to edit both your detail, and use the added features of the unit. CHANGING THE NAME OF YOUR DEVICE When in any of the device screens further settings for the device can be accessed, by pressing on the three dots in the top right-hand corner. The top option within this allows you to change the name of the device to something relevant to the use of the product, such as “Robot Vacuum”.
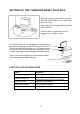
TROUBLESHOOTING FAULT POSSIBLE CAUSE SOLUTION Robot does not charge. Poor connection between the electrodes on the base of the robot and the charging base. The charging base is switched off. Ensure contacts are clean and free from obstruction. Robot gets stuck. Robot returns to charging base without completing the cleaning. Robot does not perform cleaning work automatically as scheduled. The robot may get entangled by wires and cables on the floor, by hanging curtains and by rugs and carpets.
EXPLODED VIEW SPARE PARTS A number of spare parts are available for the robot vacuum, which are available from the retailer: CODE iQlean-LR02C30-MC iQlean-LR02C30-HPFLT iQlean-LR02C30-HPSPG iQlean-LR02C30-LSB iQlean-LR02C30-RSB iQlean-LR02C30-MB iQlean-LR02C30-BAT iQlean-LR02C30-DBIN iQlean-LR02C30-EWT iQlean-LR02C30-DBAG REPLACEMENT PART Mop Cloth HEPA Filter Sponge Filter Left Side Brush Right Side Brush Main Brush Battery Dust Box Water Tank Dust Bag for Base 32
TECHNICAL SPECIFICATION Dimensions Diameter of main body Thickness of main body Net weight of main body 330mm 101mm 3.1kg Electrical Operating voltage (Charging Base) Battery capacity Battery charge duration Charge time 220-240V AC 5200mAh 200 minutes approximately 300-360 minutes Accessories Water tank capacity Dust box capacity 350ml 600ml DECLARATION OF CONFORMITY Hereby, electriQ declares that this Robot Vacuum Cleaner is in compliance with Directive 2014/53/EU.