
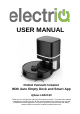
User Manual


10
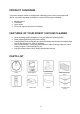
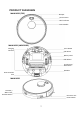
SETTING UP THE ROBOT
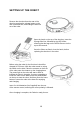
Remove the dust box from the rear of the
robot by pressing the release button on the
rear of the dust box, and sliding the dust box
out of the robot.
Open the hatch on the top of the dust box. Insert the
Sponge filter first, followed by the HEPA filter,
ensuring that the tags on the HEPA filter are on the
top to aid removal.
Once the filters are fitted, close the hatch, before
replacing the dust box in the robot.
Before using the robot for the first time it should be
charged for 12 hours. With the robot turned on using
the switch on the side, Place the contacts on the front
of the robot onto the contacts on the charging base.
The power light on the robot will start to flash to
indicate the robot is charging. If you are struggling to
locate the robot on the base, press the power button
on the top to start the robot, and then press the home
button to return the robot to the base for emptying
and charging.
Insert 2 x AAA batteries (Not Supplied) into the rear
of the remote control, ensuring the correct polarity is followed.
Once charging is complete, the Robot is ready for use.