USER MANUAL COMMERCIAL LARGE HOME OFFICE DEHUMIDIFIER WITH DIGITAL HUMIDISTAT PD45E – 40 litres per day Thank you for choosing electriQ. Please read this user manual before using this innovative Dehumidifier and keep it safe for future reference Visit our page www.electriQ.co.
CONTENTS SAFETY INSTRUCTIONS 2 INSTALLATION 5 PARTS 5 CONTROL PANEL 6 QUICK REFERENCE GUIDE 8 POSITIONING 10 WATER DRAINAGE 11 SETTING UP THE WIFI FUNCTION 12 CONTROLLING YOUR DEVICE FROM THE APP 17 CARE AND MAINTENANCE 22 TROUBLESHOOTING 23 TECHNICAL DATA 24 1
SAFETY INSTRUCTIONS IMPORTANT • • • • • • • • • • • • • • • • • • • • • • • • Carefully read the instructions before operating the unit This appliance is for indoor use only and intended for use in a domestic environment only. Any other use is not recommended by the manufacturer and may cause fire, electrical shocks or other injury to user or property. Rating: This unit must be only connected to a 220-240 V / 50 Hz earthed outlet.
• • • • • • • • • • • • • • The appliance must be placed in a room without sources of ignition (for example: open flames, an operating gas appliance or an operating electric heater). R290 refrigerant gas complies with European environmental directives. R290 has a low GWP (Global Warming Potential) of 3. The unit contains about 145g of R290 refrigerant gas. Do not use or store the dehumidifier in an unventilated space with an area smaller than 7.0m2 per unit.
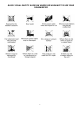
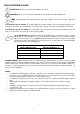
QUICK VISUAL SAFETY GUIDE ON WHERE OR WHEN NOT TO USE YOUR DEHUMIDIFIER 4
INSTALLATION Remove any water from within the water tank before starting the unit. In order to save energy do not open windows or doors while the unit is running. Place the unit on a hard / flat surface. On first use run the unit continuously for 24 hrs. TO REDUCE NOISE LEVELS: Place a piece of carpet or a rubber mat under the unit to reduce any vibrations while the unit is running. The PD45E dehumidifier uses compressor technology to extract water from the environment.
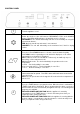
CONTROL PANEL POWER Turn the appliance on/off MODE Button Select the function of the unit between: DEHUMIDIFY, FAN and LAUNDRY modes. The LED’s will illuminate to show which mode is selected. DEHUMIDIFY: The unit will dehumidify and aim for the humidity set using the up and down buttons. FAN: Only the fan will run and water is not extracted. LAUNDRY: The unit will dehumidify at the maximum level, ideal for drying clothes.
CHILD LOCK Hold the LOCK button for 5 seconds to activate the child lock. The LED indicator will illuminate to show the child lock is activated. To turn it off hold the LOCK button again for 5 seconds. ` WIFI Hold the WIFI button for 6 seconds to reset the WIFI module ready for connection, or to change the connection method between AP (Access point) and CF (Quick Connection) modes. This also resets the WIFI module.
QUICK REFERENCE GUIDE POWER Button: Press to turn the dehumidifier on and off. MODE Button: Press to change the unit between dehumidify, fan and laundry mode. TIMER: Repeatedly press the timer button to adjust the duration of the timer (1-24 hrs, start/ stop timer). If set while the unit is running: The number will represent the number of hours the unit will operate before turning off. This will not be affected if the unit enters defrost mode or the tank is emptied and reinserted.
OTHER FEATURES AND INDICATORS TANK FULL LIGHT When the water tank is full, removed or incorrectly inserted the unit will stop dehumidifying, the tank full light will illuminate. Empty the tank and reinsert it correctly to resume operation. AUTO DEFROST When frost builds up on the evaporator coils, the compressor will cycle off and the unit will go in to defrost mode. Following completion of the defrost mode, the unit will return to the previously operating settings.
POSITIONING THE DEHUMIDIFIER A badly positioned dehumidifier will have little effect. In positioning the dehumidifier please ensure circulation of air in not restricted around the unit. Allow at least 20 cm space around the unit. This dehumidifier is designed only for indoor residential or office applications and any industrial use will invalidate the warranty. Use in an enclosed area for maximum efficiency. Close all doors, windows to create an effective operating environment. Do not use outdoors.
WATER DRAINAGE When the water tank is full, the unit will stop automatically. When this happens the TANK FULL light will show on the control panel. NOTE: Only empty the water tank when it is full or before moving or storing the unit. There are two ways to dispense collected water. 1. USE THE TANK When the tank is full, the unit will automatically stop running, and the Tank Full indicator will flash. Slowly pull out the tank. Grip the tank by its handle securely, and carefully pull it out.
SETTING UP THE WIFI FUNCTION BEFORE YOU START Ensure your router provides a standard 2.4ghz connection. If your router is dual band ensure that both networks have different network names (SSID). The provider of your router / Internet service provider will be able to provide advice specific to your router. Place the dehumidifier as close as possible to the router during setup.
REGISTER THE APP 1. Press on the register button at the bottom of the screen. 4. A verification code will be sent by the method selected in step 3. Enter the code into the app. 2. Read the Privacy policy and press the Agree Button. 5. Type in the password you would like to create. This needs to be 6-20 characters, with letters and numbers. 13 3. Enter your email address or phone number and press continue to register. 2. The app is now registered.
SETTING UP YOUR HOME WITHIN THE APP TUYA is designed so it can work with a large number of compatible smart devices within your home. It can also be set up to work with multiple devices within different houses As such during the setup process, the app requires that different areas are created and named to allow easy management of all your devices. When devices are then added, they are assigned to one of the rooms you have created. CREATING ROOMS 1. Press on the ADD HOME button. 3.
CONNECTING USING QUICK CONNECTION Before initiating the connection, make sure the unit is in standby mode, with the WIFI light flashing twice per second. If not follow the instructions for changing the connection mode. Also ensure your phone is connected to the wifi network. (We advise turning mobile data off during setup) 1. Open app and press “+” to add device, or use the add device button 4. Enter your wifi password and press confirm. 2. Select the type of device as “Dehumidifier” 5.
CONNECTING USING AP MODE (ALTERNATIVE METHOD) Before initiating the connection, make sure the unit is in standby mode, with the wifi light flashing once per second. If not follow the instructions for changing the connection type. Also ensure your phone is connected to the wifi network. (We advise turning mobile data off during setup) 1. Open app and press “+” to add device, or use the add device button 4.
CONTROLLING YOUR DEVICE THROUGH THE APP THE HOME SCREEN Add Device: Add a device to the app, and go through the setup process. Change Home: If you have a number of units at different houses, you can change between them Room Management: Allows rooms to be added, removed or renamed. Environmental information: Provides outdoor temperature and humidity based on the location details entered Add Device: Add a device to the app, and go through the setup process.
DEVICE SCREEN The device screen is the main control screen for the dehumidifier, providing access to the controls to amend the functions of the dehumidifier Edit Name: Use to change the name of the dehumidifier Back: Returns to the Home Screen ON / OFF Button: Use to turn the unit on or off. Desired Humidity UP Button: Use to increase the desired humidity. Going above 90% will put the unit into Auto Mode (AU) Desired Humidity Down Button: Use to decrease the desired humidity.
SMART SCENES Smart Scenes is a powerful tool providing the option to customise the operation of the dehumidifier based both on conditions within the room and outside influences. This gives the user the option of specifying much more intelligent actions. These are split into two catagories Scene and Automation. SCENE Scene allows for a one touch button to be added to the Home screen. The button can be used to change a number of settings in one go, and can change all the settings within the unit.
AUTOMATION Automation allows an automatic action to be set up for the device. This can be triggered by the Time, indoor temperature, humidity of the room, weather conditions, and a range of other influences. 1. Press on the Smart Scene tab at the bottom of the Home screen 2. Press on the Plus in the top right corner to add a smart scene. 4. Setup is very similar to the scene setup on the previous page, and includes an extra section for specifying a trigger for the scene to start. 3.
PROFILE TAB The profile tab gives you the option to edit both your detail, and use the added features of the unit. CHANGING THE NAME OF YOUR DEVICE When in any of the device screens further settings for the device can be accessed, by pressing on the three dots in the top right hand corner. The top option within this allows you to change the name of the device to something relevant to the use of the product, such as “Living Room Dehumidifier”.
CARE AND MAINTENANCE Always shut off the unit and unplug from the mains before cleaning or performing any maintenance. When it is not in use for long periods it is advisable to remove the plug from the power socket. Do not use chemical solvents (such as benzene, alcohol or gasoline) as they may cause irreversible damage to the unit. 1. CLEAN THE GRILLE AND CASE Use water and a mild detergent to clean the washable mesh filters. Do not use bleach or abrasives. Do not splash water directly onto the main unit.
FREQUENTLY ASKED QUESTIONS Why doesn’t the dehumidifier seem to extract much water if the temperature is low? This is a compressor dehumidifier which works best in temperatures above 15⁰C. If the temperature is low and the air is dryer than the setting on the humidistat the unit will not extract water. If you want to use a dehumidifier for outside buildings, unheated properties, boats or garages please check our desiccant range.
TECHNICAL DATA PD45E-V2 Model Voltage 1Ph, 220-240V~50Hz Dehumidifying capacity 40 L / day (at 30⁰ C / 80%RH) Fan Speeds 2 Power Consumption 600W Running Amps 2.8 Amps Tank Capacity 6 litres Humidity settings range 30%~90% Refrigerant R290, 145 grams Airflow m3/h 450 High / Low Pressure 2.6/1.0MPa Max noise level dB(A) 56dB Dimensions mm (WxDxH) 371x595x251 Weight kgs 17.5 GWP 3 Disposal: Do not dispose this product as unsorted waste.
electriQ UK SUPPORT www.electriQ.co.uk/support Please, for your own convenience, make these simple checks before calling the service line. 1. Has the unit been standing upright for at least 2 hours? 2. Is the unit plugged into the mains? 3. Is the fuse OK? 4. Switch the unit off and wait three minutes to see if the issue is resolved. Restart the unit. 5. Check if the water tank is full. 6.