EMC 1UP Ref er enceCD Pl ayer Owner ’ sManual ENG
Unpacking the EMC 1UP Immediately upon receipt of the EMC 1UP CD player, inspect the carton for possible damage during shipment. The carton and packaging have been designed to provide the safest possible protection for transport of your EMC 1UP. Unpack the unit carefully. Save all packaging materials for future shipment. The contents of the carton 1 pcs Electrocompaniet: EMC 1UP CD player. 1 pcs AC main cord. 1 pcs inspection card. 1 pcs CD clamp.
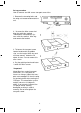
Set up procedure How to remove and UN secure transport necessities. 1. Remove the two wing bolts and the wing nut located underneath the unit. 2. Unscrew the Allen screws holding the gold sign marked «Mechanical Cancellation System» with the smallest Allen key and remove the bracket. 3. To loosen the transport screw located underneath the golden sign, use the largest Allen key and unscrew counter clockwise for about 10 turns. Do not remove this allen screw. 4.
Mains Before connecting to Mains check that the mains voltage printed on the rear panel of the CD Player corresponds to the line voltage in the territory were you intend to use the unit. How to avoid damages A good operating practice is to turn off all equipment before any connections or disconnections are made. Do not under any circumstances connect or disconnect equipment when power is turned on. The design of the RCA plug generates a huge transient when inserted.
Connecting the audio components 6 Balanced
Single ended 7
8
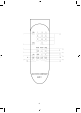
Remote control 1. 2. 3. 4. 5. 6. 7. 8. 9. 10. 11. 12. 13. 14. 15. 16. 17. Single ended STANDBY DISC – No function. SCAN – Play 10 seconds of each track. PROG a. Set the CD player in STOP MODE. b. Select tracks with the numeric buttons (9), or step to the number using buttons no. 14 or 15. c. Press the PROG (4) button – the track is programmed. Repeat b and c until all the tracks you wish to program is done. After each track is programmed, the total playtime will be shown in the display.
Front Panel Controls The power on/off button is localised in the center of the front panel. Generally, we recommend that you use the Standby button located on the Multi Connecting the audio components remote control. The display will go dark. The e- sign on top of the unit will still be lit, indicating Standby mode. When not using the EMC 1UP for a long period, turn the main switch off and disconnect the unit from the mains outlet.
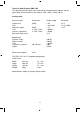
Technical Specifications EMC 1UP The following technical data were measured on randomized test objects and are typical data. All measurements are made at 120V / 240V // 50Hz / 60 Hz. Analog stage Measurements Parameters Single ended Balanced Output level Gain Maximum output THD Channel separation Equivalent input noise (RMS) 1.6 V 1.6 X (4 dB) >7V < 0.002 % > 90 dB 4 uV 3.2 V 3.
If Service is needed Your dealer will have all relevant information regarding the service centre in your area, and will ensure that your unit is serviced with minimum delay. It is our general policy to have your unit returned to you within five working days. This is an average time, and can vary locally, depending on the workload at that particular service station.
Madei nNor way W W W .ELECTRO CO M PANIET.