
Manual


7
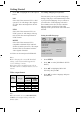
6. Connectors on the rear side
Analog
Connect the left output to the left input on the
preamplier or the integrated amplier. Con-
nect the right output to the right input on the
preamplier or the integrated amplier. Con-
nect the Center, Sub woofer, and Surround
left/right if you want to use the EMP 1 in a
surround setup.
Digital Output
Connect a 75 Ohm unbalanced digital signal
cable from S/P-DIF to the digital input on the
preamplier or the integrated amplier.
HDMI Output
Use a standard High Quality HDMI cable for
connection to your projector or television
Component Output
If you don’t have a HDMI media, use this
output for connection to you projector and
television. Use the switch to select progres-
sive or inter latched signal. After changing of
this switch, the system need to be reset.
Mains
Check that the mains voltage printed on the
rear panel corresponds with the line voltage
in the territory you intend to use the EMP
1. After this is checked out, connect the AC
main cord to the power inlet on the rear side.
Front panel controls
The power on/off button is localized in the
center of the front panel. Generally, we
recommend that you use the Standby button
located on the remote control.
When not using the EMP 1 for a long period,
turn the main switch off and disconnect the
unit from the mains outlet.
The four navigator buttons on the right front
panel have the following functions:
Top button = play/pause
Right button = next
Left button = previous
Lower button = stop / eject – hold the
button pressed to eject the disc.
Connecting the EMP 1