
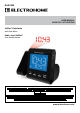
User manual


- 10 -
OPERATING INSTRUCTIONS
SNOOZE FUNCTION
1. When alarm is activated, press the SNOOZE (3) to enable snooze function, Buzzer
alarm or Radio alarm will stop.
2. Snooze interval is 9 minute (not including one second oset).
3. Snooze will continue unless the On/O button (4) is pressed. Buzzer alarm or
Radio alarm will stop automatically after 30 minutes.
4. Select the display AUTO OFF / LOW / HIGH dimmer (20) to the AUTO OFF
mode, when alarm sounds the display will automatically turn on.
CHANGING THE DISPLAY CONTENT
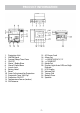
1. Pressing the << / MONTH-DAY / °C/°F (17) can switch the display to show the
month and day, after 5 seconds the display will timeout and return to display
the time.
2. Pressing the >> / YEAR / DST (18) can switch the display to show the year, after 5
seconds display will timeout and return back to display the time.
3. Press and hold the << / MONTH-DAY / °C/°F(17) for 3 seconds to change
temperature unit °C/°F.
SLEEP FUNCTION
1. While radio is on, press Snooze/Sleep button (3) to turn on Sleep mode, the sleep
time will keep ashing for 5 seconds, while ashing press the Sleep button to
change the duration from 90 min – 15 min. Press On/O button (4) to cancel
sleep function.
2. When radio is o, set the display Auto OFF / LOW / HIGH dimmer (20) to the Auto
OFF mode, the LCD display light will automatically turn o in 15 seconds. Press
any key to turn the display light on and projection on.
RADIO OPERATION
1. Press the ON/OFF (4) to turn radio on.
2. Select AM/FM band by pressing the AM/FM band(2).
3. Select the station using the TUNING DIAL (23).
4. Turn the VOLUME DIAL (22) to adjust volume as required.
5. Press the ON/OFF (4) to turn radio o.
Note:
• The AM band uses an internal directional aerial, rotate the radio for
best reception.
• Ensure that the FM ANTENNA (14) is completely unrolled and extended for best
FM reception.
PROJECTION
1. Focus setting: Adjust the projection clock brightness/focus by turning the
BRIGHTNESS/FOCUS ADJUSTMENT WHEEL (10) until the projected time is
clearly shown on the ceiling or wall.
2. To ip projected image by 180°, press 180° FLIP (11).
NOTE: PROJECTS TIME IMAGE ON THE CEILING OR WALL OF A DARKENED ROOM.
MAXIMUN PROJECTION DSTANCE IS 3-9 FEET.